cvi_busy_lib.js
cvi_busy_lib.js 是一個基于ajax的遮罩js,遮罩區域為body區域。使用比較簡單。
效果:
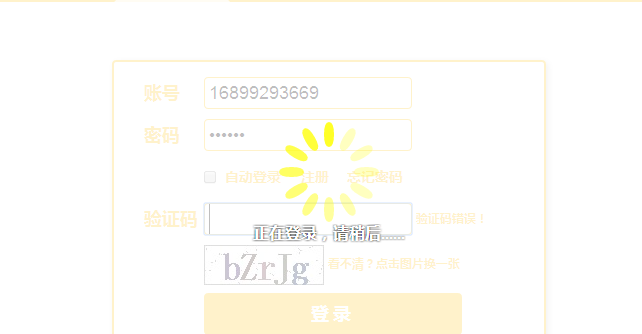
在下面的Js代碼,标注為紅色标記為需要設定的參數。
1、getBusyOverlay(id, overlay, busy) 為遮罩層的方法,
id:需要寫viewport,詳情請看Js内部。
overlay:主要是遮罩層的樣式,遮罩層顯示字型的樣式。
busy:加載進度圈的樣式。
2、xval.settext("正在登入,請稍後......"); 此處需要寫在beforeSend中,在ajax執行前,設定想要顯示的文字。(參數可不寫)
3、xval.remove(); 當ajax得到傳回資料的時候,取消遮罩層,恢複正常頁面模樣。
return {
            remove: function() {
                if (waiting) {
                    waiting = false;
                    ctrl.stop();
                    delete ctrl;
                    parent.removeChild(outer); //去掉遮罩層
                    if (parent.id == 'viewport') {
                        parent.style.display = 'none'; //隐藏div
                    }
                }
            },
            settext: function(v) {
                if (string && typeof (v) == 'string') {
                    string.firstChild.innerHTML = v;//給文字層的div指派
                    return false;
                }
            }
        };
Js代碼
<script src="/static/js/cvi_busy_lib.js"></script>

<script type="text/javascript">

//方法預設是,給body添加一個div,然後整個body都是遮罩層。
//getBusyOverlay需要3個參數
//參數一:viewport為建立遮罩層的div,
//參數二:color:'white',               背景色
//       opacity:0.75,                透明度:從 0.0 (完全透明)到 1.0(完全不透明)
//       text:'viewport: loading...', 預設顯示的提示文字,這裡是viewport: loading...
//       style:'text-shadow: 0 0 3px black;font-weight:bold;font-size:16px;color:white' 字型樣式
//參數三:color:'#ff0',   進度圈顔色
//       size:100,       進度圈大小
//       type:'o'        有5種類型,c,o,p,t,以及預設類型,具體請看js内部方法getBusyVL。
var xval = getBusyOverlay('viewport', { color: 'white', opacity: 0.75, text: 'viewport: loading...', style: 'text-shadow: 0 0 3px black;font-weight:bold;font-size:16px;color:white' }, { color: '#ff0', size: 100, type: 'o' });
$.ajax({
    url: "/Home/Index",
    type: "POST",
    dataType: "json",
    beforeSend: function() {
        if (xval) {
            xval.settext("正在登入,請稍後......");//此處可以修改預設文字,此處不寫的話,就按照預設文字來。
        }
    },
    data: { id: id },
    success: function(data) {
        xval.remove(); //此處是移除遮罩層
    }, error: function() {
        xval.remove(); //此處是移除遮罩層
    }
});
局部遮罩Js改進
cvi_busy_lib.js隻能給body加遮罩層為全頁面遮罩,如果需要給某個區域增加遮罩層,需更改getBusyOverlay方法。
以下為局部代碼,詳細代碼請在文章末尾下載下傳:
//建立id為viewport的DIV,并為其賦樣式
if (divId != "") {
    //新寫的
    viewport = document.createElement('div'); //不存在則建立
    viewport.id = 'viewport';
    cz = viewport.style; //開始設定div樣式
    cz.backgroundColor = 'transparent'; //屬性設定元素的背景顔色,transparent預設。背景顔色為透明
    cz.position = 'relative'; //一個固定定位(position屬性的值為fixed)元素會相對于視窗來定位,這意味着即便頁面滾動,它還是會停留在相同的位置。
    cz.overflow = 'hidden'; //内容會被修剪,并且其餘内容是不可見的。
    cz.display = 'block'; //此元素将顯示為塊級元素,此元素前後會帶有換行符。
    cz.zIndex = 999999;
    cz.left = '0px';
    cz.top = '0px';
    cz.zoom = 1;
    cz.width = '100%';
    cz.height = document.getElementById(divId).offsetHeight == 0 ? '150px' : document.getElementById(divId).offsetHeight - 10 + 'px';
    cz.margin = '0px'; //外邊距
    cz.padding = '0px'; //内邊距
    document.getElementById(divId).appendChild(viewport);
    parent = viewport; //給parent賦予div的意義
} else {
    //原邏輯
    if (id == 'viewport') {
        viewport = document.getElementById('viewport'); //擷取DOM對象
        if (!viewport) {
            viewport = document.createElement('div'); //不存在則建立
            viewport.id = 'viewport';
            cz = viewport.style; //開始設定div樣式
            cz.backgroundColor = 'transparent'; //屬性設定元素的背景顔色,transparent預設。背景顔色為透明
            cz.position = 'fixed'; //一個固定定位(position屬性的值為fixed)元素會相對于視窗來定位,這意味着即便頁面滾動,它還是會停留在相同的位置。
            cz.overflow = 'hidden'; //内容會被修剪,并且其餘内容是不可見的。
            cz.display = 'block'; //此元素将顯示為塊級元素,此元素前後會帶有換行符。
            cz.zIndex = 999999;
            cz.left = '0px';
            cz.top = '0px';
            cz.zoom = 1;
            cz.width = '100%';
            cz.height = '100%';
            cz.margin = '0px'; //外邊距
            cz.padding = '0px'; //内邊距
            if (document.all && !window.opera && !window.XMLHttpRequest) {//此處走不通,!window.XMLHttpRequest=false
                cz.position = 'absolute';
                if (typeof document.documentElement != 'undefined') {
                    cz.width = document.documentElement.clientWidth + 'px';
                    cz.height = document.documentElement.clientHeight + 'px';
                }
                else {
                    cz.width = document.getElementsByTagName('body')[0].clientWidth + 'px';
                    cz.height = document.getElementsByTagName('body')[0].clientHeight + 'px';
                }
            }
            document.getElementsByTagName("body")[0].appendChild(viewport); //建立的viewportDIV添加到body中
        } else {
            viewport.style.display = 'block';
            if (document.all && !window.opera && !window.XMLHttpRequest) {
                if (typeof document.documentElement != 'undefined') {
                    viewport.style.width = document.documentElement.clientWidth + 'px';
                    viewport.style.height = document.documentElement.clientHeight + 'px';
                }
                else {
                    viewport.style.width = document.getElementsByTagName('body')[0].clientWidth + 'px';
                    viewport.style.height = document.getElementsByTagName('body')[0].clientHeight + 'px';
                }
            }
        }
        parent = viewport; //給parent賦予div的意義
    }
}
在getBusyOverlay方法中,我添加了一個div的id參數,建立遮罩的時候,以div為父體遮罩這個div。這樣可以實作局部遮罩。
還修改了進度圈的樣式,修改内容可自行比對原Js。
一些注釋可能寫的不對,請諒解。
相關文章:https://www.cnblogs.com/holdon521/p/4661240.html
原Js下載下傳位址:https://files.cnblogs.com/files/cang12138/cvi_busy_lib.js
改進Js下載下傳位址:https://files.cnblogs.com/files/cang12138/cvi_busy_lib改.js