最近我們團隊一直進行.net core的轉型,web開發向着前後端分離的技術架構演進,我們背景主要是采用了asp.net core webapi來進行開發,開始每次調試以及與前端人員的溝通上都存在這效率低下的問題,一次在看微軟asp.net core官方文檔的時候,發現了swagger這個好東西。然後在實際的項目中引入了該技術。我們開發人員測試自己寫的api的過程大大得到了簡化,前端人員也可以根據我們提供的swagger help pages 自己進行一些前端代碼的測試,大大提高了前後端的開發效率。下面我就拿我自己的真實上線項目來一步一步的講解如何在asp.net core webapi中引入swagger。(也可以參照微軟官方文檔:https://docs.microsoft.com/zh-cn/aspnet/core/tutorials/web-api-help-pages-using-swagger)
一、引入swagger Nuget包
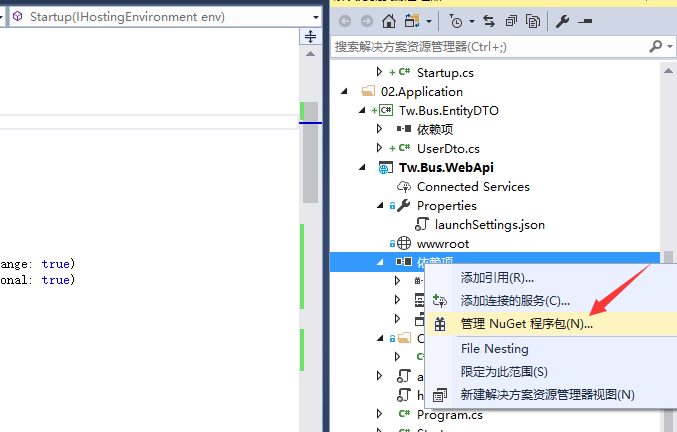
右鍵點選wepapi項目的依賴項,點選管理Nuget程式包,如下圖:

安裝完後,需要在項目中的Startup.cs檔案中進行配置。
二、配置Swagger
打開Startup.cs 檔案,在ConfigureServices 方法中,添加如下代碼:
services.AddSwaggerGen(c =>
            {
                c.SwaggerDoc("v1", new Info
                {
                    Version = "v1",
                    Title = "TwBusManagement接口文檔",
                    Description = "RESTful API for TwBusManagement",
                    TermsOfService = "None",
                    Contact = new Contact { Name = "Alvin_Su", Email = "[email protected]", Url = "" }
                });

                //Set the comments path for the swagger json and ui.
                var basePath = PlatformServices.Default.Application.ApplicationBasePath;
                var xmlPath = Path.Combine(basePath, "twbusapi.xml");
                c.IncludeXmlComments(xmlPath);

              //  c.OperationFilter<HttpHeaderOperation>(); // 添加httpHeader參數
            });
注意上段代碼的最後三行,是我們api描述文檔xml的生成位址和檔案名,需要在項目的屬性中進行配置。如下圖:
另外上圖中,禁止顯示警告中,添加1591 代碼,可以過濾掉一些類名沒有寫注釋的報警資訊。
最後需要在Configure方法中,添加如下代碼,注意下面的代碼必須添加在 app.UseMvc() 前面:
// Enable middleware to serve generated Swagger as a JSON endpoint.
            app.UseSwagger();

            // Enable middleware to serve swagger-ui (HTML, JS, CSS etc.), specifying the Swagger JSON endpoint.
            app.UseSwaggerUI(c =>
            {
                c.SwaggerEndpoint("/swagger/v1/swagger.json", "TwBusManagement API V1");
                c.ShowRequestHeaders();
            });
以上配置完後,就可以使用Swagger生成的幫助頁面了,運作項目後,在浏覽器位址 加上字尾 /swagger就可以跳轉到幫助頁面:
當然我們開發人員在開發項目的過程中并不想每次都要手動輸入位址才能跳轉到幫助頁面,這樣太麻煩。我們可借助visual studio 進行跳轉,如下圖:
打開 launchSettings.json 檔案,把webapi項目的啟動路徑設定成 swagger。這樣每次調試運作項目都會自動跳轉到swagger幫助頁面
三、Swagger的一些進階用法
Swagger非常強大,不僅僅是一些幫助頁面資訊,還可以進行api的調試。這樣就可以不用借助第三方工具 如:postman,進行webapi的調試。swagger經過配置,還可以輸入一些http頭部資訊,如權限認證資訊等。下面就來講解以下具體的配置。
首先我們需要建立一個類 HttpHeaderOperation,讓該類繼承IOperationFilter 接口,該接口需引入命名空間:Swashbuckle.AspNetCore.SwaggerGen,實作接口方法Apply 代碼如下:
public class HttpHeaderOperation : IOperationFilter
    {
        public void Apply(Operation operation, OperationFilterContext context)
        {
            if (operation.Parameters == null)
            {
                operation.Parameters = new List<IParameter>();
            }

            var actionAttrs = context.ApiDescription.ActionAttributes();

            var isAuthorized= actionAttrs.Any(a => a.GetType() == typeof(AuthorizeAttribute));

            if (isAuthorized == false) //提供action都沒有權限特性标記,檢查控制器有沒有
            {
                var controllerAttrs= context.ApiDescription.ControllerAttributes();

                isAuthorized= controllerAttrs.Any(a => a.GetType() == typeof(AuthorizeAttribute));
            }

            var isAllowAnonymous = actionAttrs.Any(a => a.GetType() == typeof(AllowAnonymousAttribute));

            if (isAuthorized && isAllowAnonymous == false)
            {
                operation.Parameters.Add(new NonBodyParameter()
                {
                    Name = "Authorization",  //添加Authorization頭部參數
                    In = "header",
                    Type = "string",
                    Required = false
                });
            }
        }
    }
然後在 Startup.cs 中的 ConfigureServices 方法,找到之前的AddSwaggerGen 代碼段,在最後添加如下代碼:
c.OperationFilter<HttpHeaderOperation>() services.AddSwaggerGen(c =>
{
c.SwaggerDoc("v1", new Info
{
Version = "v1",
Title = "TwBusManagement接口文檔",
Description = "RESTful API for TwBusManagement",
TermsOfService = "None",
Contact = new Contact { Name = "Alvin_Su", Email = "[email protected]", Url = "" }
});
//Set the comments path for the swagger json and ui.
var basePath = PlatformServices.Default.Application.ApplicationBasePath;
var xmlPath = Path.Combine(basePath, "twbusapi.xml");
c.IncludeXmlComments(xmlPath);
c.OperationFilter<HttpHeaderOperation>(); // 添加httpHeader參數
}); 這樣,我們允許webapi項目後,就可以輸入 Authorization 頭部參數了。如下圖:
更多關于Swagger的用法可以參考https://github.com/domaindrivendev/Swashbuckle.AspNetCore 以及微軟文檔:https://docs.microsoft.com/zh-cn/aspnet/core/tutorials/web-api-help-pages-using-swagger