SpringMVC詳解(五)------參數綁定
參數綁定,簡單來說就是用戶端發送請求,而請求中包含一些資料,那麼這些資料怎麼到達 Controller ?這在實際項目開發中也是用到的最多的,那麼 SpringMVC 的參數綁定是怎麼實作的呢?下面我們來詳細的講解。
1、SpringMVC 參數綁定
在 SpringMVC 中,送出請求的資料是通過方法形參來接收的。從用戶端請求的 key/value 資料,經過參數綁定,将 key/value 資料綁定到 Controller 的形參上,然後在 Controller 就可以直接使用該形參。
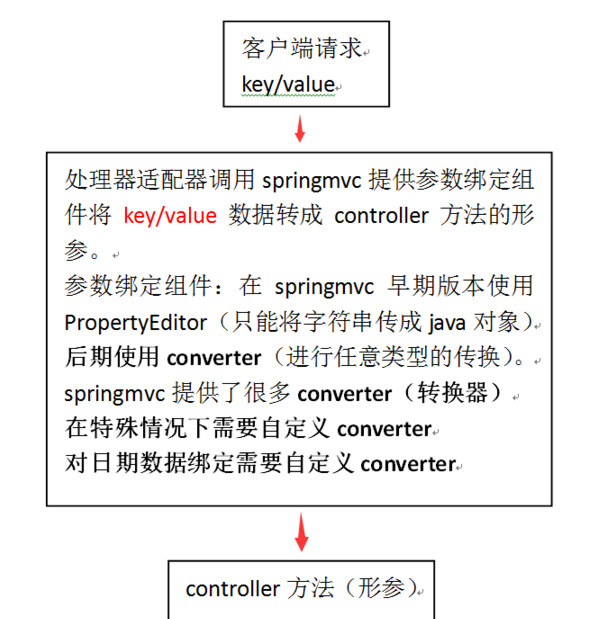
這裡涉及到參數綁定元件,那麼什麼是參數元件,這裡可以先了解為将請求的資料轉換為我們需要的資料稱為參數綁定元件,也就是參數綁定轉換器。SpringMVC 内置了很多參數轉換器,隻有在極少數情況下需要我們自定義參數轉換器。
2、預設支援的類型
SpringMVC 有支援的預設參數類型,我們直接在形參上給出這些預設類型的聲明,就能直接使用了。如下:
①、HttpServletRequest 對象
②、HttpServletResponse 對象
③、HttpSession 對象
④、Model/ModelMap 對象
Controller 代碼:
@RequestMapping("/defaultParameter")
	public ModelAndView defaultParameter(HttpServletRequest request,HttpServletResponse response,
							HttpSession session,Model model,ModelMap modelMap) throws Exception{
		request.setAttribute("requestParameter", "request類型");
		response.getWriter().write("response");
		session.setAttribute("sessionParameter", "session類型");
		//ModelMap是Model接口的一個實作類,作用是将Model資料填充到request域
		//即使使用Model接口,其内部綁定還是由ModelMap來實作
		model.addAttribute("modelParameter", "model類型");
		modelMap.addAttribute("modelMapParameter", "modelMap類型");

		ModelAndView mv = new ModelAndView();
		mv.setViewName("view/success.jsp");
		return mv;
	}
表單代碼:(截取主要代碼)
<body>
	request:${requestParameter}
	session:${sessionParameter}
	model:${modelParameter}
	modelMap:${modelMapParameter}
</body>
然後通路,頁面顯示如下:

這裡我們重點說一下 Model/ModelMap,ModelMap是Model接口的一個實作類,作用是将Model資料填充到request域,即使使用Model接口,其内部綁定還是由ModelMap來實作
3、基本資料類型的綁定
哪些是基本資料類型,我們這裡重新總結一下:
一、byte,占用一個位元組,取值範圍為 -128-127,預設是“\u0000”,表示空
二、short,占用兩個位元組,取值範圍為 -32768-32767
三、int,占用四個位元組,-2147483648-2147483647
四、long,占用八個位元組,對 long 型變量指派時必須加上"L"或“l”,否則不認為是 long 型
五、float,占用四個位元組,對 float 型進行指派的時候必須加上“F”或“f”,如果不加,會産生編譯錯誤,因為系統
自動将其定義為 double 型變量。double轉換為float類型資料會損失精度。float a = 12.23産生編譯錯誤的,float a = 12是正确的
六、double,占用八個位元組,對 double 型變量指派的時候最好加上“D”或“d”,但加不加不是硬性規定
七、char,占用兩個位元組,在定義字元型變量時,要用單引号括起來
八、boolean,隻有兩個值“true”和“false”,預設值為false,不能用0或非0來代替,這點和C語言不同
我們以 int 類型為例:
JSP 頁面代碼:
<form action="basicData" method="post">
	<input name="username" value="10" type="text"/>
	<input type="submit" value="送出">
</form>
@RequestMapping("/basicData")
	public void basicData(int username){
		System.out.println(username);//10
	}
結果是 列印出了表單裡面的 value 的值。
注意:表單中input的name值和Controller的參數變量名保持一緻,就能完成資料綁定。那麼如果不一緻呢?我們使用 @RequestParam 注解來完成,如下:
JSP頁面代碼不變,<input name="username">保持原樣,Controller 代碼如下
使用注解 @RequestParam ,我們可以使用任意形參,但是注解裡面的 value 屬性值要和表單的name屬性值一樣。
問題:我們這裡的參數是基本資料類型,如果從前台頁面傳遞的值為 null 或者 “”的話,那麼會出現資料轉換的異常,就是必須保證表單傳遞過來的資料不能為null或”",是以,在開發過程中,對可能為空的資料,最好将參數資料類型定義成包裝類型,具體參見下面的例子。
4、包裝資料類型的綁定
包裝類型如Integer、Long、Byte、Double、Float、Short,(String 類型在這也是适用的)這裡我們以 Integer 為例
Controller 代碼為:
和基本資料類型基本一樣,不同之處在于,表單傳遞過來的資料可以為null或”",以上面代碼為例,如果表單中num為”"或者表單中無num這個input,那麼,Controller方法參數中的num值則為null。
5、POJO(實體類)類型的綁定
User.java
package com.ys.po;

import java.util.Date;

public class User {
    private Integer id;

    private String username;

    private String sex;

    private Date birthday;

    public Integer getId() {
        return id;
    }

    public void setId(Integer id) {
        this.id = id;
    }

    public String getUsername() {
        return username;
    }

    public void setUsername(String username) {
        this.username = username == null ? null : username.trim();
    }

    public String getSex() {
        return sex;
    }

    public void setSex(String sex) {
        this.sex = sex == null ? null : sex.trim();
    }

    public Date getBirthday() {
        return birthday;
    }

    public void setBirthday(Date birthday) {
        this.birthday = birthday;
    }
}
JSP頁面:注意輸入框的 name 屬性值和上面 POJO 實體類的屬性保持一緻即可映射成功。
<form action="pojo" method="post">
		使用者id:<input type="text" name="id" value="2"></br>
		使用者名:<input type="text" name="username" value="Marry"></br>
		性别:<input type="text" name="sex" value="女"></br>
		出生日期:<input type="text" name="birthday" value="2017-08-25"></br>
		<input type="submit" value="送出">
	</form>
注意看:這裡面我們資料都寫死了,直接送出。有Integer類型的,String類型的,Date類型的。
Controller :
@RequestMapping("/pojo")
	public void pojo(User user){
		System.out.println(user);
	}
我們在上面代碼打個斷點,然後輸入URL,進入到這個Controller中:
上面是報錯了,User.java 的birthday 屬性是 Date 類型的,而我們輸入的是字元串類型,故綁定不了
那麼問題來了,Date 類型的資料綁定失敗,如何解決這樣的問題呢?這就是我們前面所說的需要自定義Date類型的轉換器。
①、定義由String類型到 Date 類型的轉換器
package com.ys.util;

import java.text.ParseException;
import java.text.SimpleDateFormat;
import java.util.Date;

import org.springframework.core.convert.converter.Converter;

//需要實作Converter接口,這裡是将String類型轉換成Date類型
public class DateConverter implements Converter<String, Date> {

	@Override
	public Date convert(String source) {
		//實作将字元串轉成日期類型(格式是yyyy-MM-dd HH:mm:ss)
		SimpleDateFormat dateFormat = new SimpleDateFormat("yyyy-MM-dd HH:mm:ss");
		try {
			return dateFormat.parse(source);
		} catch (ParseException e) {
			// TODO Auto-generated catch block
			e.printStackTrace();
		}
		//如果參數綁定失敗傳回null
		return null;
	}

}
②、在 springmvc.xml 檔案中配置轉換器
<mvc:annotation-driven conversion-service="conversionService"></mvc:annotation-driven>

	<bean id="conversionService" class="org.springframework.format.support.FormattingConversionServiceFactoryBean">
		<property name="converters">
			<!-- 自定義轉換器的類名 -->
			<bean class="com.ys.util.DateConverter"></bean>
		</property>
	</bean>
輸入 URL,再次檢視Controller的形參:
6、複合POJO(實體類)類型的綁定
這裡我們增加一個實體類,ContactInfo.java
package com.ys.po;

public class ContactInfo {
    private Integer id;

    private String tel;

    private String address;

    public Integer getId() {
        return id;
    }

    public void setId(Integer id) {
        this.id = id;
    }

    public String getTel() {
        return tel;
    }

    public void setTel(String tel) {
        this.tel = tel == null ? null : tel.trim();
    }

    public String getAddress() {
        return address;
    }

    public void setAddress(String address) {
        this.address = address == null ? null : address.trim();
    }
}
然後在上面的User.java中增加一個屬性 private ContactInfo contactInfo
JSP 頁面:注意屬性name的命名,User.java 的複合屬性名.字段名
Controller
User對象中有ContactInfo屬性,但是,在表單代碼中,需要使用“屬性名(對象類型的屬性).屬性名”來命名input的name。
7、數組類型的綁定
需求:我們查詢出所有User 的資訊,并且在JSP頁面周遊顯示,這時候點選送出按鈕,需要在 Controller 中獲得頁面中顯示 User 類的 id 的所有值的數組集合。
JSP 頁面:注意使用者id的name值定義為 userId
Controller.java
8、List類型的綁定
需求:批量修改 User 使用者的資訊
第一步:建立 UserVo.java,封裝 List<User> 屬性
package com.ys.po;

import java.util.List;

public class UserVo {

	private List<User> userList;
	public List<User> getUserList() {
		return userList;
	}
	public void setUserList(List<User> userList) {
		this.userList = userList;
	}
}
第二步:為了簡化過程,我們直接從 Controller 中查詢所有 User 資訊,然後在頁面顯示
@RequestMapping("selectAllUserAndList")
	public ModelAndView selectAllUserAndList(){
		List<User> listUser = userService.selectAllUser();
		ModelAndView mv = new ModelAndView();
		mv.addObject("listUser", listUser);
		mv.setViewName("list.jsp");
		return mv;
	}
JSP 頁面
第三步:修改頁面的值後,點選送出
由于我們在 JSP 頁面 input 輸入框定義的name屬性名是 userList[${status.index}].id 這種形式的,這裡我們直接用 UserVo 就能擷取頁面批量送出的 User資訊
8、Map類型的綁定
首先在 UserVo 裡面增加一個屬性 Map<String,User> userMap
第二步:JSP頁面,注意看 <input >輸入框 name 的屬性值
第三步:Controller 中擷取頁面的屬性
9、遇到的問題
①、form表單無法送出input輸入框屬性設定為 disabled 的内容
比如:
<input type="text" disabled="disabled" name="metadataName" maxlength="50" placeholder="這裡輸入模型英文名稱" title="模型英文名稱" "/>
具有 disabled="disabled" 的屬性,送出到 Controller後,metadataName 的值為null
解決辦法:改為 readonly="readonly"
readonly:針對input(text / password)和textarea有效,在設定為true的情況下,使用者可以獲得焦點,但是不能編輯,在送出表單時,輸入項會作為form的内容送出。
disabled:針對所有表單元素(select,button,input,textarea等),在設定為disabled為true的情況下,表單輸入項不能獲得焦點,使用者的所有操作無意義,在送出表單時,表單輸入項不會被送出。
作者:IT可樂
出處:http://www.cnblogs.com/ysocean/
資源:微信搜【IT可樂】關注我,回複 【電子書】有我特别篩選的免費電子書。
本文版權歸作者所有,歡迎轉載,但未經作者同意不能轉載,否則保留追究法律責任的權利。