Socket程式設計
Linux Socket程式設計領域為了處理大量連接配接請求場景,需要使用非阻塞I/O和複用,
select
、
poll
epoll
是Linux API提供的I/O複用方式,自從Linux2.6中加入了epoll之後,高性能伺服器領域得到廣泛的應用,Nignx就是使用
epoll
來實作I/O複用支援高并發。
對于“高性能”服務端而言,我們所關注的并不是語言的性能,而是緩存和語言支援異步非阻塞。
緩存
針對緩存要明白通信速度的快慢順序
- 記憶體>SSD>機械磁盤
- 本機>網絡
- 程序内 > 程序間
緩存系統的目标是希望在程序内的命中率是最高的,那麼此時緩存系統整體的效率也是最高的。
異步非阻塞
希望通路資料庫、通路網絡,通路一些比較慢的IO裝置時,不要在等待上耗費大量時間。而是使用事件驅動的方式,當系統完成某項任務後再來通知我們。這樣就可以将伺服器CPU的空閑資源,用來服務用戶端連接配接。
OpenResty
OpenResty是基于Ngnix和Lua的高性能web平台,内部內建精良的LUa庫、第三方子產品、依賴項。用于友善搭建能夠處理高并發、擴充性極高的動态web應用、web服務、動态網關。可以使用Lua腳本調用Ngnix支援的C以及Lua子產品,快速建構10K~1000K單機并發連接配接的高性能web應用系統。OpenResty的目标是讓web服務直接運作在Nginx服務内部,利用Ngnix的非阻塞IO模型,對HTTP用戶端請求和後端DB進行一緻的高性能響應。
OpenResty的出現可以說是颠覆了高性能服務端的開發模式。OpenResty實際上是Nginx+LuaJIT的完美組合。
OpenResty工作方式
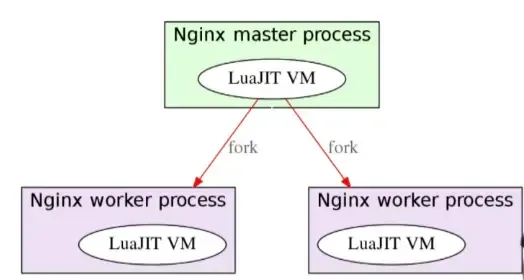
由于Nginx采用的是
master-worker
模型,也就是一個
master
主程序管理多個
worker
程序,基本的事件處理都是放在
worker
中,
master
僅負責一些全劇初始化,以及對
worker
的管理。在OpenResty中,每個
worker
使用一個LuaVM,每個請求被配置設定到
worker
時,将在這個
LuaVM
中建立一個
coroutine
協程。協程之間資料隔離,每個協程具有獨立的全局變量
_G
。
Lua中的協程和多線程下的線程類似,都有自己的堆棧、局部變量、指令指針...,但是和其他協程程式共享全局變量等資訊。線程和協程主要不同在于:多處理器的情況下,概念上來說多線程是同時運作多個線程,而協程是通過代碼來完成協程的切換,任何時刻隻有一個協程程式在運作。并且這個在運作的協程隻有明确被要求挂起時才會被挂起。
根據實際測試,OpenResty性能接近于Nginx 性能之王c module,甚至超過。
OpenResty 架構
- 負載均衡
LVS+HAProxy将流量轉發給核心Nginx1和Nginx2,即實作了流量的負載均衡。

- 單機閉環
所有想要的資料都能從本伺服器直接擷取,大多數時候無需通過網絡或去其他伺服器擷取。
- 分布式閉環
單機閉環會遇到2個主要問題
-
資料不一緻
例如沒有主從架構導緻不同伺服器資料不一緻
-
遇到存儲瓶頸
磁盤或記憶體遇到天花闆
解決資料不一緻比較好的辦法是采用主從或分布式集中存儲,而遇到存儲瓶頸就需要進行按業務鍵進行分片,将資料分散到多台伺服器。
- 接入網關
接入網關又叫接入層,即接收流量的入口,在入口處做如下事情:
OpenResty環境搭建
- http://openresty.org
- http://openresty.org/cn/download.html
安裝前準備,必須安裝
perl
libpcre
libssl
庫。
# 從系統路徑中檢視必備庫是否已經安裝
$ sudo ldconfig -v

# 安裝必備庫
$ sudo apt install libpcre3-dev libssl-dev perl make build-essential curl libreadline-dev libncurses5-dev
下載下傳并解壓OpenResty後進入其目錄
$ wget https://openresty.org/download/ngx_openresty-1.13.6.1.tar.gz
$ tar -zxvf ngx_openresty-1.13.6.1.tar.gz
$ mv openresty-1.13.6.1 openresty
$ cd openresty
$ ./configure
預設會被安裝到
/usr/local/openresty
目錄下
# 編譯并安裝
$ sudo make && make install
$ cd /usr/local/openresty
啟動Nginx
$ sudo /usr/local/openresty/nginx/sbin/nginx
$ ps -ef | grep nginx
$ service nginx status
Nginx啟動若出現
nginx: [emerg] bind() to 0.0.0.0:80 failed (98: Address already in use)
nginx: [emerg] still could not bind()
說明80端口并占用,檢視80端口被占用的端口并重新開機。原因在于nginx先監聽了ipv4的80端口之後又監聽了ipv6的80端口,于是就重複占用了。
$ sudo netstat -ntlp | grep 80
$ sudo killall -9 nginx
重新編輯Nginx配置檔案
$ sudo vim /etc/nginx/conf/nginx.conf

listen 80;
listen [::]:80 ipv6only=on default_server;
使用
curl
工具或在浏覽器通路預設80端口
$ curl 127.0.0.1
浏覽器輸入
http://127.0.0.1/
将Nginx工具配置到目前使用者的系統環境變量中
$ sudo vim ~/.bashrc
export PATH=$PATH:/usr/local/openresty/nginx/sbin
$ source ~./bashrc
$ cd ~
$ nginx -s reload
nginx: [alert] kill(12267, 1) failed (1: Operation not permitted)
開發文檔
- https://www.nginx.com/resources/wiki/modules/lua/
ubuntu 安裝 vcode 或 sublime text 編輯器
content_by_lua
$ vim /usr/local/openresty/nginx/conf/nginx.conf
location /test {
  default_type text/html;
  content_by_lua 'ngx.say("hello openresty")';
}

# 重新開機Nginx
$ /usr/local/openresty/nginx/sbin/nginx -s reload

# 浏覽器通路 127.0.0.1/test
content_by_lua_file
$ vim nginx.conf
location /test {
  content_by_lua_file 'html/test.lua';
}
$ vim ../html/test.lua
ngx.say("hello lua")
$ sudo /usr/local/nginx/sbin/nginx -s reload
$ curl 127.0.0.1/test
hello lua
為避免每次修改都需要重新開機Nginx,可在Nginx的
server
選項中配置
lua_code_cache
選項。
$ vim nginx.conf
server{
  lua_code_cache off;
  location /test{
    content_by_lua_file 'html/test.lua';
  }
}
$ sudo /usr/local/openresty/nginx/sbin/nginx -s reload
nginx: [alert] lua_code_cache is off; this will hurt performance in /usr/local/openresty/nginx/conf/nginx.conf:48
注意
lua_code_cache off;
是會引擎Nginx的性能的,在生産環境中是需要将其開啟的。
小節
在OpenResty中開發是分為兩步的,第一步是修改Nginx配置,第二步是使用Lua開發自己的腳本。
OpenResty入門
參考資料
- OpenResty最佳實踐
- Nginx Lua
建立工作目錄
OpenResty安裝之後就有配置檔案及相關目錄,為了工作目錄和安裝目錄互不幹擾,另外建立OpenResty工作目錄,并另寫配置。
$ mkdir -p ~/openresty/test/logs ~/openresty/test/conf
$ vim ~/openresty/test/conf/nginx.conf
# 設定Nginx worker工作程序數量,即CPU核數。
worker_processes 1;

# 設定錯誤日志檔案路徑
error_log logs/error.log;
# 配置Nginx伺服器與使用者的網絡連接配接
events{
# 設定每個工作程序的最大連接配接數
    worker_connections 10224;
}

http{
# 虛拟機主機塊定義
    server{
# 監聽端口
        listen 8001;
# 配置請求的路由
        location /{
            default_type text/html;
            content_by_lua_block{
                ngx.say("hello world");
            }
        }
    }
}
$ nginx -p ~/openresty/test
$ curl 127.0.0.1:8001
hello world
$ vim nginx.conf
location /test{
  content_by_lua_file "lua/test.lua";
}
$ cd .. && mkdir lua && cd lua
$ vim test.lua
local args = ngx.req.get_uri_args()
local salt = args.salt
if not salt then
  ngx.exit(ngx.HTTP_BAD_REQUEST)
end
local md5str = ngx.md5(ngx.time()..salt)
ngx.say(md5str)

$ sudo /usr/local/openresty/nginx/sbin/nginx -s reload
$ curl -i 127.0.0.1/test?salt=lua
HTTP/1.1 200 OK
Server: openresty/1.13.6.2
Date: Sun, 27 Jan 2019 10:07:17 GMT
Content-Type: application/octet-stream
Transfer-Encoding: chunked
Connection: keep-alive

b55b77f75e46b96b11778ca7edfe8d55
若代碼中出現錯誤則需要直接檢視Nginx的錯誤日志進行檢視
$ vim nginx/logs/error.log
2019/01/27 17:37:15 [error] 15764#0: *6 failed to load external Lua file "/usr/local/openresty/nginx/test.lua": cannot open /usr/local/openresty/nginx/test.lua: No such file or...
Windows系統下檢視Nginx程序
λ tasklist /fi "imagename eq nginx.exe"

映像名稱                       PID 會話名              會話#       記憶體使用
========================= ======== ================ =========== ============
nginx.exe                     9072 Console                    1      7,840 K
nginx.exe                     7692 Console                    1     12,304 K
nginx.exe                     8120 Console                    1      7,840 K
nginx.exe                     4552 Console                    1     12,188 K
nginx.exe                     9588 Console                    1      7,828 K
nginx.exe                     6256 Console                    1     12,216 K
nginx.exe                     7308 Console                    1      7,828 K
nginx.exe                    10192 Console                    1     12,212 K

λ taskkill /im nginx.exe /f
成功: 已終止程序 "nginx.exe",其 PID 為 9072。