Eureka服務注冊與發現
建立Eureka子產品
在傳統的rpc遠端調用架構中,管理每個服務與服務之間的依賴關系比較複雜,是以需要服務治理,,管理服務與服務之間的依賴關系,實作服務調用、負載均衡、容錯和服務的注冊與發現等
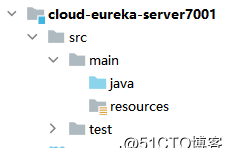
- 建立項目

SpringCloud學習筆記(三) 服務注冊中心 - 修改pom檔案
<dependencies> <!-- https://mvnrepository.com/artifact/org.springframework.cloud/spring-cloud-starter-eureka-server --> <dependency> <groupId>org.springframework.cloud</groupId> <artifactId>spring-cloud-starter-netflix-eureka-server</artifactId> </dependency> <dependency> <groupId>zjc</groupId> <artifactId>CommonComponent</artifactId> <version>1.0-SNAPSHOT</version> </dependency> <!-- https://mvnrepository.com/artifact/org.springframework.boot/spring-boot-starter-web --> <dependency> <groupId>org.springframework.boot</groupId> <artifactId>spring-boot-starter-web</artifactId> </dependency> <!-- https://mvnrepository.com/artifact/org.springframework.boot/spring-boot-starter-web --> <dependency> <groupId>org.springframework.boot</groupId> <artifactId>spring-boot-starter-actuator</artifactId> </dependency> <!-- https://mvnrepository.com/artifact/org.projectlombok/lombok --> <dependency> <groupId>org.projectlombok</groupId> <artifactId>lombok</artifactId> </dependency> <!-- https://mvnrepository.com/artifact/org.springframework.boot/spring-boot-starter-test --> <dependency> <groupId>org.springframework.boot</groupId> <artifactId>spring-boot-starter-test</artifactId> <scope>test</scope> </dependency> <dependency> <groupId>junit</groupId> <artifactId>junit</artifactId> </dependency> </dependencies> - 配置yml檔案
server: port: 7001 eureka: instance: hostname: localhost #eureka服務端的執行個體名字 client: register-with-eureka: false #表識不向注冊中心注冊自己 fetch-registry: false #表示自己就是注冊中心,職責是維護服務執行個體,并不需要去檢索服務 service-url: defaultZone: http://${eureka.instance.hostname}:${server.port}/eureka/ #設定與eureka server互動的位址查詢服務和注冊服務都需要依賴這個位址 - 配置主啟動類
package zjc; import org.springframework.boot.SpringApplication; import org.springframework.boot.autoconfigure.SpringBootApplication; import org.springframework.cloud.netflix.eureka.server.EnableEurekaServer; @SpringBootApplication @EnableEurekaServer // 添加這個注解指定啟動類為服務注冊中心 public class EurekaMain7001 { public static void main(String[] args) { SpringApplication.run(EurekaMain7001.class, args); } } -
啟動項目
通路localhost:7001後可以看到如下頁面
SpringCloud學習筆記(三) 服務注冊中心
注冊子子產品進入eureka注冊中心
将提供者注冊進注冊中心
修改cloud-provider-8001子產品的配置使其能夠注冊進eureka
- 子子產品加入eureka依賴(和服務中心的依賴不一樣)
<dependency> <groupId>org.springframework.cloud</groupId> <artifactId>spring-cloud-starter-netflix-eureka-client</artifactId> </dependency> - 子子產品yml添加eureka配置
eureka: client: register-with-eureka: true # 表示是否将自己注冊進注冊中心,預設為true fetch-registry: true # 是否從注冊中心抓取已有的注冊資訊,預設為true,單節點可以不設定,叢集必須設定才能配合ribbon使用負載均衡 service-url: defaultZone: http://eureka7001.com:7001/eureka -
啟動類添加注解配置
啟動類添加如下注解
@EnableEurekaClient // 添加這個注解指定啟動類為用戶端 -
先後啟動eureka子產品和provider子產品
通路localhost:7001
可以看到provider子產品已經被注冊進eureka注冊中心SpringCloud學習筆記(三) 服務注冊中心
将消費者注冊進服務注冊中心
修改cloud-consumer-server80子產品的相關配置
-
修改pom.xml配置
添加eureka相關依賴
<dependency> <groupId>org.springframework.cloud</groupId> <artifactId>spring-cloud-starter-netflix-eureka-client</artifactId> </dependency> -
修改yml配置檔案
添加如下内容
spring: application: name: cloud-order-service eureka: client: register-with-eureka: true fetchRegistry: true service-url: defaultZone: http://localhost:7001/eureka - 添加主啟動類的注解
@EnableEurekaClient - 看到消費者也被注冊
SpringCloud學習筆記(三) 服務注冊中心
eureka叢集
每個服務注冊中心之間互相注冊互相守望
第二個服務注冊中心
使用switchhost工具修改端口映射
因為有多個服務注冊中心,為了避免服務注冊中心的hostname重名,使用switchhost工具對端口進行映射
-
下載下傳switchhosts
下載下傳位址:SwitchHosts 網盤位址
-
修改映射
以管理者權限啟動switchhosts
建立映射方案
在映射方案中添加以下内容SpringCloud學習筆記(三) 服務注冊中心 SpringCloud學習筆記(三) 服務注冊中心 SpringCloud學習筆記(三) 服務注冊中心
建立注冊中心
- 根據cloud-eureka-server7001子產品建立cloud-eureka-server7002子產品
SpringCloud學習筆記(三) 服務注冊中心 - 修改cloud-eureka-server7001子產品的配置檔案
server: port: 7001 eureka: instance: hostname: eureka7001.com #eureka服務端的執行個體名字 client: register-with-eureka: false fetch-registry: false service-url: defaultZone: http://eureka7002.com:7002/eureka/ #互相注冊互相守望 - 修改cloud-eureka-server7002的配置檔案
server: port: 7002 eureka: instance: hostname: eureka7002.com #eureka服務端的執行個體名字 client: register-with-eureka: false fetch-registry: false service-url: defaultZone: http://eureka7001.com:7001/eureka/ #互相注冊互相守望 -
依次啟動兩個服務注冊中心
看到如下結果說明啟動成功
SpringCloud學習筆記(三) 服務注冊中心 SpringCloud學習筆記(三) 服務注冊中心
将子子產品注冊進eureka叢集
修改cloud-consumer-order80子產品和cloud-provider-payment8001的yml配置檔案
eureka:
  client:
    register-with-eureka: true # 表示是否将自己注冊進注冊中心,預設為true
    fetch-registry: true # 是否從注冊中心抓取已有的注冊資訊,預設為true,單節點可以不設定,叢集必須設定才能配合ribbon使用負載均衡
    service-url:
      #defaultZone: http://eureka7001.com:7001/eureka # 單機版
      defaultZone: http://eureka7001.com:7001/eureka,http://eureka7002.com:7002/eureka  #叢集版
依次啟動四個服務
通路頁面,彈道如下結果表示服務注冊成功
将提供者叢集注冊進服務注冊中心
第二個提供者
- 根據cloud-provider-payment8001子產品建立cloud-provider-payment8002子產品
SpringCloud學習筆記(三) 服務注冊中心 -
修改yml配置
除了端口映射其他和cloud-provider-payment8001子產品一樣
server: port: 8002 - 修改兩個提供者的controller 添加以下兩行代碼
SpringCloud學習筆記(三) 服務注冊中心
并修改傳回結果集@Value("${server.port}") private String serverPort;這樣就能從傳回結果得知傳回結果是從叢集中的哪個提供者響應的SpringCloud學習筆記(三) 服務注冊中心 -
啟動負載均衡
修改cloud-consumer-order80子產品的controller
将ip位址改為服務提供者的服務名
修改config,添加// public static final String PAYMENT_URL = "http://localhost:8001"; public static final String PAYMENT_URL = "http://CLOUD-PAYMENT-SERVICE";@LoadBalanced
SpringCloud學習筆記(三) 服務注冊中心 - 通路localhost/consumer/payment/get/1
SpringCloud學習筆記(三) 服務注冊中心 可以同時通路到來自8001端口和8002端口的結果集,說明負載均衡開啟成功SpringCloud學習筆記(三) 服務注冊中心
修改主機名
修改提供者的yml配置
eureka:
  client:
    register-with-eureka: true # 表示是否将自己注冊進注冊中心,預設為true
    fetch-registry: true # 是否從注冊中心抓取已有的注冊資訊,預設為true,單節點可以不設定,叢集必須設定才能配合ribbon使用負載均衡
    service-url:
      #defaultZone: http://eureka7001.com:7001/eureka # 單機版
      defaultZone: http://eureka7001.com:7001/eureka,http://eureka7002.com:7002/eureka  #叢集版
  instance:
    instance-id: payment8001 # 修改主機名
  	prefer-ip-address: true # 通路路徑顯示ip位址
可以看到主機名發生了變化
使用actuator健康檢查得到如下結果說明服務正常
服務發現Discovery
提供者将自己的基礎服務資訊送出給服務注冊中心
-
修改服務提供者的controller
添加以下内容
@Resource private DiscoveryClient discoveryClient; @GetMapping("/payment/discovery") public Object discovery() { // 方式一 得到服務清單清單 List<String> services = discoveryClient.getServices(); services.forEach(i -> log.info("{}", i)); // 方式二 得到服務執行個體 List<ServiceInstance> instances = discoveryClient.getInstances("CLOUD-PAYMENT-SERVICE"); instances.forEach(i -> log.info("{}\t{}\t{}\t{}", i.getServiceId(), i.getHost(), i.getPort(), i.getUri()) ); return this.discoveryClient; } -
修改啟動類
添加
@EnableDiscoveryClient
- 通路localhost:8001/payment/discovery得到如下結果 可以看到DiscoveryClient使用了兩種方式輸出了CLOUD-PAYMENT-SERVICE的相關資訊
SpringCloud學習筆記(三) 服務注冊中心 SpringCloud學習筆記(三) 服務注冊中心
Eureka的自我保護
保護機制:
- 某時刻某一微服務不可用了,eureka不會立即清理,而是依舊會保留微服務的資訊
- client會定時向server發送心跳包,如果server一定時間内沒有收到某個服務心跳包,就會把這個服務清除
- 如果在指定時間内server沒有收到client的心跳包,server會暫時保留服務
關閉自我保護機制
- 修改cloud-eureka-server7001子產品的yml配置
server:
	enable-self-preservation: false # 關閉自我保護
	eviction-interval-timer-in-ms: 2000 # 心跳檢測間隔為2秒
SpringCloud學習筆記(三) 服務注冊中心 -
lease-renewal-interval-in-seconds: 1 # 用戶端向服務端發送心跳的時間間隔(預設30秒)
lease-expiration-duration-in-seconds: 2 # 服務端最後一次檢測用戶端心跳的時間間隔(預設90秒)