Day 1
1. JDK版本之間的差異相關問題
2. 怎麼通過maven設定建構項目的jdk版本:profiles
3. spring boot應用如何打包成一個可運作的jar包
要建立一個可執行jar,我們需要将spring-boot-maven-plugin添加到我們的pom.xml中。要做到這一點,請在dependencies部分下面插入以下幾行:
<build>
    <plugins>
        <plugin>
            <groupId>org.springframework.boot</groupId>
            <artifactId>spring-boot-maven-plugin</artifactId>
        </plugin>
    </plugins>
</build>
4. spring boot starter是什麼,它有哪些類型的starter
https://docs.spring.io/spring-boot/docs/2.4.0-SNAPSHOT/reference/html/using-spring-boot.html#using-boot
5. spring boot為什麼能從application.properties或者yaml檔案中取配置
應該是從在啟動類底層代碼中固定的配置檔案名稱
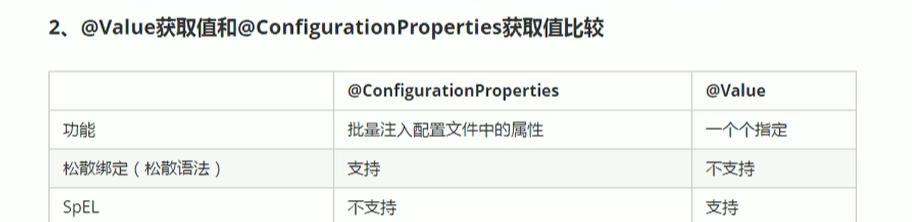
6. 怎麼通過spring boot擷取配置檔案中的值、yaml支援的資料類型
要加@Compent将類标記為容器中的一個元件
注解 org.springframework.boot.context.properties.ConfigurationProperties,需要比對配置檔案中的字首prefix
用法示例:
@ConfigurationProperties(prefix = "person")
在yaml檔案中就以:@ConfigurationProperties(prefix = "person") @Compent public Class Person { private String key1; private String key2; // set get ... }使用@Valueperson: key1: value1 key2: value2
7. @Autowire和@Resource差別
1.@Autowire是Spring開發的,而@Resource是jdk開發的
2.@Autowire是按照type來注解的,而@Resource是按照名稱來的,如果名稱找不到,那麼就按照type
截至
https://www.bilibili.com/video/BV1gW411W76m?p=13
從14開始看
Day 2
1. @PropertySource
預設是從根目錄的application.properties或application.yaml擷取,可以通過@PropertySource指定配置檔案目錄和名稱
2. @ImportResource
@ImportResource
@ImportResource(locations = {"classpath:bean.xml"})
可以支援Spring時期使用的xml配置方式
3. @Configuration+@Bean
@Configuration+@Bean

4. 配置檔案占位符
支援随機數,包括整數、字元串uuid等
5. Profile
激活方式
spring.profiles.active=dev
對應application-dev.properties/yml
yml檔案可使用---來分隔文檔塊,每一塊都可以了解為一個profile的配置塊,指定active後對應文檔塊的配置生效
也可以使用啟動的參數配置,
java -jar x.jar--spring.profiles.active=dev
6. 配置檔案的優先級,以下四個目錄都會加載,由高到低,高覆寫低,可以利用優先級實作互補配置
spring.config.location可以用作指令行參數
7. 自動配置
截至:
https://www.bilibili.com/video/BV1gW411W76m?p=19
Day 3
1. @Conditional
@Conditional
當滿足某個條件時,才往容器中注入該Bean
2. 什麼是SpEL表達式
SpEL(Spring Expression Language),即Spring表達式語言。它是一種類似JSP的EL表達式、但又比後者更為強大有用的表達式語言。
為什麼要用SpEL:因為它可以在spring容器内實時查詢和操作資料,尤其是操作List清單型、Array數組型資料。是以使用SpEL可以有效縮減代碼量,優化代碼結構,筆者認為很有用
3. 配置debug啟動
啟動項目,控制台列印自動配置報告,友善得知哪些自動配置類生效
Positive matches:啟用的、比對上的自動配置類
Negative matches:沒有啟動、沒有比對上的自動配置類
4. 日志介紹
SLF4J是一種抽象,它對應的實作有Log4J/Logback,抽象和兩種實作都出自同一人之手
Logback是繼Log4J出現性能問題後的另實作的一套架構
SLF4J了解為一種抽象、公認的規範,你系統要記錄日志,我這個規範能滿足你、也能限制你實作的更好,而實作這一規範就按需進行了,世面上有些已有的,開發人員也可根據自己需要自己按規範實作,
slf4j-api.jar
就是規範的引入,再往下一層引入該規範的實作,實作比如null、logbak、log4j、java.util .logging等等
每個架構都有自己的日志用法,可能每種架構都用各自不同的日志架構,而Spring Boot這樣的架構是一個集結多種架構于一體的開發解決方案,比如它有Spring/MyBatis/Hibernate/MQ...,各自用各自的日志就太過于混亂,slf4j提供了一套日志統一解決方案,大緻原理如下:
- 已知市面上流行的所有日志架構
- 将它們與SLF4J進行一個轉換,比如ALogging架構中的XX類,在其對應轉換的Jar包中有同樣的接口名稱,但是其對應的實作類就用SLF4J的實作類
這樣的替換包流行的有以下幾種:
jcl-over-slf4j
jul-to-slf4j
log4j-over-slf4j 5. spring boot 日志場景、啟動器
spring boot日志相關的底層依賴關系
- spring boot 底層使用slf4j+logback方式進行日志記錄
- 将其他架構中的日志依賴轉換為slf4j
- 排除掉每個架構預設的日志,排除示例如下
<dependency>
        <groupId>org.apache.activemq</groupId>
        <artifactId>activemq-console</artifactId>
        <version>${activemq.version}</version>
        <exclusions>
          <exclusion>
            <groupId>commons-logging</groupId>
            <artifactId>commons-logging</artifactId>
          </exclusion>
        </exclusions>
</dependency> 在正常開發中,日志對應的級别,spring boot預設設定為info,可以指定報名改變日志列印級别,級别分高低,如圖
# 指定報名設定日志列印級别,以下是設定了com.nobt包下的類列印都以trace級别列印
logging.level.com.nobt=trace

# 指定日志檔案目錄
logging.path=/spring/log

# 不指定路徑在目前項目下生成springboot.log日志
# 可以指定完整的路徑
logging.file=G:/springboot.log
官方文檔中有這麼一句:
If you want to write log files in addition to the console output you
need to set a logging.file or logging.path property
也就是說,它們不會同時生效,隻配置其中一個就好了。
例如我配置的時候隻指定path
logging.path = ./logs
那麼記錄日志的時候預設的檔案名是:spring.log
https://www.bilibili.com/video/BV1gW411W76m?p=26
Day 4
自己搭建的hello world maven 工程Junit一直不正常,故拉取 ityouknow 的教程合集,看了幾個快速簡單的,跟一兩年前一樣,上手寫業務代碼都是照葫蘆畫瓢,但是細節上的配置還需要熟悉,比如 maven 對應的好些配置,是不了解、不知道怎麼配置的。
<project>
  <modelVersion>4.0.0</modelVersion>
<!--maven2.0必須是這樣寫,現在是maven2唯一支援的版本-->
  <!-- 基礎設定 -->
  <groupId>...</groupId>
  <artifactId>...</artifactId>
  <version>...</version>
  <packaging>...</packaging>
  <name>...</name>
  <url>...</url>
  <dependencies>...</dependencies>
  <parent>...</parent>
  <dependencyManagement>...</dependencyManagement>
  <modules>...</modules>
  <properties>...</properties>

  <!--建構設定 -->
  <build>...</build>
  <reporting>...</reporting>

  <!-- 更多項目資訊 -->
  <name>...</name>
  <description>...</description>
  <url>...</url>
  <inceptionYear>...</inceptionYear>
  <licenses>...</licenses>
  <organization>...</organization>
  <developers>...</developers>
  <contributors>...</contributors>

  <!-- 環境設定-->
  <issueManagement>...</issueManagement>
  <ciManagement>...</ciManagement>
  <mailingLists>...</mailingLists>
  <scm>...</scm>
  <prerequisites>...</prerequisites>
  <repositories>...</repositories>
  <pluginRepositories>...</pluginRepositories>
  <distributionManagement>...</distributionManagement>
  <profiles>...</profiles>
</project> - fork ityouknow 的spring boot教程并拉取本地環境搭建
https://gitee.com/nobt/spring-boot-examples
Day 5
spring boot admin 和 spring boot actuator
這兩者的關系描述:Spring Boot Admin就是将Spring Boot Actuator中提供的endpoint資訊可視化表示,在BookPub應用(被監控)的這一端,隻需要進行一點配置即可。
也就是說Admin 依賴 Actuator,從pom 依賴關系中找到展現:
<!-- spring-boot-admin-server.pom -->

<dependency>
      <groupId>org.springframework.boot</groupId>
      <artifactId>spring-boot-starter-actuator</artifactId>
      <version>2.1.0.RELEASE</version>
      <scope>compile</scope>
 </dependency>
Admin 可以做以下功能:監控你的 Spring Boot 程式,支援異常郵件通知
大體上有個了解,細節上的API、用法需要時再查閱
spring 斷言
用法示例spring的底層也較多的用到了該用法,其實就是個方法抽離的用法
org.springframework.util.Assert 的注釋如下:
斷言實用工具類,幫助驗證參數。
有助于在運作時早期和清晰地識别程式員錯誤。
例如,如果一個公共方法的契約聲明它不存在,允許{@code null}參數,{@code Assert}可以用來驗證。這樣做就清楚地表明違反了約定發生并保護類的不變量。
通常用于驗證方法參數,而不是配置屬性。
帶着疑問閱讀源碼
BeanA中注入BeanB,或者依賴注解@DependsOn 他們在容器注冊Bean時怎麼确認這個先後順序
getBean、doGetBean、createBean、doCreateBean
banner在哪個環節加載的、加載目錄、檔案名稱
啟動的第一步就是去找banner
// 1. 啟動類的構造方法中
// org.springframework.boot.SpringApplication.run(String...)

    public ConfigurableApplicationContext run(String... args) {
            ...
            Banner printedBanner = printBanner(environment);
            ...
        }
        return context;
    }
// 2. org.springframework.boot.SpringApplication.printBanner(ConfigurableEnvironment)

// 3. org.springframework.boot.SpringApplicationBannerPrinter.print(Environment, Class<?>, PrintStream)

// 4. org.springframework.boot.SpringBootBanner.printBanner(Environment, Class<?>, PrintStream)
// 會有擷取的操作,擷取不到就列印預設的:
// 此方法中會循環列印靜态變量:org.springframework.boot.SpringBootBanner.BANNER,預設就是spring的banner樣式

class SpringBootBanner implements Banner {

    private static final String[] BANNER = { "",
            "  .   ____          _            __ _ _",
            " /\\\\ / ___'_ __ _ _(_)_ __  __ _ \\ \\ \\ \\",
            "( ( )\\___ | '_ | '_| | '_ \\/ _` | \\ \\ \\ \\",
            " \\\\/  ___)| |_)| | | | | || (_| |  ) ) ) )",
            "  '  |____| .__|_| |_|_| |_\\__, | / / / /",
            " =========|_|==============|___/=/_/_/_/" };

    private static final String SPRING_BOOT = " :: Spring Boot :: ";

    private static final int STRAP_LINE_SIZE = 42;

    @Override
    public void printBanner(Environment environment, Class<?> sourceClass,
            PrintStream printStream) {
        for (String line : BANNER) {
            printStream.println(line);
        }
        String version = SpringBootVersion.getVersion();
        version = (version == null ? "" : " (v" + version + ")");
        String padding = "";
        while (padding.length() < STRAP_LINE_SIZE
                - (version.length() + SPRING_BOOT.length())) {
            padding += " ";
        }

        printStream.println(AnsiOutput.toString(AnsiColor.GREEN, SPRING_BOOT,
                AnsiColor.DEFAULT, padding, AnsiStyle.FAINT, version));
        printStream.println();
    }

}
配置檔案從哪讀取的、配置檔案所在位置優先級定義、配置檔案名稱定義、properties/yml的解析邏輯
CSDN說明環境變量配置檔案實作類properties和xml對應一個實作類:
org.springframework.boot.env.PropertiesPropertySourceLoader
yml和yaml對應一個實作類:
org.springframework.boot.env.YamlPropertySourceLoader
國際化如何使用、配置、解析
// Initialize message source for this context.
initMessageSource();
能否理清refresh 方法邏輯走向、子父類關系
org.springframework.context.support.AbstractApplicationContext.refresh()
spring boot預設的server.port為什麼是8080
server.port指定web服務的端口号,隻要是application或者是yml檔案中支援配置的,都會有對應的屬性類進行擷取配置的這些值,擷取到後進行相應設定,所有的配置都有預設值,這從哪展現呢,從spring-boot-hello-world 的程式中不添加application配置檔案或檔案中為空,程式仍然正常啟動
而server.port 對應的屬性類檔案是:
org.springframework.boot.autoconfigure.web.ServerProperties.class
@ConfigurationProperties(prefix = "server", ignoreUnknownFields = true)
加上
@ConfigurationProperties
代表該類是一個屬性檔案類,
prefix
指定該類從配置檔案中解析相關配置的字首,也就是諸如
server.xxx
樣的配置,将都會被它一一對應,比如
server.port
那在該類中就有個
port
字段,如果在配置檔案中配了一個該
server.yyy
,這個yyy在該類中沒有對應的字段綁定,可能會導緻報錯,是以,加上了注解屬性:
ignoreUnknownFields = true
意為忽略未知字段
而當你不配置server.port時,它預設使用8080,是為什麼,來按這個順序看看在spring boot啟動時建立Tomcat的邏輯:
1. org.springframework.context.support.AbstractApplicationContext.onRefresh()

2. org.springframework.boot.web.servlet.context.ServletWebServerApplicationContext.onRefresh()

3. org.springframework.boot.web.servlet.context.ServletWebServerApplicationContext.createWebServer()

4. org.springframework.boot.web.servlet.context.ServletWebServerApplicationContext.getWebServerFactory()

5. 再走到這
// 它根據ConditionalOnClass和ConditionalOnMissingBean來控制是否向容器中注入該Bean,這就是在建立一個Tomcat的
    @Configuration
    @ConditionalOnClass({ Servlet.class, Tomcat.class, UpgradeProtocol.class })
    @ConditionalOnMissingBean(value = ServletWebServerFactory.class, search = SearchStrategy.CURRENT)
    public static class EmbeddedTomcat {

        @Bean
        public TomcatServletWebServerFactory tomcatServletWebServerFactory() {
            return new TomcatServletWebServerFactory();
        }

    }

6. 再後置處理器将applicaiton或yml檔案中有關tomcat的配置給Tomcat設定上
org.springframework.boot.autoconfigure.web.embedded.TomcatWebServerFactoryCustomizer.customize(ConfigurableTomcatWebServerFactory factory)

7. 在此過程中它預設使用的是Tomcat,将會建立一個Tomcat對象,而Tomcat對象中,port字段預設值就是8080 為什麼預設8080,總結為一句話:因為Tomcat端口預設值就是8080
是以一開始的猜測,它是在哪預設配置的,比如通過server.port,不是的
還全局搜尋搜尋到了
/META-INF/spring-configuration-metadata.json
裡面有server.port 描述為8080,其實不是,這是在properties或yml配置檔案中添加配置時的提示來源,看看官方的介紹:
中繼資料官方解釋該提示功能需要在pom.xml中引入依賴:
<dependency>
     <groupId>org.springframework.boot</groupId>
     <artifactId>spring-boot-configuration-processor</artifactId>
     <optional>true</optional>
 </dependency>
精美的類設計
org.springframework.boot.autoconfigure.web.ResourceProperties
它的功能就是從配置檔案中映射spring.resources字首的配置,到這些屬性裡面去,這樣嵌套的靜态内部類
如果讓我寫,我現在也隻知道按類名區分開來寫,但是寫完後,spring.resources就套不了娃了,他這樣可以套娃,用一個類可以支援resources這一類的所有配置,還清晰分層
設計模式
一直以來,設計模式都是面試的高頻詞彙,可能簡單的總是就說單例、工廠等,但是如果想讀懂spring裡面各個功能,比如較為複雜的後置處理器,需要學習設計模式後加上手寫Spring等教程