在PAI-Notebook下訓練DeepFM
應該說,DeepFM是目前最普遍的CTR預估模型之一,對于一個基于CTR預估的推薦系統,最重要的是學習到使用者點選行為背後隐含的特征組合。在不同的推薦場景中,低階組合特征或者高階組合特征可能都會對最終的CTR産生影響。廣度模型(LR/ FM/ FFM)一般隻能學習1階和2階特征組合;而深度模型(FNN/PNN)一般學習的是高階特征組合。而DeepFM模型同時考慮了兩者,先來回顧一下DeepFM的模型結構:
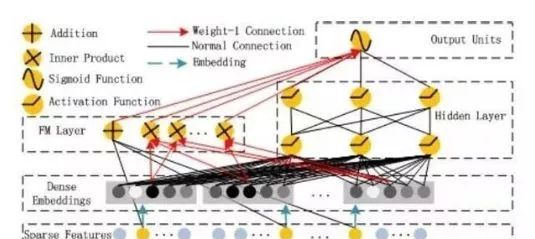
如圖所示,DeepFM包含兩部分:因子分解機(FM)部分與神經網絡部分(DNN),分别負責低階特征的提取和高階特征的提取。這兩部分共享同樣的嵌入層輸入。DeepFM的預測結果可以寫為

資料集
我們先以下面的資料集作為示例
import pandas as pd


TRAIN_FILE = "data/train.csv"
TEST_FILE = "data/test.csv"


NUMERIC_COLS = [
    "ps_reg_01", "ps_reg_02", "ps_reg_03",
    "ps_car_12", "ps_car_13", "ps_car_14", "ps_car_15"
]


IGNORE_COLS = [
    "id", "target",
    "ps_calc_01", "ps_calc_02", "ps_calc_03", "ps_calc_04",
    "ps_calc_05", "ps_calc_06", "ps_calc_07", "ps_calc_08",
    "ps_calc_09", "ps_calc_10", "ps_calc_11", "ps_calc_12",
    "ps_calc_13", "ps_calc_14",
    "ps_calc_15_bin", "ps_calc_16_bin", "ps_calc_17_bin",
    "ps_calc_18_bin", "ps_calc_19_bin", "ps_calc_20_bin"
]


dfTrain = pd.read_csv(TRAIN_FILE)
dfTest = pd.read_csv(TEST_FILE)
如下是資料集展示
接下來,我們将計算出feature-map。這個featrue-map定義了如何将變量的值轉換為其對應的特征索引feature-index。
feature_dict = {}
total_feature = 0
for col in df.columns:
    if col in IGNORE_COLS:
        continue
    elif col in NUMERIC_COLS:
        feature_dict[col] = total_feature
        total_feature += 1
    else:
        unique_val = df[col].unique()
        feature_dict[col] = dict(zip(unique_val,range(total_feature,len(unique_val) + total_feature)))
        total_feature += len(unique_val)
print(total_feature)
print(feature_dict)
如圖所示為feature_dict中包含的feature-index以及feature-value 的對應關系,結果如下
FM實作
下一步,需要将訓練集轉換為新的數組,将每一條資料轉換為對應的feature-index以及feature-value
print(dfTrain.columns)
train_y = dfTrain[['target']].values.tolist()
dfTrain.drop(['target','id'],axis=1,inplace=True)
train_feature_index = dfTrain.copy()
train_feature_value = dfTrain.copy()

for col in train_feature_index.columns:
    if col in IGNORE_COLS:
        train_feature_index.drop(col,axis=1,inplace=True)
        train_feature_value.drop(col,axis=1,inplace=True)
        continue
    elif col in NUMERIC_COLS:
        train_feature_index[col] = feature_dict[col]
    else:
        train_feature_index[col] = train_feature_index[col].map(feature_dict[col])
        train_feature_value[col] = 1
接下來定義模型的一些參數,如學習率、embedding的大小、深度網絡的參數、激活函數等等;并啟動模型訓練,訓練模型的輸入有三個,分别是剛才轉換得到的特征索引和特征值,以及label:
import tensorflow as tf
import numpy as np
"""模型參數"""
dfm_params = {
    "use_fm":True,
    "use_deep":True,
    "embedding_size":8,
    "dropout_fm":[1.0,1.0],
    "deep_layers":[32,32],
    "dropout_deep":[0.5,0.5,0.5],
    "deep_layer_activation":tf.nn.relu,
    "epoch":30,
    "batch_size":1024,
    "learning_rate":0.001,
    "optimizer":"adam",
    "batch_norm":1,
    "batch_norm_decay":0.995,
    "l2_reg":0.01,
    "verbose":True,
    "eval_metric":'gini_norm',
    "random_seed":3
}
dfm_params['feature_size'] = total_feature
dfm_params['field_size'] = len(train_feature_index.columns)

feat_index = tf.placeholder(tf.int32,shape=[None,None],name='feat_index')
feat_value = tf.placeholder(tf.float32,shape=[None,None],name='feat_value')

label = tf.placeholder(tf.float32,shape=[None,1],name='label')
定義好輸入之後 我們可以按照如下的公式,建構FM模型:
如下所示我們将輸入轉為Embedding,這也是FM部分計算時所用到的一次項的權重參數;接下來進行FM計算
"""embedding"""
embeddings = tf.nn.embedding_lookup(weights['feature_embeddings'],feat_index)

reshaped_feat_value = tf.reshape(feat_value,shape=[-1,dfm_params['field_size'],1])

embeddings = tf.multiply(embeddings,reshaped_feat_value)


"""fm part"""
fm_first_order = tf.nn.embedding_lookup(weights['feature_bias'],feat_index)
fm_first_order = tf.reduce_sum(tf.multiply(fm_first_order,reshaped_feat_value),2)

summed_features_emb = tf.reduce_sum(embeddings,1)
summed_features_emb_square = tf.square(summed_features_emb)

squared_features_emb = tf.square(embeddings)
squared_sum_features_emb = tf.reduce_sum(squared_features_emb,1)

fm_second_order = 0.5 * tf.subtract(summed_features_emb_square,squared_sum_features_emb)
Deep
Deep部分很簡單了,就是幾層全連接配接的神經網絡:
y_deep = tf.reshape(embeddings,shape=[-1,dfm_params['field_size'] * dfm_params['embedding_size']])

for i in range(0,len(dfm_params['deep_layers'])):
    y_deep = tf.add(tf.matmul(y_deep,weights["layer_%d" %i]), weights["bias_%d"%i])
    y_deep = tf.nn.relu(y_deep)
最後的輸出部分,論文中的公式如下:
"""final layer"""
if dfm_params['use_fm'] and dfm_params['use_deep']:
    concat_input = tf.concat([fm_first_order,fm_second_order,y_deep],axis=1)
elif dfm_params['use_fm']:
    concat_input = tf.concat([fm_first_order,fm_second_order],axis=1)
elif dfm_params['use_deep']:
    concat_input = y_deep

out = tf.nn.sigmoid(tf.add(tf.matmul(concat_input,weights['concat_projection']),weights['concat_bias']))
至此,我們整個DeepFM模型的架構就搭起來了,接下來,我們可以測試我們的模型結果:
"""train"""
with tf.Session() as sess:
    sess.run(tf.global_variables_initializer())
    for i in range(100):
        epoch_loss,_ = sess.run([loss,optimizer],feed_dict={feat_index:train_feature_index,
                             feat_value:train_feature_value,
                             label:train_y})
        print("epoch %s,loss is %s" % (str(i),str(epoch_loss))
以上為DeepFM的實作部分,整個流程全部在PAI-Nootbook中實作
現在在PAI-Studio中,
https://yq.aliyun.com/articles/742753?spm=a2c4e.11157919.spm-cont-list.8.146cf2042NrSK5也已經支援了FM操作,詳情見,我們與TensorFlow DNN做拼接,也可以實作類似DeepFM的效果;
後續也希望PAI-Studio能夠更靈活的支援子產品定制, 目前僅支援Pyspark spark和Sql, 不支援上傳py代碼