一、Service的概念
運作在Pod中的應用是向用戶端提供服務的守護程序,比如,nginx、tomcat、etcd等等,它們都是受控于控制器的資源對象,存在生命周期,我們知道Pod資源對象在自願或非自願終端後,隻能被重構的Pod對象所替代,屬于不可再生類元件。而在動态和彈性的管理模式下,Service為該類Pod對象提供了一個固定、統一的通路接口和負載均衡能力。是不是覺得一堆話都沒聽明白呢????
其實,就是說Pod存在生命周期,有銷毀,有重建,無法提供一個固定的通路接口給用戶端。并且為了同類的Pod都能夠實作工作負載的價值,由此Service資源出現了,可以為一類Pod資源對象提供一個固定的通路接口和負載均衡,類似于阿裡雲的負載均衡或者是LVS的功能。
但是要知道的是,Service和Pod對象的IP位址,一個是虛拟位址,一個是Pod IP位址,都僅僅在叢集内部可以進行通路,無法接入叢集外部流量。而為了解決該類問題的辦法可以是在單一的節點上做端口暴露(hostPort)以及讓Pod資源共享工作節點的網絡名稱空間(hostNetwork)以外,還可以使用NodePort或者是LoadBalancer類型的Service資源,或者是有7層負載均衡能力的Ingress資源。
Service是Kubernetes的核心資源類型之一,Service資源基于标簽選擇器将一組Pod定義成一個邏輯組合,并通過自己的IP位址和端口排程代理請求到組内的Pod對象,如下圖所示,它向用戶端隐藏了真是的,處理使用者請求的Pod資源,使得從用戶端上看,就像是由Service直接處理并響應一樣,是不是很像負載均衡器呢!
Service對象的IP位址也稱為Cluster IP,它位于為Kubernetes叢集配置指定專用的IP位址範圍之内,是一種虛拟的IP位址,它在Service對象建立之後保持不變,并且能夠被同一叢集中的Pod資源所通路。Service端口用于接受用戶端請求,并将請求轉發至後端的Pod應用的相應端口,這樣的代理機制,也稱為端口代理,它是基于TCP/IP 協定棧的傳輸層。
二、Service的實作模型
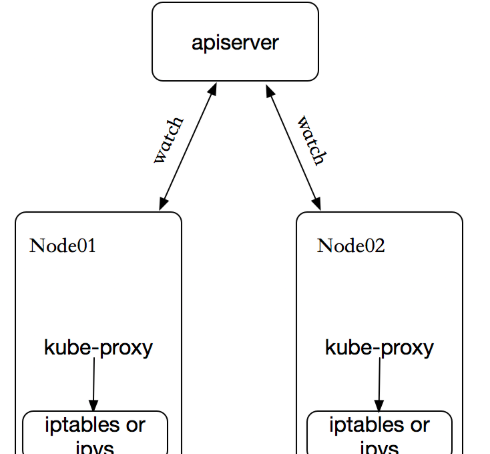
在 Kubernetes 叢集中,每個 Node 運作一個
kube-proxy
程序。
kube-proxy
負責為
Service
實作了一種 VIP(虛拟 IP)的形式,而不是
ExternalName
的形式。 在 Kubernetes v1.0 版本,代理完全在 userspace。在 Kubernetes v1.1 版本,新增了 iptables 代理,但并不是預設的運作模式。 從 Kubernetes v1.2 起,預設就是 iptables 代理。在Kubernetes v1.8.0-beta.0中,添加了ipvs代理。在 Kubernetes v1.0 版本,
Service
是 “4層”(TCP/UDP over IP)概念。 在 Kubernetes v1.1 版本,新增了
Ingress
API(beta 版),用來表示 “7層”(HTTP)服務。
kube-proxy 這個元件始終監視着apiserver中有關service的變動資訊,擷取任何一個與service資源相關的變動狀态,通過watch監視,一旦有service資源相關的變動和建立,kube-proxy都要轉換為目前節點上的能夠實作資源排程規則(例如:iptables、ipvs)
2.1、userspace代理模式
這種模式,當用戶端Pod請求核心空間的service iptables後,把請求轉到給使用者空間監聽的kube-proxy 的端口,由kube-proxy來處理後,再由kube-proxy将請求轉給核心空間的 service ip,再由service iptalbes根據請求轉給各節點中的的service pod。
由此可見這個模式有很大的問題,由用戶端請求先進入核心空間的,又進去使用者空間通路kube-proxy,由kube-proxy封裝完成後再進去核心空間的iptables,再根據iptables的規則分發給各節點的使用者空間的pod。這樣流量從使用者空間進出核心帶來的性能損耗是不可接受的。在Kubernetes 1.1版本之前,userspace是預設的代理模型。

2.2、 iptables代理模式
用戶端IP請求時,直接請求本地核心service ip,根據iptables的規則直接将請求轉發到到各pod上,因為使用iptable NAT來完成轉發,也存在不可忽視的性能損耗。另外,如果叢集中存在上萬的Service/Endpoint,那麼Node上的iptables rules将會非常龐大,性能還會再打折扣。iptables代理模式由Kubernetes 1.1版本引入,自1.2版本開始成為預設類型。
2.3、ipvs代理模式
Kubernetes自1.9-alpha版本引入了ipvs代理模式,自1.11版本開始成為預設設定。用戶端IP請求時到達核心空間時,根據ipvs的規則直接分發到各pod上。kube-proxy會監視Kubernetes
Service
對象和
Endpoints
,調用
netlink
接口以相應地建立ipvs規則并定期與Kubernetes
Service
Endpoints
對象同步ipvs規則,以確定ipvs狀态與期望一緻。通路服務時,流量将被重定向到其中一個後端Pod。
與iptables類似,ipvs基于netfilter 的 hook 功能,但使用哈希表作為底層資料結構并在核心空間中工作。這意味着ipvs可以更快地重定向流量,并且在同步代理規則時具有更好的性能。此外,ipvs為負載均衡算法提供了更多選項,例如:
- rr:
輪詢排程
- lc:最小連接配接數
-
dh
-
sh
-
sed
-
nq
注意: ipvs模式假定在運作kube-proxy之前在節點上都已經安裝了IPVS核心子產品。當kube-proxy以ipvs代理模式啟動時,kube-proxy将驗證節點上是否安裝了IPVS子產品,如果未安裝,則kube-proxy将回退到iptables代理模式。
如果某個服務後端pod發生變化,标簽選擇器适應的pod有多一個,适應的資訊會立即反映到apiserver上,而kube-proxy一定可以watch到etc中的資訊變化,而将它立即轉為ipvs或者iptables中的規則,這一切都是動态和實時的,删除一個pod也是同樣的原理。如圖:
三、Service的定義
3.1、清單建立Service
1 [root@k8s-master ~]# kubectl explain svc
 2 KIND:     Service
 3 VERSION:  v1
 4
 5 DESCRIPTION:
 6      Service is a named abstraction of software service (for example, mysql)
 7      consisting of local port (for example 3306) that the proxy listens on, and
 8      the selector that determines which pods will answer requests sent through
 9      the proxy.
10
11 FIELDS:
12    apiVersion    <string>
13      APIVersion defines the versioned schema of this representation of an
14      object. Servers should convert recognized schemas to the latest internal
15      value, and may reject unrecognized values. More info:
16      https://git.k8s.io/community/contributors/devel/api-conventions.md#resources
17
18    kind    <string>
19      Kind is a string value representing the REST resource this object
20      represents. Servers may infer this from the endpoint the client submits
21      requests to. Cannot be updated. In CamelCase. More info:
22      https://git.k8s.io/community/contributors/devel/api-conventions.md#types-kinds
23
24    metadata    <Object>
25      Standard object's metadata. More info:
26      https://git.k8s.io/community/contributors/devel/api-conventions.md#metadata
27
28    spec    <Object>
29      Spec defines the behavior of a service.
30      https://git.k8s.io/community/contributors/devel/api-conventions.md#spec-and-status
31
32    status    <Object>
33      Most recently observed status of the service. Populated by the system.
34      Read-only. More info:
35      https://git.k8s.io/community/contributors/devel/api-conventions.md#spec-and-status
View Code
其中重要的4個字段:
apiVersion:
kind:
metadata:
spec:
clusterIP: 可以自定義,也可以動态配置設定
ports:(與後端容器端口關聯)
selector:(關聯到哪些pod資源上)
type:服務類型
3.2、service的類型
對一些應用(如 Frontend)的某些部分,可能希望通過外部(Kubernetes 叢集外部)IP 位址暴露 Service。
Kubernetes
ServiceTypes
允許指定一個需要的類型的 Service,預設是
ClusterIP
類型。
Type
的取值以及行為如下:
-
ClusterIP
ServiceType
-
NodePort
NodePort
NodePort
ClusterIP
ClusterIP
<NodeIP>:<NodePort>
NodePort
-
LoadBalancer
NodePort
ClusterIP
-
ExternalName
CNAME
externalName
foo.bar.example.com
kube-dns
3.2.1、ClusterIP的service類型示範:
[root@k8s-master mainfests]# cat redis-svc.yaml
apiVersion: v1
kind: Service
metadata:
  name: redis
  namespace: default
spec:
  selector:  #标簽選擇器,必須指定pod資源本身的标簽
    app: redis
    role: logstor
  type: ClusterIP  #指定服務類型為ClusterIP
  ports:   #指定端口
  - port: 6379  #暴露給服務的端口
  - targetPort: 6379  #容器的端口
[root@k8s-master mainfests]# kubectl apply -f redis-svc.yaml
service/redis created
[root@k8s-master mainfests]# kubectl get svc
NAME         TYPE        CLUSTER-IP       EXTERNAL-IP   PORT(S)    AGE
kubernetes   ClusterIP   10.96.0.1        <none>        443/TCP    36d
redis        ClusterIP   10.107.238.182   <none>        6379/TCP   1m

[root@k8s-master mainfests]# kubectl describe svc redis
Name:              redis
Namespace:         default
Labels:            <none>
Annotations:       kubectl.kubernetes.io/last-applied-configuration={"apiVersion":"v1","kind":"Service","metadata":{"annotations":{},"name":"redis","namespace":"default"},"spec":{"ports":[{"port":6379,"targetPort":6379}...
Selector:          app=redis,role=logstor
Type:              ClusterIP
IP:                10.107.238.182  #service ip
Port:              <unset>  6379/TCP
TargetPort:        6379/TCP
Endpoints:         10.244.1.16:6379  #此處的ip+端口就是pod的ip+端口
Session Affinity:  None
Events:            <none>

[root@k8s-master mainfests]# kubectl get pod redis-5b5d6fbbbd-v82pw -o wide
NAME                     READY     STATUS    RESTARTS   AGE       IP            NODE
redis-5b5d6fbbbd-v82pw   1/1       Running   0          20d       10.244.1.16   k8s-node01
從上示範可以總結出:service不會直接到pod,service是直接到endpoint資源,就是位址加端口,再由endpoint再關聯到pod。
service隻要建立完,就會在dns中添加一個資源記錄進行解析,添加完成即可進行解析。資源記錄的格式為:SVC_NAME.NS_NAME.DOMAIN.LTD.
預設的叢集service 的A記錄:svc.cluster.local.
redis服務建立的A記錄:redis.default.svc.cluster.local.
3.2.2、NodePort的service類型示範:
NodePort即節點Port,通常在部署Kubernetes叢集系統時會預留一個端口範圍用于NodePort,其範圍預設為:30000~32767之間的端口。定義NodePort類型的Service資源時,需要使用.spec.type進行明确指定。
[root@k8s-master mainfests]# kubectl get pods --show-labels |grep myapp-deploy
myapp-deploy-69b47bc96d-4hxxw   1/1       Running   0          12m       app=myapp,pod-template-hash=2560367528,release=canary
myapp-deploy-69b47bc96d-95bc4   1/1       Running   0          12m       app=myapp,pod-template-hash=2560367528,release=canary
myapp-deploy-69b47bc96d-hwbzt   1/1       Running   0          12m       app=myapp,pod-template-hash=2560367528,release=canary
myapp-deploy-69b47bc96d-pjv74   1/1       Running   0          12m       app=myapp,pod-template-hash=2560367528,release=canary
myapp-deploy-69b47bc96d-rf7bs   1/1       Running   0          12m       app=myapp,pod-template-hash=2560367528,release=canary

[root@k8s-master mainfests]# cat myapp-svc.yaml #為myapp建立service
apiVersion: v1
kind: Service
metadata:
  name: myapp
  namespace: default
spec:
  selector:
    app: myapp
    release: canary
  type: NodePort
  ports:
  - port: 80
    targetPort: 80
    nodePort: 30080
[root@k8s-master mainfests]# kubectl apply -f myapp-svc.yaml
service/myapp created
[root@k8s-master mainfests]# kubectl get svc
NAME         TYPE        CLUSTER-IP       EXTERNAL-IP   PORT(S)        AGE
kubernetes   ClusterIP   10.96.0.1        <none>        443/TCP        36d
myapp        NodePort    10.101.245.119   <none>        80:30080/TCP   5s
redis        ClusterIP   10.107.238.182   <none>        6379/TCP       28m

[root@k8s-master mainfests]# while true;do curl http://192.168.56.11:30080/hostname.html;sleep 1;done
myapp-deploy-69b47bc96d-95bc4
myapp-deploy-69b47bc96d-4hxxw
myapp-deploy-69b47bc96d-pjv74
myapp-deploy-69b47bc96d-rf7bs
myapp-deploy-69b47bc96d-95bc4
myapp-deploy-69b47bc96d-rf7bs
myapp-deploy-69b47bc96d-95bc4
myapp-deploy-69b47bc96d-pjv74
myapp-deploy-69b47bc96d-4hxxw
myapp-deploy-69b47bc96d-pjv74
myapp-deploy-69b47bc96d-pjv74
myapp-deploy-69b47bc96d-4hxxw
myapp-deploy-69b47bc96d-pjv74
myapp-deploy-69b47bc96d-pjv74
myapp-deploy-69b47bc96d-pjv74
myapp-deploy-69b47bc96d-95bc4
myapp-deploy-69b47bc96d-hwbzt

[root@k8s-master mainfests]# while true;do curl http://192.168.56.11:30080/;sleep 1;done
Hello MyApp | Version: v1 | <a href="hostname.html">Pod Name</a>
從以上例子,可以看到通過NodePort方式已經實作了從叢集外部端口進行通路,通路連結如下:http://192.168.56.11:30080/。實踐中并不鼓勵使用者自定義使用節點的端口,因為容易和其他現存的Service沖突,建議留給系統自動配置。
3.2.3、Pod的會話保持
Service資源還支援Session affinity(粘性會話)機制,可以将來自同一個用戶端的請求始終轉發至同一個後端的Pod對象,這意味着它會影響排程算法的流量分發功用,進而降低其負載均衡的效果。是以,當用戶端通路Pod中的應用程式時,如果有基于用戶端身份儲存某些私有資訊,并基于這些私有資訊追蹤使用者的活動等一類的需求時,那麼應該啟用session affinity機制。
Service affinity的效果僅僅在一段時間内生效,預設值為10800秒,超出時長,用戶端再次通路會重新排程。該機制僅能基于用戶端IP位址識别用戶端身份,它會将經由同一個NAT伺服器進行原位址轉換的所有用戶端識别為同一個用戶端,由此可知,其排程的效果并不理想。Service 資源 通過. spec. sessionAffinity 和. spec. sessionAffinityConfig 兩個字段配置粘性會話。 spec. sessionAffinity 字段用于定義要使用的粘性會話的類型,它僅支援使用“ None” 和“ ClientIP” 兩種屬性值。如下:
[root@k8s-master mainfests]# kubectl explain svc.spec.sessionAffinity
KIND:     Service
VERSION:  v1

FIELD:    sessionAffinity <string>

DESCRIPTION:
     Supports "ClientIP" and "None". Used to maintain session affinity. Enable
     client IP based session affinity. Must be ClientIP or None. Defaults to
     None. More info:
     https://kubernetes.io/docs/concepts/services-networking/service/#virtual-ips-and-service-proxies
sessionAffinity支援ClientIP和None 兩種方式,預設是None(随機排程) ClientIP是來自于同一個用戶端的請求排程到同一個pod中
[root@k8s-master mainfests]# vim myapp-svc.yaml
apiVersion: v1
kind: Service
metadata:
  name: myapp
  namespace: default
spec:
  selector:
    app: myapp
    release: canary
  sessionAffinity: ClientIP
  type: NodePort
  ports:
  - port: 80
    targetPort: 80
    nodePort: 30080
[root@k8s-master mainfests]# kubectl apply -f myapp-svc.yaml
service/myapp configured
[root@k8s-master mainfests]# kubectl describe svc myapp
Name:                     myapp
Namespace:                default
Labels:                   <none>
Annotations:              kubectl.kubernetes.io/last-applied-configuration={"apiVersion":"v1","kind":"Service","metadata":{"annotations":{},"name":"myapp","namespace":"default"},"spec":{"ports":[{"nodePort":30080,"port":80,"ta...
Selector:                 app=myapp,release=canary
Type:                     NodePort
IP:                       10.101.245.119
Port:                     <unset>  80/TCP
TargetPort:               80/TCP
NodePort:                 <unset>  30080/TCP
Endpoints:                10.244.1.18:80,10.244.1.19:80,10.244.2.15:80 + 2 more...
Session Affinity:         ClientIP
External Traffic Policy:  Cluster
Events:                   <none>
[root@k8s-master mainfests]# while true;do curl http://192.168.56.11:30080/hostname.html;sleep 1;done
myapp-deploy-69b47bc96d-hwbzt
myapp-deploy-69b47bc96d-hwbzt
myapp-deploy-69b47bc96d-hwbzt
myapp-deploy-69b47bc96d-hwbzt
myapp-deploy-69b47bc96d-hwbzt
myapp-deploy-69b47bc96d-hwbzt
myapp-deploy-69b47bc96d-hwbzt
myapp-deploy-69b47bc96d-hwbzt
也可以使用打更新檔的方式進行修改yaml内的内容,如下:
kubectl patch svc myapp -p '{"spec":{"sessionAffinity":"ClusterIP"}}'  #session保持,同一ip通路同一個pod

kubectl patch svc myapp -p '{"spec":{"sessionAffinity":"None"}}'    #取消session
四、Headless Service
有時不需要或不想要負載均衡,以及單獨的 Service IP。 遇到這種情況,可以通過指定 Cluster IP(
spec.clusterIP
)的值為
"None"
來建立
Headless
Service。
這個選項允許開發人員自由尋找他們自己的方式,進而降低與 Kubernetes 系統的耦合性。 應用仍然可以使用一種自注冊的模式和擴充卡,對其它需要發現機制的系統能夠很容易地基于這個 API 來建構。
對這類
Service
并不會配置設定 Cluster IP,kube-proxy 不會處理它們,而且平台也不會為它們進行負載均衡和路由。 DNS 如何實作自動配置,依賴于
Service
是否定義了 selector。
(1)編寫headless service配置清單
[root@k8s-master mainfests]# cp myapp-svc.yaml myapp-svc-headless.yaml
[root@k8s-master mainfests]# vim myapp-svc-headless.yaml
apiVersion: v1
kind: Service
metadata:
  name: myapp-headless
  namespace: default
spec:
  selector:
    app: myapp
    release: canary
  clusterIP: "None"  #headless的clusterIP值為None
  ports:
  - port: 80
    targetPort: 80

(2)建立headless service
[root@k8s-master mainfests]# kubectl apply -f myapp-svc-headless.yaml
service/myapp-headless created
[root@k8s-master mainfests]# kubectl get svc
NAME             TYPE        CLUSTER-IP       EXTERNAL-IP   PORT(S)        AGE
kubernetes       ClusterIP   10.96.0.1        <none>        443/TCP        36d
myapp            NodePort    10.101.245.119   <none>        80:30080/TCP   1h
myapp-headless   ClusterIP   None             <none>        80/TCP         5s
redis            ClusterIP   10.107.238.182   <none>        6379/TCP       2h

(3)使用coredns進行解析驗證
[root@k8s-master mainfests]# dig -t A myapp-headless.default.svc.cluster.local. @10.96.0.10

; <<>> DiG 9.9.4-RedHat-9.9.4-61.el7 <<>> -t A myapp-headless.default.svc.cluster.local. @10.96.0.10
;; global options: +cmd
;; Got answer:
;; ->>HEADER<<- opcode: QUERY, status: NOERROR, id: 62028
;; flags: qr aa rd ra; QUERY: 1, ANSWER: 5, AUTHORITY: 0, ADDITIONAL: 1

;; OPT PSEUDOSECTION:
; EDNS: version: 0, flags:; udp: 4096
;; QUESTION SECTION:
;myapp-headless.default.svc.cluster.local. IN A

;; ANSWER SECTION:
myapp-headless.default.svc.cluster.local. 5 IN A 10.244.1.18
myapp-headless.default.svc.cluster.local. 5 IN A 10.244.1.19
myapp-headless.default.svc.cluster.local. 5 IN A 10.244.2.15
myapp-headless.default.svc.cluster.local. 5 IN A 10.244.2.16
myapp-headless.default.svc.cluster.local. 5 IN A 10.244.2.17

;; Query time: 4 msec
;; SERVER: 10.96.0.10#53(10.96.0.10)
;; WHEN: Thu Sep 27 04:27:15 EDT 2018
;; MSG SIZE  rcvd: 349

[root@k8s-master mainfests]# kubectl get svc -n kube-system
NAME       TYPE        CLUSTER-IP   EXTERNAL-IP   PORT(S)         AGE
kube-dns   ClusterIP   10.96.0.10   <none>        53/UDP,53/TCP   36d

[root@k8s-master mainfests]# kubectl get pods -o wide -l app=myapp
NAME                            READY     STATUS    RESTARTS   AGE       IP            NODE
myapp-deploy-69b47bc96d-4hxxw   1/1       Running   0          1h        10.244.1.18   k8s-node01
myapp-deploy-69b47bc96d-95bc4   1/1       Running   0          1h        10.244.2.16   k8s-node02
myapp-deploy-69b47bc96d-hwbzt   1/1       Running   0          1h        10.244.1.19   k8s-node01
myapp-deploy-69b47bc96d-pjv74   1/1       Running   0          1h        10.244.2.15   k8s-node02
myapp-deploy-69b47bc96d-rf7bs   1/1       Running   0          1h        10.244.2.17   k8s-node02

(4)對比含有ClusterIP的service解析
[root@k8s-master mainfests]# dig -t A myapp.default.svc.cluster.local. @10.96.0.10

; <<>> DiG 9.9.4-RedHat-9.9.4-61.el7 <<>> -t A myapp.default.svc.cluster.local. @10.96.0.10
;; global options: +cmd
;; Got answer:
;; ->>HEADER<<- opcode: QUERY, status: NOERROR, id: 50445
;; flags: qr aa rd ra; QUERY: 1, ANSWER: 1, AUTHORITY: 0, ADDITIONAL: 1

;; OPT PSEUDOSECTION:
; EDNS: version: 0, flags:; udp: 4096
;; QUESTION SECTION:
;myapp.default.svc.cluster.local. IN    A

;; ANSWER SECTION:
myapp.default.svc.cluster.local. 5 IN    A    10.101.245.119

;; Query time: 1 msec
;; SERVER: 10.96.0.10#53(10.96.0.10)
;; WHEN: Thu Sep 27 04:31:16 EDT 2018
;; MSG SIZE  rcvd: 107

[root@k8s-master mainfests]# kubectl get svc
NAME             TYPE        CLUSTER-IP       EXTERNAL-IP   PORT(S)        AGE
kubernetes       ClusterIP   10.96.0.1        <none>        443/TCP        36d
myapp            NodePort    10.101.245.119   <none>        80:30080/TCP   1h
myapp-headless   ClusterIP   None             <none>        80/TCP         11m
redis            ClusterIP   10.107.238.182   <none>        6379/TCP       2h
從以上的示範可以看到對比普通的service和headless service,headless service做dns解析是直接解析到pod的,而servcie是解析到ClusterIP的,那麼headless有什麼用呢???這将在statefulset中應用到,這裡暫時僅僅做了解什麼是headless service和建立方法。
Don't forget the beginner's mind