Kubernetes 是什麼
Kubernetes 是一個開源的,用于管理雲平台中多個主機上的容器化的應用,Kubernetes 的目标是讓部署容器化的應用簡單并且高效,Kubernetes 提供了應用部署,規劃,更新,維護的一種機制。
Kubernetes 在設計結構上定義了一系列的構模組化塊,其目的是為了提供一個可以部署、維護和擴充應用程式的機制,組成 Kubernetes 的元件設計概念為松耦合和可擴充的,這樣可以使之滿足多種不同的工作負載。可擴充性在很大程度上由 Kubernetes
API 提供,此 API 主要被作為擴充的内部元件以及 Kubernetes 上運作的容器來使用。
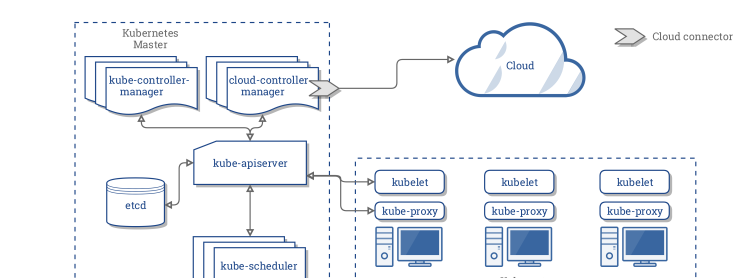
Kubernetes 主要由以下幾個核心元件組成:
-
etcd
-
apiserver
-
controller manager
-
scheduler
-
kubelet
-
Container runtime
-
kube-proxy
除了核心元件,還有一些推薦的 Add-ons:
-
kube-dns
-
Ingress Controller
-
Heapster
-
Dashboard
-
Federation
-
Fluentd-elasticsearch
Kubernetes 和資料庫
資料庫容器化是最近的一大熱點,那麼 Kubernetes 能為資料庫帶來什麼好處呢?
- 故障恢複: Kubernetes 提供故障恢複的功能,資料庫應用如果宕掉,Kubernetes 可以将其自動重新開機,或者将資料庫執行個體遷移到叢集中其他節點上
- 存儲管理: Kubernetes 提供了豐富的存儲接入方案,資料庫應用能透明地使用不同類型的存儲系統
- 負載均衡: Kubernetes Service 提供負載均衡功能,能将外部通路平攤給不同的資料庫執行個體副本上
- 水準拓展: Kubernetes 可以根據目前資料庫叢集的資源使用率情況,縮放副本數目,進而提升資源的使用率
目前很多資料庫,如:MySQL,MongoDB 和 TiDB 在 Kubernetes 叢集中都能運作很良好。
Nebula Graph在Kubernetes中的實踐
Nebula Graph 是一個分布式的開源圖資料庫,主要元件有:Query Engine 的 graphd,資料存儲的 storaged,和中繼資料的 meted。在 Kubernetes 實踐過程中,它主要給圖資料庫 Nebula Graph 帶來了以下的好處:
- Kubernetes 能分攤 nebula graphd,metad 和 storaged 不副本之間的負載。graphd,metad 和 storaged 可以通過 Kubernetes 的域名服務自動發現彼此。
- 通過 storageclass,pvc 和 pv 可以屏蔽底層存儲細節,無論使用本地卷還是雲盤,Kubernetes 均可以屏蔽這些細節。
- 通過 Kubernetes 可以在幾秒内成功部署一套 Nebula 叢集,Kubernetes 也可以無感覺地實作 Nebula 叢集的更新。
- Nebula 叢集通過 Kubernetes 可以做到自我恢複,單體副本 crash,Kubernetes 可以重新将其拉起,無需運維人員介入。
- Kubernetes 可以根據目前 Nebula 叢集的資源使用率情況水準伸縮 Nebula 叢集,進而提供叢集的性能。
下面來講解下具體的實踐内容。
叢集部署
硬體和軟體要求
這裡主要羅列下本文部署涉及到的機器、作業系統參數
- 作業系統使用的 CentOS-7.6.1810 x86_64
- 虛拟機配置
- 4 CPU
- 8G 記憶體
- 50G 系統盤
- 50G 資料盤A
- 50G 資料盤B
- Kubernetes 叢集版本 v1.16
- Nebula 版本為 v1.0.0-rc3
- 使用本地 PV 作為資料存儲
kubernetes 叢集規劃
以下為叢集清單
| 伺服器 IP | nebula 執行個體 | role |
|---|---|---|
| 192.168.0.1 | k8s-master | |
| 192.168.0.2 | graphd, metad-0, storaged-0 | k8s-slave |
| 192.168.0.3 | graphd, metad-1, storaged-1 | |
| 192.168.0.4 | graphd, metad-2, storaged-2 |
Kubernetes 待部署元件
- 安裝 Helm
- 準備本地磁盤,并安裝本地卷插件
- 安裝 nebula 叢集
- 安裝 ingress-controller
Helm 是 Kubernetes 叢集上的包管理工具,類似 CentOS 上的 yum,Ubuntu 上的 apt-get。使用 Helm 可以極大地降低使用 Kubernetes 部署應用的門檻。由于本篇文章不做 Helm 詳細介紹,有興趣的小夥伴可自行閱讀
《Helm 入門指南》下載下傳安裝Helm
使用下面指令在終端執行即可安裝 Helm
[root@nebula ~]# wget https://get.helm.sh/helm-v3.0.1-linux-amd64.tar.gz
[root@nebula ~]# tar -zxvf helm/helm-v3.0.1-linux-amd64.tgz
[root@nebula ~]# mv linux-amd64/helm /usr/bin/helm
[root@nebula ~]# chmod +x /usr/bin/helm
檢視 Helm 版本
執行
helm version
指令即可檢視對應的 Helm 版本,以文本為例,以下為輸出結果:
version.BuildInfo{
    Version:"v3.0.1",
    GitCommit:"7c22ef9ce89e0ebeb7125ba2ebf7d421f3e82ffa",
    GitTreeState:"clean",
    GoVersion:"go1.13.4"
}
設定本地磁盤
在每台機器上做如下配置
建立 mount 目錄
[root@nebula ~]# sudo mkdir -p /mnt/disks 格式化資料盤
[root@nebula ~]# sudo mkfs.ext4 /dev/diskA
[root@nebula ~]# sudo mkfs.ext4 /dev/diskB
挂載資料盤
[root@nebula ~]# DISKA_UUID=$(blkid -s UUID -o value /dev/diskA)
[root@nebula ~]# DISKB_UUID=$(blkid -s UUID -o value /dev/diskB)
[root@nebula ~]# sudo mkdir /mnt/disks/$DISKA_UUID
[root@nebula ~]# sudo mkdir /mnt/disks/$DISKB_UUID
[root@nebula ~]# sudo mount -t ext4 /dev/diskA /mnt/disks/$DISKA_UUID
[root@nebula ~]# sudo mount -t ext4 /dev/diskB /mnt/disks/$DISKB_UUID

[root@nebula ~]# echo UUID=`sudo blkid -s UUID -o value /dev/diskA` /mnt/disks/$DISKA_UUID ext4 defaults 0 2 | sudo tee -a /etc/fstab
[root@nebula ~]# echo UUID=`sudo blkid -s UUID -o value /dev/diskB` /mnt/disks/$DISKB_UUID ext4 defaults 0 2 | sudo tee -a /etc/fstab
部署本地卷插件
[root@nebula ~]# curl https://github.com/kubernetes-sigs/sig-storage-local-static-provisioner/archive/v2.3.3.zip
[root@nebula ~]# unzip v2.3.3.zip
修改 v2.3.3/helm/provisioner/values.yaml
#
# Common options.
#
common:
  #
  # Defines whether to generate service account and role bindings.
  #
  rbac: true
  #
  # Defines the namespace where provisioner runs
  #
  namespace: default
  #
  # Defines whether to create provisioner namespace
  #
  createNamespace: false
  #
  # Beta PV.NodeAffinity field is used by default. If running against pre-1.10
  # k8s version, the `useAlphaAPI` flag must be enabled in the configMap.
  #
  useAlphaAPI: false
  #
  # Indicates if PVs should be dependents of the owner Node.
  #
  setPVOwnerRef: false
  #
  # Provisioner clean volumes in process by default. If set to true, provisioner
  # will use Jobs to clean.
  #
  useJobForCleaning: false
  #
  # Provisioner name contains Node.UID by default. If set to true, the provisioner
  # name will only use Node.Name.
  #
  useNodeNameOnly: false
  #
  # Resync period in reflectors will be random between minResyncPeriod and
  # 2*minResyncPeriod. Default: 5m0s.
  #
  #minResyncPeriod: 5m0s
  #
  # Defines the name of configmap used by Provisioner
  #
  configMapName: "local-provisioner-config"
  #
  # Enables or disables Pod Security Policy creation and binding
  #
  podSecurityPolicy: false
#
# Configure storage classes.
#
classes:
- name: fast-disks # Defines name of storage classe.
  # Path on the host where local volumes of this storage class are mounted
  # under.
  hostDir: /mnt/fast-disks
  # Optionally specify mount path of local volumes. By default, we use same
  # path as hostDir in container.
  # mountDir: /mnt/fast-disks
  # The volume mode of created PersistentVolume object. Default to Filesystem
  # if not specified.
  volumeMode: Filesystem
  # Filesystem type to mount.
  # It applies only when the source path is a block device,
  # and desire volume mode is Filesystem.
  # Must be a filesystem type supported by the host operating system.
  fsType: ext4
  blockCleanerCommand:
  #  Do a quick reset of the block device during its cleanup.
  #  - "/scripts/quick_reset.sh"
  #  or use dd to zero out block dev in two iterations by uncommenting these lines
  #  - "/scripts/dd_zero.sh"
  #  - "2"
  # or run shred utility for 2 iteration.s
     - "/scripts/shred.sh"
     - "2"
  # or blkdiscard utility by uncommenting the line below.
  #  - "/scripts/blkdiscard.sh"
  # Uncomment to create storage class object with default configuration.
  # storageClass: true
  # Uncomment to create storage class object and configure it.
  # storageClass:
    # reclaimPolicy: Delete # Available reclaim policies: Delete/Retain, defaults: Delete.
    # isDefaultClass: true # set as default class

#
# Configure DaemonSet for provisioner.
#
daemonset:
  #
  # Defines the name of a Provisioner
  #
  name: "local-volume-provisioner"
  #
  # Defines Provisioner's image name including container registry.
  #
  image: quay.io/external_storage/local-volume-provisioner:v2.3.3
  #
  # Defines Image download policy, see kubernetes documentation for available values.
  #
  #imagePullPolicy: Always
  #
  # Defines a name of the service account which Provisioner will use to communicate with API server.
  #
  serviceAccount: local-storage-admin
  #
  # Defines a name of the Pod Priority Class to use with the Provisioner DaemonSet
  #
  # Note that if you want to make it critical, specify "system-cluster-critical"
  # or "system-node-critical" and deploy in kube-system namespace.
  # Ref: https://k8s.io/docs/tasks/administer-cluster/guaranteed-scheduling-critical-addon-pods/#marking-pod-as-critical
  #
  #priorityClassName: system-node-critical
  # If configured, nodeSelector will add a nodeSelector field to the DaemonSet PodSpec.
  #
  # NodeSelector constraint for local-volume-provisioner scheduling to nodes.
  # Ref: https://kubernetes.io/docs/concepts/configuration/assign-pod-node/#nodeselector
  nodeSelector: {}
  #
  # If configured KubeConfigEnv will (optionally) specify the location of kubeconfig file on the node.
  #  kubeConfigEnv: KUBECONFIG
  #
  # List of node labels to be copied to the PVs created by the provisioner in a format:
  #
  #  nodeLabels:
  #    - failure-domain.beta.kubernetes.io/zone
  #    - failure-domain.beta.kubernetes.io/region
  #
  # If configured, tolerations will add a toleration field to the DaemonSet PodSpec.
  #
  # Node tolerations for local-volume-provisioner scheduling to nodes with taints.
  # Ref: https://kubernetes.io/docs/concepts/configuration/taint-and-toleration/
  tolerations: []
  #
  # If configured, resources will set the requests/limits field to the Daemonset PodSpec.
  # Ref: https://kubernetes.io/docs/concepts/configuration/manage-compute-resources-container/
  resources: {}
#
# Configure Prometheus monitoring
#
prometheus:
  operator:
    ## Are you using Prometheus Operator?
    enabled: false

    serviceMonitor:
      ## Interval at which Prometheus scrapes the provisioner
      interval: 10s

      # Namespace Prometheus is installed in
      namespace: monitoring

      ## Defaults to whats used if you follow CoreOS [Prometheus Install Instructions](https://github.com/coreos/prometheus-operator/tree/master/helm#tldr)
      ## [Prometheus Selector Label](https://github.com/coreos/prometheus-operator/blob/master/helm/prometheus/templates/prometheus.yaml#L65)
      ## [Kube Prometheus Selector Label](https://github.com/coreos/prometheus-operator/blob/master/helm/kube-prometheus/values.yaml#L298)
      selector:
        prometheus: kube-prometheus
将
hostDir: /mnt/fast-disks
改成
hostDir: /mnt/disks
# storageClass: true
storageClass: true
然後執行:
#安裝
[root@nebula ~]# helm install local-static-provisioner v2.3.3/helm/provisioner
#檢視local-static-provisioner部署情況
[root@nebula ~]# helm list
部署 nebula 叢集
下載下傳 nebula helm-chart 包
# 下載下傳nebula
[root@nebula ~]# wget https://github.com/vesoft-inc/nebula/archive/master.zip
# 解壓
[root@nebula ~]# unzip master.zip
設定 Kubernetes slave 節點
下面是 Kubernetes 節點清單,我們需要設定 slave 節點的排程标簽。可以将 _192.168.0.2_,_192.168.0.3_,_192.168.0.4_ 打上 nebula: "yes" 的标簽。
| kubernetes roles | nodeName | |
|---|---|---|
| master | ||
| worker | ||
具體操作如下:
[root@nebula ~]# kubectl  label node 192.168.0.2 nebula="yes" --overwrite
[root@nebula ~]# kubectl  label node 192.168.0.3 nebula="yes" --overwrite
[root@nebula ~]# kubectl  label node 192.168.0.4 nebula="yes" --overwrite
調整 nebula helm chart 預設的 values 值
nebula helm-chart 包目錄如下:
master/kubernetes/
└── helm
    ├── Chart.yaml
    ├── templates
    │   ├── configmap.yaml
    │   ├── deployment.yaml
    │   ├── _helpers.tpl
    │   ├── ingress-configmap.yaml\
    │   ├── NOTES.txt
    │   ├── pdb.yaml
    │   ├── service.yaml
    │   └── statefulset.yaml
    └── values.yaml

2 directories, 10 files
我們需要調整
master/kubernetes/values.yaml
裡面的 MetadHosts 的值,将這個 IP List 替換本環境的 3 個 k8s worker 的 ip。
MetadHosts:
  - 192.168.0.2:44500
  - 192.168.0.3:44500
  - 192.168.0.4:44500
通過 helm 安裝 nebula
# 安裝
[root@nebula ~]# helm install nebula master/kubernetes/helm
# 檢視
[root@nebula ~]# helm status nebula
# 檢視k8s叢集上nebula部署情況
[root@nebula ~]# kubectl get pod  | grep nebula
nebula-graphd-579d89c958-g2j2c                   1/1     Running            0          1m
nebula-graphd-579d89c958-p7829                   1/1     Running            0          1m
nebula-graphd-579d89c958-q74zx                   1/1     Running            0          1m
nebula-metad-0                                   1/1     Running            0          1m
nebula-metad-1                                   1/1     Running            0          1m
nebula-metad-2                                   1/1     Running            0          1m
nebula-storaged-0                                1/1     Running            0          1m
nebula-storaged-1                                1/1     Running            0          1m
nebula-storaged-2                                1/1     Running            0          1m
部署 Ingress-controller
Ingress-controller 是 Kubernetes 的一個 Add-Ons。Kubernetes 通過 ingress-controller 将 Kubernetes 内部署的服務暴露給外部使用者通路。Ingress-controller 還提供負載均衡的功能,可以将外部通路流量平攤給 k8s 中應用的不同的副本。

選擇一個節點部署 Ingress-controller
[root@nebula ~]# kubectl get node
NAME              STATUS     ROLES    AGE   VERSION
192.168.0.1       Ready      master   82d   v1.16.1
192.168.0.2       Ready      <none>   82d   v1.16.1
192.168.0.3       Ready      <none>   82d   v1.16.1
192.168.0.4       Ready      <none>   82d   v1.16.1
[root@nebula ~]# kubectl label node 192.168.0.4 ingress=yes
編寫 ingress-nginx.yaml 部署檔案
apiVersion: v1
kind: Namespace
metadata:
  name: ingress-nginx
  labels:
    app.kubernetes.io/name: ingress-nginx
    app.kubernetes.io/part-of: ingress-nginx
---
kind: ConfigMap
apiVersion: v1
metadata:
  name: nginx-configuration
  namespace: ingress-nginx
  labels:
    app.kubernetes.io/name: ingress-nginx
    app.kubernetes.io/part-of: ingress-nginx
---
kind: ConfigMap
apiVersion: v1
metadata:
  name: tcp-services
  namespace: ingress-nginx
  labels:
    app.kubernetes.io/name: ingress-nginx
    app.kubernetes.io/part-of: ingress-nginx
---
kind: ConfigMap
apiVersion: v1
metadata:
  name: udp-services
  namespace: ingress-nginx
  labels:
    app.kubernetes.io/name: ingress-nginx
    app.kubernetes.io/part-of: ingress-nginx
---
apiVersion: v1
kind: ServiceAccount
metadata:
  name: nginx-ingress-serviceaccount
  namespace: ingress-nginx
  labels:
    app.kubernetes.io/name: ingress-nginx
    app.kubernetes.io/part-of: ingress-nginx

---
apiVersion: rbac.authorization.k8s.io/v1beta1
kind: ClusterRole
metadata:
  name: nginx-ingress-clusterrole
  labels:
    app.kubernetes.io/name: ingress-nginx
    app.kubernetes.io/part-of: ingress-nginx
rules:
  - apiGroups:
      - ""
    resources:
      - configmaps
      - endpoints
      - nodes
      - pods
      - secrets
    verbs:
      - list
      - watch
  - apiGroups:
      - ""
    resources:
      - nodes
    verbs:
      - get
  - apiGroups:
      - ""
    resources:
      - services
    verbs:
      - get
      - list
      - watch
  - apiGroups:
      - "extensions"
      - "networking.k8s.io"
    resources:
      - ingresses
    verbs:
      - get
      - list
      - watch
  - apiGroups:
      - ""
    resources:
      - events
    verbs:
      - create
      - patch
  - apiGroups:
      - "extensions"
      - "networking.k8s.io"
    resources:
      - ingresses/status
    verbs:
      - update
---
apiVersion: rbac.authorization.k8s.io/v1beta1
kind: Role
metadata:
  name: nginx-ingress-role
  namespace: ingress-nginx
  labels:
    app.kubernetes.io/name: ingress-nginx
    app.kubernetes.io/part-of: ingress-nginx
rules:
  - apiGroups:
      - ""
    resources:
      - configmaps
      - pods
      - secrets
      - namespaces
    verbs:
      - get
  - apiGroups:
      - ""
    resources:
      - configmaps
    resourceNames:
      # Defaults to "<election-id>-<ingress-class>"
      # Here: "<ingress-controller-leader>-<nginx>"
      # This has to be adapted if you change either parameter
      # when launching the nginx-ingress-controller.
      - "ingress-controller-leader-nginx"
    verbs:
      - get
      - update
  - apiGroups:
      - ""
    resources:
      - configmaps
    verbs:
      - create
  - apiGroups:
      - ""
    resources:
      - endpoints
    verbs:
      - get
---
apiVersion: rbac.authorization.k8s.io/v1beta1
kind: RoleBinding
metadata:
  name: nginx-ingress-role-nisa-binding
  namespace: ingress-nginx
  labels:
    app.kubernetes.io/name: ingress-nginx
    app.kubernetes.io/part-of: ingress-nginx
roleRef:
  apiGroup: rbac.authorization.k8s.io
  kind: Role
  name: nginx-ingress-role
subjects:
  - kind: ServiceAccount
    name: nginx-ingress-serviceaccount
    namespace: ingress-nginx

---
apiVersion: rbac.authorization.k8s.io/v1beta1
kind: ClusterRoleBinding
metadata:
  name: nginx-ingress-clusterrole-nisa-binding
  labels:
    app.kubernetes.io/name: ingress-nginx
    app.kubernetes.io/part-of: ingress-nginx
roleRef:
  apiGroup: rbac.authorization.k8s.io
  kind: ClusterRole
  name: nginx-ingress-clusterrole
subjects:
  - kind: ServiceAccount
    name: nginx-ingress-serviceaccount
    namespace: ingress-nginx

---
apiVersion: apps/v1
kind: DaemonSet
metadata:
  name: nginx-ingress-controller
  namespace: ingress-nginx
  labels:
    app.kubernetes.io/name: ingress-nginx
    app.kubernetes.io/part-of: ingress-nginx
spec:
  selector:
    matchLabels:
      app.kubernetes.io/name: ingress-nginx
      app.kubernetes.io/part-of: ingress-nginx
  template:
    metadata:
      labels:
        app.kubernetes.io/name: ingress-nginx
        app.kubernetes.io/part-of: ingress-nginx
      annotations:
        prometheus.io/port: "10254"
        prometheus.io/scrape: "true"
    spec:
      hostNetwork: true
      tolerations:
        - key: "node-role.kubernetes.io/master"
          operator: "Exists"
          effect: "NoSchedule"
      affinity:
        podAntiAffinity:
          requiredDuringSchedulingIgnoredDuringExecution:
            - labelSelector:
                matchExpressions:
                  - key: app.kubernetes.io/name
                    operator: In
                    values:
                      - ingress-nginx
              topologyKey: "ingress-nginx.kubernetes.io/master"
      nodeSelector:
        ingress: "yes"
      serviceAccountName: nginx-ingress-serviceaccount
      containers:
        - name: nginx-ingress-controller
          image: quay.io/kubernetes-ingress-controller/nginx-ingress-controller-amd64:0.26.1
          args:
            - /nginx-ingress-controller
            - --configmap=$(POD_NAMESPACE)/nginx-configuration
            - --tcp-services-configmap=default/graphd-services
            - --udp-services-configmap=$(POD_NAMESPACE)/udp-services
            - --publish-service=$(POD_NAMESPACE)/ingress-nginx
            - --annotations-prefix=nginx.ingress.kubernetes.io
            - --http-port=8000
          securityContext:
            allowPrivilegeEscalation: true
            capabilities:
              drop:
                - ALL
              add:
                - NET_BIND_SERVICE
            # www-data -> 33
            runAsUser: 33
          env:
            - name: POD_NAME
              valueFrom:
                fieldRef:
                  fieldPath: metadata.name
            - name: POD_NAMESPACE
              valueFrom:
                fieldRef:
                  fieldPath: metadata.namespace
          ports:
            - name: http
              containerPort: 80
            - name: https
              containerPort: 443
          livenessProbe:
            failureThreshold: 3
            httpGet:
              path: /healthz
              port: 10254
              scheme: HTTP
            initialDelaySeconds: 10
            periodSeconds: 10
            successThreshold: 1
            timeoutSeconds: 10
          readinessProbe:
            failureThreshold: 3
            httpGet:
              path: /healthz
              port: 10254
              scheme: HTTP
            periodSeconds: 10
            successThreshold: 1
            timeoutSeconds: 10
部署 ingress-nginx
# 部署
[root@nebula ~]# kubectl create -f ingress-nginx.yaml
# 檢視部署情況
[root@nebula ~]# kubectl get pod -n ingress-nginx
NAME                             READY   STATUS    RESTARTS   AGE
nginx-ingress-controller-mmms7   1/1     Running   2          1m
通路 nebula 叢集
檢視 ingress-nginx 所在的節點:
[root@nebula ~]# kubectl get node -l ingress=yes -owide
NAME            STATUS   ROLES    AGE   VERSION   INTERNAL-IP    EXTERNAL-IP   OS-IMAGE                KERNEL-VERSION          CONTAINER-RUNTIME
192.168.0.4     Ready    <none>   1d   v1.16.1    192.168.0.4    <none>        CentOS Linux 7 (Core)   7.6.1810.el7.x86_64     docker://19.3.3
通路 nebula 叢集:
[root@nebula ~]# docker run --rm -ti --net=host vesoft/nebula-console:nightly --addr=192.168.0.4 --port=3699 FAQ
如何搭建一套 Kubernetes 叢集?
搭建高可用的 Kubernetes 可以參考社群文檔:
https://kubernetes.io/docs/setup/production-environment/tools/kubeadm/high-availability/你也可以通過 minikube 搭建本地的 Kubernetes 叢集,參考文檔:
https://kubernetes.io/docs/setup/learning-environment/minikube/如何調整 nebula 叢集的部署參數?
在使用 helm install 時,使用 --set 可以設定部署參數,進而覆寫掉 helm chart 中 values.yaml 中的變量。參考文檔:
https://helm.sh/docs/intro/using_helm/如何檢視 nebula 叢集狀況?
使用
kubectl get pod | grep nebula
指令,或者直接在 Kubernetes dashboard 上檢視 nebula 叢集的運作狀況。
如何使用其他類型的存儲?
參考文檔:
https://kubernetes.io/zh/docs/concepts/storage/storage-classes/參考資料
附錄
- Nebula Graph:一個開源的分布式圖資料庫
- GitHub: https://github.com/vesoft-inc/nebula
- 知乎: zhihu.com/org/nebulagraph/posts
- 微網誌: weibo.com/nebulagraph