當我們須要動态的多界面切換的時候,就須要将UI元素和Activity融合成一個子產品。
在2.3中我們一般通過各種Activity中進行跳轉來實作多界面的跳轉和單個界面動态改變。在4.0或以上系統中就能夠使用新的特性來友善的達到這個效果--Fragment類。Fragment類似一個嵌套Activity,能夠定義自己的layout和自己的生命周期。
多個Fragment能夠放在一個Activity中(是以上面講到類似一個嵌套Activity),而這個類能夠對這些Fragment進行配置以适應不同的螢幕尺寸(比方平闆和手機)。
使用Android庫
Android支援庫是一個jar檔案。使用這個支援庫能夠讓我們在低版本号上執行高版本号的特性(比方Fragment并不是1.6的特性,可是通過庫的引入,我們能夠将包括fragment的程式執行在1.6上面,保證程式相容性)。
步驟:
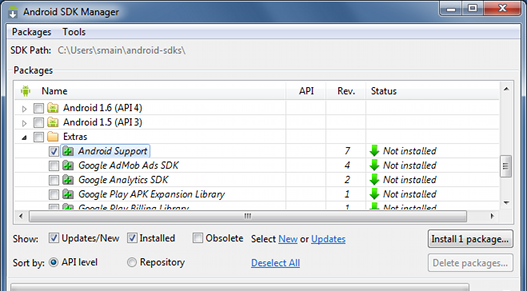
1. 通過SDK Manager下載下傳Android Support Package。
2. 在項目代碼頂層建立libs目錄,并将你須要的jar庫檔案複制到libs裡面去。
3. 更新manifest檔案,設定例如以下
<uses-sdk android:minSdkVersion="4" android:targetSdkVersion="15" />
為了確定沒有在舊的系統上面使用新的api特性,卻要在使用Fragment的檔案裡包括例如以下内容:
import android.support.v4.app.Fragment;
import android.support.v4.app.FragmentManager;
應該聲明FragmentActivity(而不是Activity)來包括Fragments。
建立Fragment
我們能夠将Fragment當成是一個獨立的Activity。它有自己獨立的生命周期、擷取單獨的觸發事件。而且在Activity執行的時候能夠動态的移除或者加入Fragment而且你能夠在其它地方重用這個Fragment。
建立Fragment類
就像建立Activity類一樣,繼承Fragment,實作一些生命周期中的關鍵函數,而且記得把你自己的功能代碼放到裡面去。建立一個Fragment。必須使用onCreateView()定義他的layout布局檔案。實際上這是讓一個Fragment可以執行起來的唯一一個回調函數,看看以下的樣例:
import android.os.Bundle;
import android.support.v4.app.Fragment;
import android.view.LayoutInflater;
import android.view.ViewGroup;

public class ArticleFragment extends Fragment {
    @Override
    public View onCreateView(LayoutInflater inflater, ViewGroup container,
        Bundle savedInstanceState) {
        // Inflate the layout for this fragment
        return inflater.inflate(R.layout.article_view, container, false);
    }
}
就像Activity一樣,Fragment也應該實作其它生命周期中的函數,這樣我們才幹夠實作對他的加入删除。
舉例來說,當activity收到onPause()方法調用的時候,它裡面的Fragment相同會被調用到onPause(),是以看好機會,在Fragment裡面的onPause()裡面放入你寫的代碼吧。
使用XML将Fragment加入到一個Activity中
當重用Fragment的時候。每個執行個體化的Fragment必須依附于一個父FragmentActivity。我們能夠通過在這個父活動的布局檔案xml中定義fragment。
以下是一個将兩個Fragment加入到一個活動中的樣例
res/layout-large/news_articles.xml:
<LinearLayout xmlns:android="http://schemas.android.com/apk/res/android"
    android:orientation="horizontal"
    android:layout_width="fill_parent"
    android:layout_height="fill_parent">

    <fragment android:name="com.example.android.fragments.HeadlinesFragment"
              android:id="@+id/headlines_fragment"
              android:layout_weight="1"
              android:layout_width="0dp"
              android:layout_height="match_parent" />

    <fragment android:name="com.example.android.fragments.ArticleFragment"
              android:id="@+id/article_fragment"
              android:layout_weight="2"
              android:layout_width="0dp"
              android:layout_height="match_parent" />

</LinearLayout>
以下就是怎麼使用這個布局的代碼了:
import android.os.Bundle;
import android.support.v4.app.FragmentActivity;

public class MainActivity extends FragmentActivity {
    @Override
    public void onCreate(Bundle savedInstanceState) {
        super.onCreate(savedInstanceState);
        setContentView(R.layout.news_articles);
    }
}
通過在xml中定義fragment的方式。我們不能在執行時移除fragment。
假設我們想要通過切換fragments來跟使用者有更好的互動,那麼就須要在activity啟動的時候定義fragment了。
建立更靈活的UI(進階應用)
當我們針對各種不同螢幕尺寸的裝置設計應用程式的時候。我們能夠在不同的布局檔案裡重用fragments來讓客戶體驗最優化。
比方在平闆和手機上,當使用fragment時。表現可能就全然不一樣。平闆上面我們可以将前後的兩個Fragment都顯示在螢幕上(由于螢幕空間足夠顯示了,并且不至于讓螢幕空間太空),而在手機上這兩個Fragment僅僅能進行切換顯示了,由于手機螢幕空間太小,僅僅可以一次顯示一屏。圖檔例如以下:
我們能夠用類FragmentManager提供一些方法,在執行時對activity中的一些fragments進行加入、移除、覆寫操作,來提供給客戶一個動态的更優的體驗。
在執行時加入一個Fragment到Activity
上面一節的在activity的布局檔案(layout xml)中加入Fragment的方法我們已經知道了。
如今我們将學習第二種方式。這樣的方式同意我們在執行時動态的顯示和隐藏fragment。
為了達到在activity中動态管理Fragment,我們須要用到FragmentManager,而且通過它建立FragmentTransaction(提供針對Fragment操作的一些列api,add/attach/detach/hide等)。
假設須要在activity中動态的移除或者替換fragments,我們就須要在onCreate函數中将初始化的fragments增加到該activity中。在處理Fragments時,特别是在執行中動态增加的fragments,有一個非常重要的規則就是fragment必須有一個容器View,來容納fragments的layout布局。
以下的layout是針對前面一節内容的替代,每次僅僅顯示一個fragment。
為了替換目前的fragment,這個activity的layout必須包括一個FrameLayout用來當做fragment容器。
注意:該布局檔案檔案名稱是跟上節一樣,可是layout目錄并沒有large修飾。是以你懂的。
res/layout/news_articles.xml:
<FrameLayout xmlns:android="http://schemas.android.com/apk/res/android"
    android:id="@+id/fragment_container"
    android:layout_width="match_parent"
    android:layout_height="match_parent" />
在你的activity内,用getSupportFragmentManager()函數擷取FragmentManager。
使用beginTransaction建立一個FragmentTransaction,而且調用add()函數加入一個Fragment。我們能夠用FragmentTransaction運作多次fragment相關的操作。當我們準備切換的時候。調用函數call()就能夠了。
以下就是将一個fragment增加一個layout中:
import android.os.Bundle;
import android.support.v4.app.FragmentActivity;

public class MainActivity extends FragmentActivity {
    @Override
    public void onCreate(Bundle savedInstanceState) {
        super.onCreate(savedInstanceState);
        setContentView(R.layout.news_articles);

        // Check that the activity is using the layout version with
        // the fragment_container FrameLayout
        if (findViewById(R.id.fragment_container) != null) {

            // However, if we're being restored from a previous state,
            // then we don't need to do anything and should return or else
            // we could end up with overlapping fragments.
            if (savedInstanceState != null) {
                return;
            }

            // Create an instance of ExampleFragment
            HeadlinesFragment firstFragment = new HeadlinesFragment();

            // In case this activity was started with special instructions from an Intent,
            // pass the Intent's extras to the fragment as arguments
            firstFragment.setArguments(getIntent().getExtras());

            // Add the fragment to the 'fragment_container' FrameLayout
            getSupportFragmentManager().beginTransaction()
                    .add(R.id.fragment_container, firstFragment).commit();
        }
    }
}
由于是在執行時增加到FrameLayout容器中。并非寫死在xml中。是以activity可以移除、替換該fragment。
怎樣在兩個fragment間切換
替換fragment的過程跟add差不錯。差别就是一個是replace()函數。一個是add()函數。時刻要注意的是當運作fragment操作,比方替換或者移除一個fragment。使用者常常的操作是回退(backward)或者還原(undo)操作。
為了支援使用者的這些操作,我們要在commit()一個FragmentTransaction之前先調用函數addToBackStack()函數。
注意:當移除或者替換一個fragment,而且将這個操作放入back stack(回退堆棧?),當fragment被移除的時候,fragment是停止的(并不是銷毀)。假設使用者要回退,會從堆棧中取一個fragment而且重新啟動(restart)它。假設沒有增加back stack,當移除或者替換的時候,這個fragment就直接被銷毀了。
切換fragment例如以下:
// Create fragment and give it an argument specifying the article it should show
ArticleFragment newFragment = new ArticleFragment();
Bundle args = new Bundle();
args.putInt(ArticleFragment.ARG_POSITION, position);
newFragment.setArguments(args);

FragmentTransaction transaction = getSupportFragmentManager().beginTransaction();

// Replace whatever is in the fragment_container view with this fragment,
// and add the transaction to the back stack so the user can navigate back
transaction.replace(R.id.fragment_container, newFragment);
transaction.addToBackStack(null);

// Commit the transaction
transaction.commit();
addToBackStack()裡面的有一個可選的String參數,該參數在須要使用FragmentManager.BackStackEntry類的APIs的時候須要用到。
Fragment間通信
為了重用Fragment UI,我們就須要将該Fragment建立成一個能夠自包括(自閉)的系統,擁有自己的layout和行為。一旦定義了這些可重用的fragments,就能夠将他們綁定到一個activity上,實作所有的活動UI。非常多時候我們想要在兩個fragments間進行通信(比如依據使用者輸入改變内容)。所有的Fragment間通信都是通過他們所依附的Activity。他們之間永遠不能夠直接通信。
定義一個接口
為了同意一個Fragment跟包括他的Activity通信,我們能夠在Fragment類中定義一個接口。而且在Activity内實作。Fragment在onAttach()函數裡面捕獲接口實作。而且調用接口方法和Activity通信。(上面都說了Fragment間僅僅能通過Activity進行通信了。)
看看以下的Fragment和Activity通信的樣例:
public class HeadlinesFragment extends ListFragment {
    OnHeadlineSelectedListener mCallback;

    // Container Activity must implement this interface
    public interface OnHeadlineSelectedListener {
        public void onArticleSelected(int position);
    }

    @Override
    public void onAttach(Activity activity) {
        super.onAttach(activity);

        // This makes sure that the container activity has implemented
        // the callback interface. If not, it throws an exception
        try {
            mCallback = (OnHeadlineSelectedListener) activity;
        } catch (ClassCastException e) {
            throw new ClassCastException(activity.toString()
                    + " must implement OnHeadlineSelectedListener");
        }
    }

    ...
}
如今Fragment能夠通過onArticleSelected()函數,将消息傳遞到到Activity中。通過使用OnHeadlineSelectedListener的執行個體達到傳遞的目的。
比如:以下的樣例中。當點選一個清單的元素的時候,fragment中的一個方法被調用。Fragment使用mcallback這個執行個體化的東東
,将該事件傳遞給它所依附的父Activity。
@Override
    public void onListItemClick(ListView l, View v, int position, long id) {
        // Send the event to the host activity
        mCallback.onArticleSelected(position);
    }
實作接口
為了從Fragment中接受事件消息,父activity必須實作fragment類中定義的幾個接口。
示比例如以下:
public static class MainActivity extends Activity
        implements HeadlinesFragment.OnHeadlineSelectedListener{
    ...

    public void onArticleSelected(int position) {
        // The user selected the headline of an article from the HeadlinesFragment
        // Do something here to display that article
    }
}
傳遞消息到Fragment中
public static class MainActivity extends Activity
        implements HeadlinesFragment.OnHeadlineSelectedListener{
    ...

    public void onArticleSelected(int position) {
        // The user selected the headline of an article from the HeadlinesFragment
        // Do something here to display that article

        ArticleFragment articleFrag = (ArticleFragment)
                getSupportFragmentManager().findFragmentById(R.id.article_fragment);

        if (articleFrag != null) {
            // If article frag is available, we're in two-pane layout...

            // Call a method in the ArticleFragment to update its content
            articleFrag.updateArticleView(position);
        } else {
            // Otherwise, we're in the one-pane layout and must swap frags...

            // Create fragment and give it an argument for the selected article
            ArticleFragment newFragment = new ArticleFragment();
            Bundle args = new Bundle();
            args.putInt(ArticleFragment.ARG_POSITION, position);
            newFragment.setArguments(args);

            FragmentTransaction transaction = getSupportFragmentManager().beginTransaction();

            // Replace whatever is in the fragment_container view with this fragment,
            // and add the transaction to the back stack so the user can navigate back
            transaction.replace(R.id.fragment_container, newFragment);
            transaction.addToBackStack(null);

            // Commit the transaction
            transaction.commit();
        }
    }
} ![mvp初探[圖]](data:image/gif;base64,R0lGODlhAQABAIAAAP///wAAACwAAAAAAQABAAACAkQBADs=)