背景
資源編排服務(Resource Orchestration Service, 簡稱ROS)是阿裡雲提供的一項簡化雲計算資源管理的服務。您可以遵循ROS定義的模闆規範編寫資源棧模闆,在模闆中定義所需的雲計算資源(例如ECS執行個體、RDS資料庫執行個體)、資源間的依賴關系等。ROS的編排引擎将根據模闆自動完成所有資源的建立和配置,實作自動化部署及運維。
ROS資源編排接入了大量的阿裡雲資源,目前涉及38個服務,近200個資源,而且還在持續增長中。對于尚未提供的資源,或無法提供的資源或功能,ROS提供了
自定義資源(
ALIYUN::ROS::CustomResource)作為解決方案。如果您還不了解自定義資源,可以參考
資源編排ROS之自定制資源(基礎篇)。
本篇為ROS多雲部署AWS篇。
其他進階篇:
多雲部署Terraform篇目标
通過ROS成功部署AWS雲資源。推而廣之,使用類似的方法,可以對所有其他雲廠商的雲資源進行部署,進而達到多雲部署的目标。
準備工作
ROS模闆
為了簡化,我們使用如下模闆在ROS中進行部署。這個模闆建立了3個資源:
- Service:FC(函數計算)的Service,用于建立Function。
- Function:FC(函數計算)的Function,其代碼實作了在AWS CloudFormation管理堆棧的邏輯。模闆中,通過與ROS資源棧同一地域的OSS(對象存儲) Bucket和Object指定代碼。為了示例,這裡的BucketName為ros-demo,ObjectName為test-custom-resource-aws.zip。
- TestAwsCloudFormationStack:自定義資源,用于傳遞參數和接收輸出。
- 傳遞參數:包括AWS的AK資訊,地域資訊,CloudFormation堆棧資訊(包括名稱、模闆和參數)。用于測試的CloudFormation的模闆由于較為簡單,已内嵌到ROS模闆當中。為了友善示例,這個模闆隻建立了一個AWS::S3::Bucket資源。
- 接收輸出:為了簡單,内嵌的CloudFormation模闆的輸出與自定義資源的輸出一緻。為了友善示例,輸出隻有一個,為AWS::S3::Bucket資源的ARN。
ROSTemplateFormatVersion: '2015-09-01'
Parameters:
  ServiceName:
    Type: String
    Default: test-service
  FunctionName:
    Type: String
    Default: test-function
  Timeout:
    Type: Number
    Default: 600
    MaxValue: 600
  AwsAccessKeyId:
    Type: String
    NoEcho: true
  AwsAccessKeySecret:
    Type: String
    NoEcho: true
  AwsRegionId:
    Type: String
    Default: us-east-1
Resources:
  Service:
    Type: ALIYUN::FC::Service
    Properties:
      ServiceName:
        Ref: ServiceName
  Function:
    Type: ALIYUN::FC::Function
    Properties:
      ServiceName:
        Fn::GetAtt: [Service, ServiceName]
      FunctionName:
        Ref: FunctionName
      Handler: index.handler
      Runtime: python2.7
      Timeout:
        Ref: Timeout
      Code:
        OssBucketName: ros-demo
        OssObjectName: test-custom-resource-aws.zip
  TestAwsCloudFormationStack:
    Type: Custom::AwsCloudFormationStack
    Properties:
      ServiceToken:
        Fn::GetAtt: [Function, ARN]
      Parameters:
        AccessKeyId:
          Ref: AwsAccessKeyId
        AccessKeySecret:
          Ref: AwsAccessKeySecret
        RegionId:
          Ref: AwsRegionId
        Stack:
          Name: stack-by-ros
          Template: |
            AWSTemplateFormatVersion: '2010-09-09'

            Parameters:

              BucketName:
                Type: String

            Resources:
              MyBucket:
                Type: AWS::S3::Bucket
                Properties:
                  BucketName:
                    Ref: BucketName

            Outputs:
              MyBucketArn:
                Value:
                  Fn::GetAtt: [MyBucket, Arn]
          Parameters:
            BucketName: bucket-by-ros
      Timeout:
        Ref: Timeout
Outputs:
  AwsMyBucketArn:
    Value:
      Fn::GetAtt: [TestAwsCloudFormationStack, MyBucketArn]
函數代碼
模闆中的Function資源的主要實作代碼如下。這個FC函數的主要功能如下:
- 按照ALIYUN::ROS::CustomResource的規範接受輸入,傳回輸出。
- 按照在模闆中自定義的資源屬性,對AWS CloudFormation的堆棧進行管理。這是一個簡單的示例實作,使用AWS提供的boto3庫,對CloudFormation的堆棧執行操作(建立、更新、删除),并使用輪詢的方式等待其完成。
# -*- coding: utf-8 -*-

import time
import json
import urllib2
import logging

import six
import boto3


class AwsError(Exception):

    pass


class AwsStack(object):

    def __init__(self, client, logger, event):
        self._client = client
        self._logger = logger
        self._event = event

    def _get_stack_args(self):
        event = self._event
        client_token = '-'.join([event['StackId'], event['RequestId'],
                                 event['LogicalResourceId']])[:128]
        stack_info = event['ResourceProperties']['Stack']
        stack_name = event.get('PhysicalResourceId') or stack_info['Name']
        return (stack_name, stack_info['Template'],
                [dict(ParameterKey=k, ParameterValue=v)
                 for k, v in six.iteritems(stack_info['Parameters'])], client_token)

    def _wait(self, stack_id):
        self._logger.info('begin to wait for stack %s.', stack_id)
        while True:
            resp = self._client.describe_stacks(StackName=stack_id)
            stack = resp['Stacks'][0]
            status = stack['StackStatus']
            if status.endswith('_IN_PROGRESS'):
                time.sleep(3)
                continue
            self._logger.info('end to wait for stack %s: %s.', stack_id, stack)
            if status.endswith('_COMPLETE'):
                return {item['OutputKey']: item['OutputValue']
                        for item in stack.get('Outputs', ())}
            raise AwsError('Stack operation failed, status: {}.'.format(status))

    def create(self):
        stack_name, template_body, parameters, client_token = self._get_stack_args()
        resp = self._client.create_stack(
            StackName=stack_name,
            TemplateBody=template_body,
            Parameters=parameters,
            ClientRequestToken=client_token
        )
        self._logger.info('create stack: %s.', resp)
        stack_id = resp['StackId']
        return stack_id, self._wait(stack_id)

    def update(self):
        stack_name, template_body, parameters, client_token = self._get_stack_args()
        resp = self._client.update_stack(
            StackName=stack_name,
            TemplateBody=template_body,
            Parameters=parameters,
            ClientRequestToken=client_token
        )
        self._logger.info('update stack: %s.', resp)
        return self._wait(stack_name)

    def delete(self):
        stack_name, _, _, client_token = self._get_stack_args()
        resp = self._client.delete_stack(
            StackName=stack_name,
            ClientRequestToken=client_token
        )
        self._logger.info('delete stack: %s.', resp)
        self._wait(stack_name)

    @classmethod
    def from_event(cls, event, logger):
        res_props = event['ResourceProperties']
        session = boto3.Session(aws_access_key_id=res_props['AccessKeyId'],
                                aws_secret_access_key=res_props['AccessKeySecret'],
                                region_name=res_props['RegionId'])
        client = session.client('cloudformation')
        return cls(client, logger, event)


def handler(event, context):
    logger = logging.getLogger()
    event = json.loads(event)
    req_type = event['RequestType']
    aws_stack = AwsStack.from_event(event, logger)

    result = dict(
        RequestId=event['RequestId'],
        LogicalResourceId=event['LogicalResourceId'],
        StackId=event['StackId'],
    )
    try:
        aws_stack_id = aws_stack_outputs = None
        if req_type == 'Create':
            aws_stack_id, aws_stack_outputs = aws_stack.create()
        elif req_type == 'Update':
            aws_stack_outputs = aws_stack.update()
        else:
            aws_stack.delete()

        result['Status'] = 'SUCCESS'
        result['PhysicalResourceId'] = aws_stack_id or event.get('PhysicalResourceId')
        if aws_stack_outputs:
            result['Data'] = aws_stack_outputs
    except Exception as ex:
        result['Status'] = 'FAILED'
        result['Reason'] = str(ex)

    headers = {
      'Content-type': 'application/json',
      'Accept': 'application/json',
      'Date': time.strftime('%a, %d %b %Y %X GMT', time.gmtime())
    }
    req = urllib2.Request(event['ResponseURL'], data=json.dumps(result), headers=headers)
    resp = urllib2.urlopen(req)
    resp_content = resp.read()
    logger.info('response: %s %s', result, resp_content)
由于這個FC函數使用了非内置庫boto3,是以不内直接使用上述代碼,需要進行打包。具體可以參考
使用自定義的子產品。大緻流程如下:
# 環境資訊:MAC, Python 2.7

mkdir /tmp/code
# 寫入函數代碼
cat > /tmp/code/index.py<<EOF
# 上述代碼内容
EOF
# 安裝依賴庫
pip install -t /tmp/code boto3
# 删除pyc檔案
find . -iname "*.pyc" | xargs rm -f


# 安裝fc sdk
pip install aliyun-fc2
# 把檔案夾壓縮成zip包
python -c "from fc2 import util; util.zip_dir('/tmp/code', '/tmp/test-custom-resource-aws.zip')"
然後把/tmp/test-custom-resource-aws.zip檔案上傳到OSS上即可。模闆中上傳到的OSS Bucket為ros-demo、Object為test-custom-resource-aws.zip,可按需調整,但要與ROS資源棧在同一地域。
示例中的壓縮包也可以通過
這個位址進行下載下傳。
測試驗證
我們在ROS對上述模闆和代碼進行測試驗證。
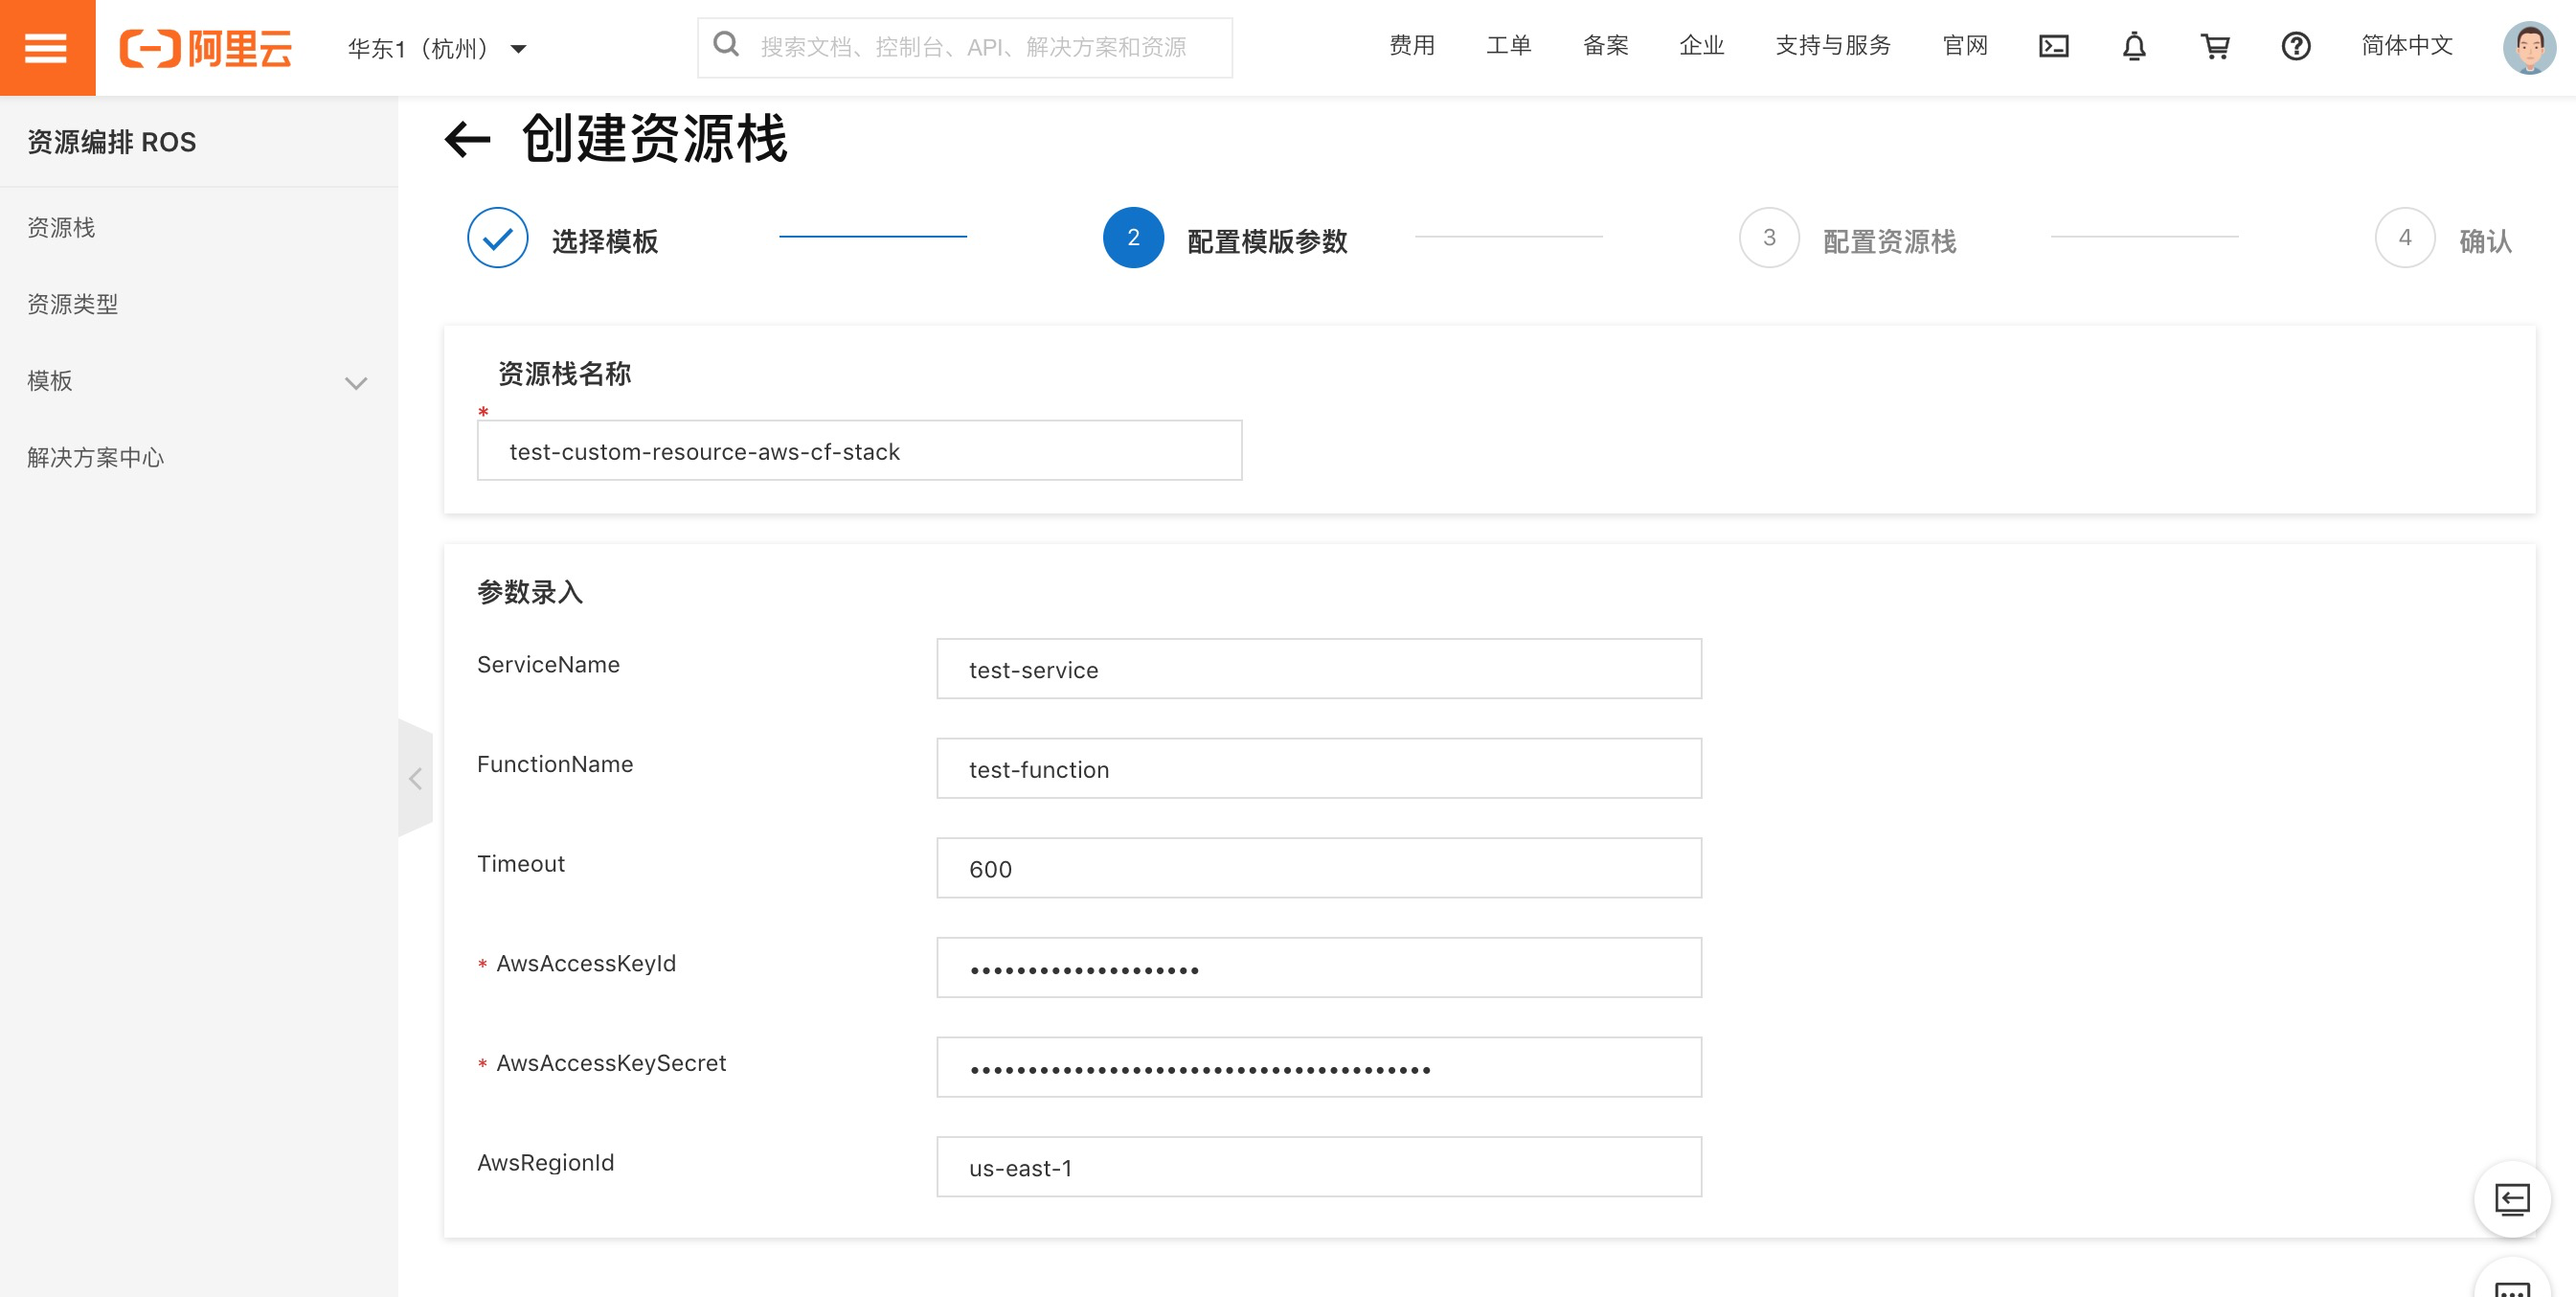
建立資源棧。在模闆中,AwsAccessKeyId和AwsAccessKeySecret都被設定成了加密參數。

觀察資源清單,ALIYUN::ROS::CustomResource資源已成功建立。
觀察輸出清單,擷取到AWS S3 Bucket的ARN。
觀察AWS CloudFormation控制台,可以看到stack-by-ros堆棧,以及相關的AWS::S3::Bucket資源。
總結
通過
)可以實作多雲部署,輕松實作一個入口,一鍵部署。