前言
微服務已經是每個網際網路開發者必須掌握的一項技術。而RPC架構,是構成微服務最重要的組成部分之一。在五一假期,嘗試去看了看dubbo的源代碼,這裡做一個整理。
廣義的來講一個完整的RPC包含了很多元件,包括服務發現,服務治理,遠端調用,調用鍊分析,網關等等。這篇文章主要先講解的是 RPC 的基石,遠端調用 的實作。
RPC調用過程
下圖就很直覺的表明了一次RPC調用的過程
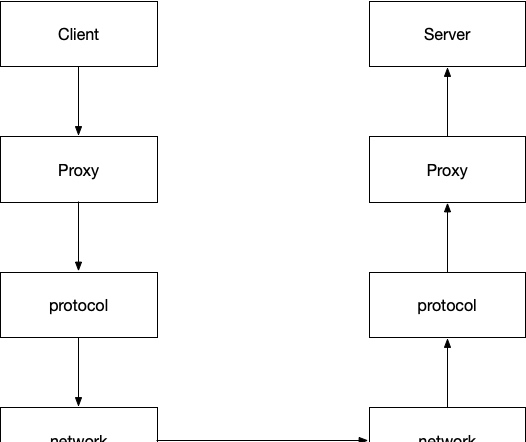
- client 會調用本地動态代理 proxy
- 這個代理會将調用通過協定轉序列化位元組流
- 通過網絡架構,将位元組流發送到服務端
- 服務端在受到這個位元組流後,會根據協定,反序列化為原始的調用,利用反射原理調用服務方提供的方法
- 如果請求有傳回值,又需要把結果根據協定序列化後,再通過網絡架構傳回給調用方
技術選型:proxy的實作使用cglib,網絡架構使用的是廣為使用的netty,序列化的方式使用的是json(友善起見)。
具體實作
基礎代碼
首先我門需要考慮的是如何實作RPC架構的基礎,也就是協定以及網絡的部分。
針對一次RPC的調用過程肯定會存在請求和相應那麼我們需要定義出來這兩個實體。
RpcRequest:
@Data
public class RpcRequest implements Serializable {

    private static final long serialVersionUID = -2662364013035730034L;

    /**
     * 調用id
     */
    private String requestId;

    /**
     * rpc請求類名
     */
    private String className;

    /**
     * rpc請求方法名
     */
    private String methodName;

    /**
     * rpc請求的參數類型
     */
    private Class<?>[] parameterTypes;

    /**
     * rpc請求的參數
     */
    private Object[] parameters;

    public RpcRequest() {
    }

    public RpcRequest(String requestId, String className, String methodName, Class<?>[] parameterTypes, Object[] parameters) {
        this.requestId = requestId;
        this.className = className;
        this.methodName = methodName;
        this.parameterTypes = parameterTypes;
        this.parameters = parameters;
    }
}
RpcResponse:
@Data
public class RpcResponse implements Serializable {

    private static final long serialVersionUID = -3757187413601154175L;

    /**
     * rpc請求id
     */
    private String requestId;

    /**
     * 出現的異常
     */
    private Throwable throwable;

    /**
     * 傳回的結果
     */
    private Object result;

}
定義對象之後,我們需要思索的意見事就是對象在網絡中傳輸那一定是需要進行序列化的,可以選擇的序列化協定有很多:
- jdk 的序列化方法。(不推薦,不利于之後的跨語言調用)
- json 可讀性強,但是序列化速度慢,體積大。
- protobuf,kyro,Hessian 等都是優秀的序列化架構,也可按需選擇。
為了簡單和便于調試,我們就選擇 json 作為序列化協定,使用fastjson作為 json 解析架構。具體的序列化代碼就不展開了。
序列化搞定了之後,就可以考慮一下服務端和用戶端進行通信的問題了。
server
server 是負責處理用戶端請求的元件。在網際網路高并發的環境下,使用nio非阻塞的方式可以相對輕松的應付高并發的場景。netty是一個優秀的 Nio 處理架構。Server就基于netty 進行開發。關鍵代碼如下:
- netty是基于Reacotr模型的。是以需要初始化兩組線程boss和worker。boss負責分發請求,worker負責執行相應的handler:
@Bean
    public ServerBootstrap serverBootstrap() {
        ServerBootstrap serverBootstrap = new ServerBootstrap();

        serverBootstrap.group(bossGroup(), workerGroup())
                .channel(NioServerSocketChannel.class)
                .handler(new LoggingHandler(LogLevel.DEBUG))
                .childHandler(serverInitializer);
        Map<ChannelOption<?>, Object> tcpChannelOptions = tcpChannelOptions();
        for (ChannelOption option : tcpChannelOptions.keySet()) {
            serverBootstrap.option(option, tcpChannelOptions.get(option));
        }
        return serverBootstrap;
} - netty的操作是基于pipeline的。是以我們需要把在protocol實作的幾個coder注冊到netty的pipeline中。
@Override
    protected void initChannel(SocketChannel socketChannel) throws Exception {
        ChannelPipeline pipeline = socketChannel.pipeline();
        // 處理tcp請求中粘包的 coder,
        pipeline.addLast(new LengthFieldBasedFrameDecoder(65535, 0, 4));
        // 實作的序列化和反序列化 coder
        pipeline.addLast(new RpcEncoder(RpcResponse.class, new JSONSerializer()));
        pipeline.addLast(new RpcDecoder(RpcRequest.class, new JSONSerializer()));
        // 具體處理請求的handler
        pipeline.addLast(serverHandler);
} - 實作具體的ServerHandler用于處理真正的調用。
ServerHandler繼承SimpleChannelInboundHandler。簡單來說這個 InboundHandler會在資料被接受時或者對于的Channel的狀态發生變化的時候被調用。當這個 handler讀取資料的時候方法channelRead0()會被用,是以我們就重寫這個方法就夠了。
@Override
    protected void channelRead0(ChannelHandlerContext channelHandlerContext, RpcRequest request) throws Exception {

        RpcResponse rpcResponse = new RpcResponse();
        rpcResponse.setRequestId(request.getRequestId());

        try {
            // 收到請求後開始處理請求
            Object res = handler(request);
            rpcResponse.setResult(res);
        } catch (Throwable throwable) {
            rpcResponse.setThrowable(throwable);
            log.error("ServerHandler.handle failed, request : {}", request, throwable);
        }
        // 操作完以後寫入netty的上下文中。netty自己處理傳回值。
        channelHandlerContext.writeAndFlush(rpcResponse);
    }
handler(msg) 實際上使用的是 cglib 的 Fastclass 實作的,其實根本原理,還是反射。
private Object handler(RpcRequest request) throws Throwable {

        Class<?> clz = Class.forName(request.getClassName());

        Object bean = ctx.getBean(clz);
        Class<?> serviceClass = bean.getClass();
        String methodName = request.getMethodName();
        Class<?>[] parameterType = request.getParameterTypes();
        Object[] parameters = request.getParameters();
        // 根本思路還是擷取類名和方法名,利用反射實作調用
        FastClass fastClass = FastClass.create(serviceClass);
        FastMethod method = fastClass.getMethod(methodName, parameterType);

        // 實際調用發生的地方
        return method.invoke(bean, parameters);

    }
總體上來看,server 的實作不是很困難。核心的知識點是 netty 的 channel 的使用和 cglib 的反射機制。
client
其實,對于我來說,client的實作難度要大于server的實作。netty 是一個異步架構,所有的傳回都是基于future和callback的機制。
我們可以基于wait和notify實作一個簡易的future類
public class DefaultFuture {

    private RpcResponse rpcResponse;

    private volatile boolean isSucc = false;

    private final byte[] lock = new byte[0];

    public RpcResponse getResponse(int timeout) {
        synchronized (lock) {
            while (!isSucc) {
                try {
                    lock.wait(timeout);
                } catch (InterruptedException e) {
                    log.error("getRpcResponse.Interrupted");
                }
            }
            return rpcResponse;
        }
    }

    public void setResponse(RpcResponse response) {
        if (isSucc) {
            return;
        }
        synchronized (lock) {
            this.rpcResponse = response;
            this.isSucc = true;
            lock.notify();
        }
    }

}
為了能夠提升 client 的吞吐量,可提供的思路有以下幾種:
- 使用對象池:建立多個client以後儲存在對象池中。但是代碼的複雜度和維護client的成本會很高。
- 盡可能的複用netty中的channel。之前你可能注意到,為什麼要在RpcRequest和RpcResponse中增加一個id。因為netty中的channel是會被多個線程使用的。當一個結果異步的傳回後,你并不知道是哪個線程傳回的。這個時候就可以考慮利用一個Map,建立一個id和future 映射。這樣請求的線程隻要使用對應的id就能擷取,相應的傳回結果。
public class ClientHandler extends ChannelDuplexHandler {

    private final Map<String, DefaultFuture> futureMap = new ConcurrentHashMap<>();

    @Override
    public void write(ChannelHandlerContext ctx, Object msg, ChannelPromise promise) throws Exception {
        if(msg instanceof RpcRequest) {
            RpcRequest request = (RpcRequest) msg;
            futureMap.putIfAbsent(request.getRequestId(), new DefaultFuture());
        }
        super.write(ctx, msg, promise);
    }

    @Override
    public void channelRead(ChannelHandlerContext ctx, Object msg) throws Exception {
        if(msg instanceof RpcResponse) {
            RpcResponse response = (RpcResponse) msg;
            DefaultFuture future = futureMap.get(response.getRequestId());
            future.setResponse(response);
        }
        super.channelRead(ctx, msg);
    }


    public RpcResponse getRpcResponse(String requestId){
        try{
            DefaultFuture future = futureMap.get(requestId);
            return future.getResponse(10);
        } finally {
            futureMap.remove(requestId);
        }
    }

}
這裡沒有繼承 server 中的 InboundHandler 而使用了 ChannelDuplexHandler。顧名思義就是在寫入和讀取資料的時候,都會觸發相應的方法。寫入的時候在Map中儲存id和 future。讀到資料的時候從Map中取出future并将結果放入Future中。擷取結果的時候需要對應的id。
更多詳細的代碼可以參考底部給出的gitlab連結。
使用
參考工程中帶有test的module。
總結
通過以上的代碼,我們實作了一個簡單的RPC架構,這隻是RPC架構的最最基礎的一部分,再其上我們還需要做的是服務發現,服務治理,容災等一系列的事情。優秀的架構總是需要時間去沉澱。
![Java String.format方法的簡單使用[圖]](data:image/gif;base64,R0lGODlhAQABAIAAAP///wAAACwAAAAAAQABAAACAkQBADs=)