前言:
本文主要講述如何在項目中,在不重新開機應用的情況下,實作動态換膚的效果。換膚這塊做的比較好的,有網易雲音樂,qq等,給使用者帶來了多樣的界面選擇和個性化定制。之前看到換膚的效果後對這塊也比較好奇,就抽時間研究了下,今天給大家分享解析原理和實踐中遇到的問題。
為什麼要做動态換膚:
- 動态換膚可以滿足日常産品和營運需求,滿足使用者個性化界面定制的需求等等。
- 動态換膚,相比于靜态皮膚,可以減小apk大小
- 皮膚子產品獨立便于維護
- 由伺服器下發,不需要發版即可實作動态更新
換膚的一般實作思路:
-
資源打包靜态替換方案:
指定資源路徑位址,在打包時将對應資源打包進去
build.gradle中進行對應配置
這種方式是在打包時,通過指定資源檔案的路徑在編譯打包時将對應的資源打包進去,以實作不同的主題樣式等換膚需求。适合釋出馬甲版本的app需求。sourceSets { // 測試版本和線上版本用同一套資源 YymTest { res.srcDirs = ["src/Yym/res", "src/YymTest/res"] assets.srcDirs = ["src/Yym/assets"] } } -
動态換膚方案:
應用運作時,選擇皮膚後,在主app中拿到對應皮膚包的Resource,将皮膚包中的
資源動态加載到應用中展示并呈現給使用者。
動态換膚的一般步驟為:
- 下載下傳并加載皮膚包
- 拿到皮膚包Resource對象
- 标記需要換膚的View
- 切換時即時重新整理頁面
- 制作皮膚包
- 換膚整體架構的搭建
如何拿到皮膚包Resouce對象:
PackageManager mPm = context.getPackageManager();
                    PackageInfo mInfo = mPm.getPackageArchiveInfo(skinPkgPath,
PackageManager.GET_ACTIVITIES);
skinPackageName = mInfo.packageName;

AssetManager assetManager = AssetManager.class.newInstance();
Method addAssetPath = assetManager.getClass().getMethod("addAssetPath", String.class);
addAssetPath.invoke(assetManager, skinPkgPath);

Resources superRes = context.getResources();
Resources skinResource = new
Resources(assetManager,superRes.getDisplayMetrics(),superRes.getConfiguration());
其中需要傳入的參數即為皮膚包的檔案路徑位址,還有目前app的context
其中superResource為目前app的Resource對象,而skinResource即為加載後的皮膚包的Resource對象。
皮膚包的資源即可通過skinResource.getIdentifier(resName, "color", skinPackageName);這種方式拿到了。
如何标記需要換膚的View
-
如何找到需要換膚的View
1)通過xml标記的View:
這種方式主要要通過實作LayoutInflate.Factory2這個接口(為支援AppcompotActivty 用LayoutInflaterFactory API是一樣的)。
/**
* Used with {@code LayoutInflaterCompat.setFactory()}. Offers the same API as
* {@code LayoutInflater.Factory2}.
*/
public interface LayoutInflaterFactory {

/**
 * Hook you can supply that is called when inflating from a LayoutInflater.
 * You can use this to customize the tag names available in your XML
 * layout files.
 *
 * @param parent The parent that the created view will be placed
 * in; <em>note that this may be null</em>.
 * @param name Tag name to be inflated.
 * @param context The context the view is being created in.
 * @param attrs Inflation attributes as specified in XML file.
 *
 * @return View Newly created view. Return null for the default
 *         behavior.
 */
public View onCreateView(View parent, String name, Context context, AttributeSet attrs);
}
LayoutInflater 提供了setFactory(LayoutInflater.Factory factory)和setFactory2(LayoutInflater.Factory2 factory)兩個方法可以讓你去自定義布局的填充(有點類似于過濾器,我們在填充這個View之前可以做一些額外的事),Factory2 是在API 11才添加的。
通過實作這兩個接口可以實作View的重寫。Activity本身就預設實作了Factory接口,是以我們複寫了Factory的onCreateView之後,就可以不通過系統層而是自己截獲從xml映射的View進行相關View建立的操作,包括對View的屬性進行設定(比如背景色,字型大小,顔色等)以實作換膚的效果。如果onCreateView傳回null的話,會将建立View的操作交給Activity預設實作的Factory的onCreateView處理。
SkinInflaterFactory:
public class SkinInflaterFactory implements LayoutInflaterFactory {

private static final boolean DEBUG = true;

/**
 * Store the view item that need skin changing in the activity
 */
private List<SkinItem> mSkinItems = new ArrayList<SkinItem>();
@Override
public View onCreateView(View parent, String name, Context context, AttributeSet attrs) {
    // if this is NOT enable to be skined , simplly skip it
    boolean isSkinEnable = attrs.getAttributeBooleanValue(SkinConfig.NAMESPACE, SkinConfig.ATTR_SKIN_ENABLE, false);
    Log.d("ansen", "isSkinEnable----->" + isSkinEnable);
    Log.d("ansen", "name----->" + name);
    if (!isSkinEnable) {
        return null;
    }

    View view = createView(context, name, attrs);

    if (view == null) {
        return null;
    }

    parseSkinAttr(context, attrs, view);

    return view;
}


/**
 * Invoke low-level function for instantiating a view by name. This attempts to
 * instantiate a view class of the given <var>name</var> found in this
 * LayoutInflater's ClassLoader.
 *
 * @param context
 * @param name    The full name of the class to be instantiated.
 * @param attrs   The XML attributes supplied for this instance.
 * @return View The newly instantiated view, or null.
 */
private View createView(Context context, String name, AttributeSet attrs) {
    View view = null;
    try {
        if (-1 == name.indexOf('.')) {
            view = createViewFromPrefix(context, name, "android.view.", attrs);
            if (view == null) {
                view=createViewFromPrefix(context, name, "android.widget.", attrs);
                if(view==null){
                    view= createViewFromPrefix(context, name, "android.webkit.", attrs);
                }
            }

        } else {
            L.i("自定義View to create " + name);
            view=createViewFromPrefix(context, name, null, attrs);
        }

    } catch (Exception e) {
        L.e("error while create 【" + name + "】 : " + e.getMessage());
        view = null;
    }
    return view;
}

private View createViewFromPrefix(Context context, String name, String prefix, AttributeSet attrs) {
    View view;
    try {
        view = createView(context, name, prefix, attrs);
    } catch (Exception e) {
        view = null;
    }
    return view;

}

public void applySkin() {
    if (ListUtils.isEmpty(mSkinItems)) {
        return;
    }

    for (SkinItem si : mSkinItems) {
        if (si.view == null) {
            continue;
        }
        si.apply();
    }
  }

public void addSkinView(SkinItem item) {
    mSkinItems.add(item);
 }

}
對View屬性進行識别并轉化為皮膚屬性實體
  /**
     * Collect skin able tag such as background , textColor and so on
     *
     * @param context
     * @param attrs
     * @param view
     */
    private void parseSkinAttr(Context context, AttributeSet attrs, View view) {
        List<SkinAttr> viewAttrs = new ArrayList<SkinAttr>();

        for (int i = 0; i < attrs.getAttributeCount(); i++) {
        String attrName = attrs.getAttributeName(i);
        String attrValue = attrs.getAttributeValue(i);

        if (!AttrFactory.isSupportedAttr(attrName)) {
            continue;
        }

        if (attrValue.startsWith("@")) {
            try {
                int id = Integer.parseInt(attrValue.substring(1));
                String entryName = context.getResources().getResourceEntryName(id);
                String typeName = context.getResources().getResourceTypeName(id);
                SkinAttr mSkinAttr = AttrFactory.get(attrName, id, entryName, typeName);
                if (mSkinAttr != null) {
                    viewAttrs.add(mSkinAttr);
                }
            } catch (NumberFormatException e) {
                e.printStackTrace();
            } catch (NotFoundException e) {
                e.printStackTrace();
            }
          }
        }

        if (!ListUtils.isEmpty(viewAttrs)) {
        SkinItem skinItem = new SkinItem();
        skinItem.view = view;
        skinItem.attrs = viewAttrs;

        mSkinItems.add(skinItem);

        if (SkinManager.getInstance().isExternalSkin()) {
            skinItem.apply();
            }
        }
下面通過skin:enbale="true"這種方式,對布局中需要換膚的View進行标記
 <LinearLayout xmlns:android="http://schemas.android.com/apk/res/android"
  xmlns:app="http://schemas.android.com/apk/res-auto"
  xmlns:skin="http://schemas.android.com/android/skin"
  xmlns:tools="http://schemas.android.com/tools"
  android:layout_width="match_parent"
  android:layout_height="match_parent"
  android:orientation="vertical"
  android:background="@color/hall_back_color"
  skin:enable="true"
  >

<code.solution.widget.CustomActivityBar
    android:id="@+id/custom_activity_bar"
    android:layout_width="match_parent"
    android:layout_height="@dimen/widget_action_bar_height"
    app:common_activity_title="@string/app_name"
    app:common_activity_title_gravity="center"
    app:common_activity_title_icon="@drawable/ic_win_cp"
    />
</LinearLayout>
在SKinInflaterFactory的onCreateView 方法中,實際是對xml中映射的每個View
進行過濾。如果skin:enbale不為true則直接傳回null交給系統預設去建立。而如果為true,則自己去建立這個View,并将這個VIew的所有屬性比如id, width height,textColor,background等與支援換膚的屬性進行對比。比如我們支援換background textColor listSelector等, android:background="@color/hall_back_color" 這個屬性,在進行換膚的時候,如果皮膚包裡存在hall_back_color這個值的設定,就将這個顔色值替換為皮膚包裡的顔色值,以完成換膚的需求。同時,也會将這個需要換膚的View儲存起來。
如果在切換換膚之後,進入一個新的頁面,就在進入這個頁面Activity的 InlfaterFacory的onCreateView裡根據skin:enable="true" 這個标記,進行判斷。為true則進行換膚操作。而對于切換換膚操作時,已經存在的頁面,就對這幾個存在頁面儲存好的需要換膚的View進行換膚操作。
2)在代碼中動态添加的View
上述是針對在布局中設定skin:ebable="true"的View進行換膚,那麼如果我們的View不是通過布局檔案,而是通過在代碼種建立的View,怎樣換膚呢?
public void dynamicAddSkinEnableView(Context context, View view, List<DynamicAttr> pDAttrs) {
    List<SkinAttr> viewAttrs = new ArrayList<SkinAttr>();
    SkinItem skinItem = new SkinItem();
    skinItem.view = view;

    for (DynamicAttr dAttr : pDAttrs) {
        int id = dAttr.refResId;
        String entryName = context.getResources().getResourceEntryName(id);
        String typeName = context.getResources().getResourceTypeName(id);
        SkinAttr mSkinAttr = AttrFactory.get(dAttr.attrName, id, entryName, typeName);
        viewAttrs.add(mSkinAttr);
    }

    skinItem.attrs = viewAttrs;
    skinItem.apply();
    addSkinView(skinItem);
}

public void dynamicAddSkinEnableView(Context context, View view, String attrName, int attrValueResId)     {
    int id = attrValueResId;
    String entryName = context.getResources().getResourceEntryName(id);
    String typeName = context.getResources().getResourceTypeName(id);
    SkinAttr mSkinAttr = AttrFactory.get(attrName, id, entryName, typeName);
    SkinItem skinItem = new SkinItem();
    skinItem.view = view;
    List<SkinAttr> viewAttrs = new ArrayList<SkinAttr>();
    viewAttrs.add(mSkinAttr);
    skinItem.attrs = viewAttrs;
    skinItem.apply();
    addSkinView(skinItem);
}
即在Activity中通過比如
dynamicAddSkinEnableView(context, mTextView,"textColor",R.color.main_text_color)即可完成對動态建立的View的換膚操作。
本文研究是基于github開源項目Android-Skin-Loader進行的。這個架構主要是動态加載皮膚包,在不需要重新開機應用的前提下,實作對頁面布局等動态換膚的操作。皮膚包獨立制作和維護,不和主工程産生耦合。同時由背景伺服器下發,可即時線上更新不依賴用戶端版本。
皮膚包的加載過程:
SKinManger:
public void load(String skinPackagePath, final ILoaderListener callback) {

    new AsyncTask<String, Void, Resources>() {

        protected void onPreExecute() {
            if (callback != null) {
                callback.onStart();
            }
        };

        @Override
        protected Resources doInBackground(String... params) {
            try {
                if (params.length == 1) {
                    String skinPkgPath = params[0];

                    File file = new File(skinPkgPath);
                    if(file == null || !file.exists()){
                        return null;
                    }

                    PackageManager mPm = context.getPackageManager();
                    PackageInfo mInfo = mPm.getPackageArchiveInfo(skinPkgPath, PackageManager.GET_ACTIVITIES);
                    skinPackageName = mInfo.packageName;

                    AssetManager assetManager = AssetManager.class.newInstance();
                    Method addAssetPath = assetManager.getClass().getMethod("addAssetPath", String.class);
                    addAssetPath.invoke(assetManager, skinPkgPath);

                    Resources superRes = context.getResources();
                    Resources skinResource = new Resources(assetManager,superRes.getDisplayMetrics(),superRes.getConfiguration());

                    SkinConfig.saveSkinPath(context, skinPkgPath);

                    skinPath = skinPkgPath;
                    isDefaultSkin = false;
                    return skinResource;
                }
                return null;
            } catch (Exception e) {
                e.printStackTrace();
                return null;
            }
        };

        protected void onPostExecute(Resources result) {
            mResources = result;

            if (mResources != null) {
                if (callback != null) callback.onSuccess();
                notifySkinUpdate();
            }else{
                isDefaultSkin = true;
                if (callback != null) callback.onFailed();
            }
        };

    }.execute(skinPackagePath);
}

@Override
public void attach(ISkinUpdate observer) {
    if(skinObservers == null){
        skinObservers = new ArrayList<ISkinUpdate>();
    }
    if(!skinObservers.contains(observer)){
        skinObservers.add(observer);
    }
}

@Override
public void detach(ISkinUpdate observer) {
    if(skinObservers == null) return;
    if(skinObservers.contains(observer)){
        skinObservers.remove(observer);
    }
}

@Override
public void notifySkinUpdate() {
    if(skinObservers == null) return;
    for(ISkinUpdate observer : skinObservers){
        observer.onThemeUpdate();
    }
}
SKinManager為整個皮膚包的管理類,負責加載皮膚封包件,并得到該皮膚包的包名skinPackageName,和這個皮膚包的Resource對象skinResource,這樣整個皮膚包的資源檔案我們就都可以拿到了。在加載得到皮膚包的Resource之後,通知每個注冊過(attach)的頁面(Activity),去重新整理這些頁面所有儲存過的需要換膚的View,進行換膚操作。
切換時如何即時更新界面:
1、SkinBaseApplication:
public class SkinApplication extends BaseApplication {
@Override
public void onCreate() {
    super.onCreate();
    SkinManager.getInstance().init(this);
    SkinManager.getInstance().load();
  }
}
主要是進行一些初始化的操作。
2、SkinBaseActivity:
public abstract class BaseActivity extends
    code.solution.base.BaseActivity implements ISkinUpdate, IDynamicNewView {

private SkinInflaterFactory mSkinInflaterFactory;

@Override
protected void onCreate(Bundle savedInstanceState) {

mSkinInflaterFactory = new SkinInflaterFactory();
LayoutInflaterCompat.setFactory(getLayoutInflater(), mSkinInflaterFactory);
super.onCreate(savedInstanceState);
changeStatusColor();
}

/**
 * dynamic add a skin view
 *
 * @param view
 * @param attrName
 * @param attrValueResId
 */
protected void dynamicAddSkinEnableView(View view, String attrName, int attrValueResId){
    mSkinInflaterFactory.dynamicAddSkinEnableView(this, view, attrName, attrValueResId);
}

@Override
public void onThemeUpdate() {
    if(!isResponseOnSkinChanging){
        return;
    }
    mSkinInflaterFactory.applySkin();
    changeStatusColor();
}
在這裡使用了之前自定義的SkinInflaterFactory,來替換預設的Factory,以達到截獲建立View,擷取View的屬性,與支援換膚的屬性進行對比,進行View換膚操作以及儲存這些需要換膚的View到List中,在下次換膚切換時對這些View進行換膚的目的。
其中換膚操作執行時,會調用SKinManager.notifySKinUpdate方法
@Override
public void notifySkinUpdate() {
    if(skinObservers == null) return;
    for(ISkinUpdate observer : skinObservers){
        observer.onThemeUpdate();
    }
}
而這裡的observer.onThemeUpdate裡面主要是執行這個Activity的下述方法:
public void onThemeUpdate() {
    if(!isResponseOnSkinChanging){
        return;
    }
    mSkinInflaterFactory.applySkin();
    changeStatusColor();
}
mSkinInflaterFactory.applySkin();即為SKinInflaterFactory的applySkin方法,
public void applySkin() {
    if (ListUtils.isEmpty(mSkinItems)) {
        return;
    }

    for (SkinItem si : mSkinItems) {
        if (si.view == null) {
            continue;
        }
        si.apply();
    }
  }
其中 mSKinItems即為目前Acitivty通過xml 檔案中skin:enbale進行标記的 及動态dynamicAddSkinEnableView(…)添加的需要換膚的View的集合,這樣整個換膚的過程就完成了。
整體換膚架構類圖:
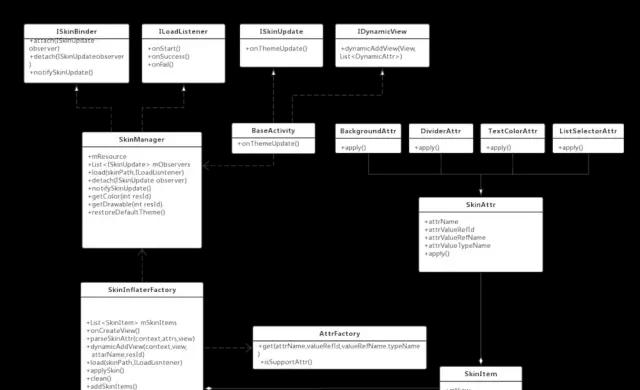
img
換膚架構類圖.png
如何制作皮膚包:
1). 建立工程project
2). 将換膚的資源檔案添加到res檔案下,無java檔案
3). 直接運作build.gradle,生成apk檔案(注意,運作時Run/Redebug configurations 中Launch Options選擇launch nothing),否則build 會報 no default Activty的錯誤。
4). 将apk檔案重命名如black.apk,重命名為black.skin防止使用者點選安裝
線上換膚:
- 将皮膚包上傳到伺服器背景
- 用戶端根據接口資料下載下傳皮膚包,進行加載及用戶端換膚操作
結語:
至此,整個換膚流程的原了解析已經全部講完了。本文針對基本的換膚原理流程做了解析,初步建立了一套相對完善的換膚架構。但是如何建立一套更加完善更加對其他開發者友善的換膚機制仍然是可以繼續研究的方向。比如如何更加安全的換膚,如何對代碼的侵入性做到最小(比如通過在配置檔案中配置需要換膚的View的id name 而不是通過在xml檔案中進行标記)等等,都是可以繼續研究的方向,以後有時間會繼續在這方面進行探索。
因時間關系文章難免有疏漏,歡迎提出指正,謝謝。同時對換膚感興趣的童鞋可以參考以下連結:
1、Android-Skin-Loader
2、Android-skin-support
3、Android主題換膚 無縫切換
更多Android進階技術,面試資料系統整理分享,職業生涯規劃,産品,思維,行業觀察,談天說地。可以加Android架構師群;701740775。
![Java小案例——随機數猜測随機數猜測[圖]](data:image/gif;base64,R0lGODlhAQABAIAAAP///wAAACwAAAAAAQABAAACAkQBADs=)