[TOC]
一、背景
在
補習系列(3)-springboot 幾種scope一文中,筆者介紹過 Session的部分,如下:
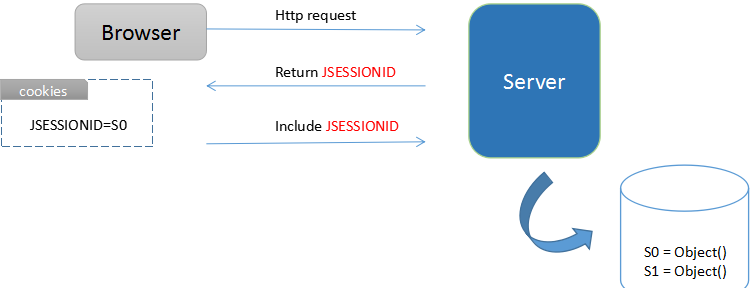
對于伺服器而言,Session 通常是存儲在本地的,比如Tomcat 預設将Session 存儲在記憶體(ConcurrentHashMap)中。
但随着網站的使用者越來越多,Session所需的空間會越來越大,同時單機部署的 Web應用會出現性能瓶頸。
這時候需要進行架構的優化或調整,比如擴充Web 應用節點,在應用伺服器節點之前實作負載均衡。
那麼,這對現有的會話session 管理帶來了麻煩,當一個帶有會話表示的Http請求到Web伺服器後,需求在請求中的處理過程中找到session資料,
而 session資料是存儲在本地的,假設我們有應用A和應用B,某使用者第一次通路網站,session資料儲存在應用A中;
第二次通路,如果請求到了應用B,會發現原來的session并不存在!
一般,我們可通過集中式的 session管理來解決這個問題,即分布式會話。

[圖 - ] 分布式會話
二、SpringBoot 分布式會話
在前面的文章中介紹過Redis 作為緩存讀寫的功能,而常見的分布式會話也可以通過Redis來實作。
在SpringBoot 項目中,可利用spring-session-data-redis 元件來快速實作分布式會話功能。
引入架構
<!-- redis -->
<dependency>
   <groupId>org.springframework.boot</groupId>
   <artifactId>spring-boot-starter-data-redis</artifactId>
   <version>${spring-boot.version}</version>
</dependency>
<!-- redis session -->
<dependency>
    <groupId>org.springframework.session</groupId>
    <artifactId>spring-session-data-redis</artifactId>
    <version>1.3.3.RELEASE</version>
</dependency>
同樣,需要在application.properties中配置 Redis連接配接參數:
spring.redis.database=0
spring.redis.host=127.0.0.1
spring.redis.password=
spring.redis.port=6379
spring.redis.ssl=false
#
## 連接配接池最大數
spring.redis.pool.max-active=10
## 空閑連接配接最大數
spring.redis.pool.max-idle=10
## 擷取連接配接最大等待時間(s)
spring.redis.pool.max-wait=600
接下來,我們需要在JavaConfig中啟用分布式會話的支援:
@Configuration
@EnableRedisHttpSession(maxInactiveIntervalInSeconds = 24
        * 3600, redisNamespace = "app", redisFlushMode = RedisFlushMode.ON_SAVE)
public class RedisSessionConfig {
屬性解釋如下:
| 屬性 | 說明 |
|---|---|
| maxInactiveIntervalInSeconds | 指定時間内不活躍則淘汰 |
| redisNamespace | 名稱空間(key的部分) |
| redisFlushMode | 重新整理模式 |
至此,我們已經完成了最簡易的配置。
三、樣例程式
通過一個簡單的例子來示範會話資料生成:
@Controller
@RequestMapping("/session")

@SessionAttributes("seed")
public class SessionController {

    private static final Logger logger = LoggerFactory.getLogger(SessionController.class);

    /**
     * 通過注解擷取
     *
     * @param counter
     * @param response
     * @return
     */
    @GetMapping("/some")
    @ResponseBody
    public String someSession(@SessionAttribute(value = "seed", required = false) Integer seed, Model model) {

        logger.info("seed:{}", seed);

        if (seed == null) {
            seed = (int) (Math.random() * 10000);
        } else {
            seed += 1;
        }
        model.addAttribute("seed", seed);

        return seed + "";
    }
上面的代碼中,我們聲明了一個seed屬性,每次通路時都會自增(從随機值開始),并将該值置入目前的會話中。
浏覽器通路
http://localhost:8090/session/some?seed=1,得到結果:
2153
2154
2155
...
此時推斷會話已經寫入 Redis,通過背景檢視Redis,如下:
127.0.0.1:6379> keys *
1) "spring:session:app:sessions:expires:732134b2-2fa5-438d-936d-f23c9a384a46"
2) "spring:session:app:expirations:1543930260000"
3) "spring:session:app:sessions:732134b2-2fa5-438d-936d-f23c9a384a46"
如我們的預期産生了會話資料。
示例代碼可從
碼雲gitee下載下傳。
https://gitee.com/littleatp/springboot-samples/四、原理進階
A. 序列化
接下來,繼續嘗試檢視 Redis 所存儲的會話資料
127.0.0.1:6379> hgetall "spring:session:app:sessions:8aff1144-a1bb-4474-b9fe-593
a347145a6"
1) "maxInactiveInterval"
2) "\xac\xed\x00\x05sr\x00\x11java.lang.Integer\x12\xe2\xa0\xa4\xf7\x81\x878\x02
\x00\x01I\x00\x05valuexr\x00\x10java.lang.Number\x86\xac\x95\x1d\x0b\x94\xe0\x8b
\x02\x00\x00xp\x00\x01Q\x80"
3) "sessionAttr:seed"
4) "\xac\xed\x00\x05sr\x00\x11java.lang.Integer\x12\xe2\xa0\xa4\xf7\x81\x878\x02
\x00\x01I\x00\x05valuexr\x00\x10java.lang.Number\x86\xac\x95\x1d\x0b\x94\xe0\x8b
\x02\x00\x00xp\x00\x00 \xef"
5) "lastAccessedTime"
6) "\xac\xed\x00\x05sr\x00\x0ejava.lang.Long;\x8b\xe4\x90\xcc\x8f#\xdf\x02\x00\x
01J\x00\x05valuexr\x00\x10java.lang.Number\x86\xac\x95\x1d\x0b\x94\xe0\x8b\x02\x
00\x00xp\x00\x00\x01gtT\x15T"
7) "creationTime"
8) "\xac\xed\x00\x05sr\x00\x0ejava.lang.Long;\x8b\xe4\x90\xcc\x8f#\xdf\x02\x00\x
01J\x00\x05valuexr\x00\x10java.lang.Number\x86\xac\x95\x1d\x0b\x94\xe0\x8b\x02\x
00\x00xp\x00\x00\x01gtT\x15T"
發現這些資料根本不可讀,這是因為,對于會話資料的值,架構預設使用了JDK的序列化!
為了讓會話資料使用文本的形式存儲,比如JSON,我們可以聲明一個Bean:
@Bean("springSessionDefaultRedisSerializer")
    public Jackson2JsonRedisSerializer<Object> jackson2JsonSerializer() {
        Jackson2JsonRedisSerializer<Object> jackson2JsonRedisSerializer = new Jackson2JsonRedisSerializer<>(
                Object.class);

        ObjectMapper mapper = new ObjectMapper();
        mapper.setSerializationInclusion(Include.NON_NULL);
        mapper.enableDefaultTyping(ObjectMapper.DefaultTyping.NON_FINAL);
        jackson2JsonRedisSerializer.setObjectMapper(mapper);
        return jackson2JsonRedisSerializer;
    }
需要 RedisSerializer 定義為springSessionDefaultRedisSerializer的命名,否則架構無法識别。
再次檢視會話内容,發現變化如下:
127.0.0.1:6379> hgetall "spring:session:app:sessions:d145463d-7b03-4629-b0cb-97c
be520b7e2"
1) "lastAccessedTime"
2) "1543844570061"
3) "sessionAttr:seed"
4) "7970"
5) "maxInactiveInterval"
6) "86400"
7) "creationTime"
8) "1543844570061"
RedisHttpSessionConfiguration 類定義了所有配置,如下所示:
@Bean
    public RedisTemplate<Object, Object> sessionRedisTemplate(
            RedisConnectionFactory connectionFactory) {
        RedisTemplate<Object, Object> template = new RedisTemplate<Object, Object>();
        template.setKeySerializer(new StringRedisSerializer());
        template.setHashKeySerializer(new StringRedisSerializer());
        if (this.defaultRedisSerializer != null) {
            template.setDefaultSerializer(this.defaultRedisSerializer);
        }
        template.setConnectionFactory(connectionFactory);
        return template;
    }
可以發現,除了預設的值序列化之外,Key/HashKey都使用了StringRedisSerializer(字元串序列化)
B. 會話代理
通常SpringBoot 内嵌了 Tomcat 或 Jetty 應用伺服器,而這些HTTP容器都實作了自己的會話管理。
盡管容器也都提供了會話管理的擴充接口,但實作各種會話管理擴充會非常複雜,我們注意到
spring-session-data-redis依賴了spring-session元件;
而spring-session實作了非常豐富的 session管理功能接口。
RedisOperationsSessionRepository是基于Redis實作的Session讀寫類,由spring-data-redis提供;
在調用路徑搜尋中可以發現,SessionRepositoryRequestWrapper調用了會話讀寫類的操作,而這正是一個實作了HttpServletRequest接口的代理類!
源碼片段:
private S getSession(String sessionId) {
            S session = SessionRepositoryFilter.this.sessionRepository
                    .getSession(sessionId);
            if (session == null) {
                return null;
            }
            session.setLastAccessedTime(System.currentTimeMillis());
            return session;
        }

        @Override
        public HttpSessionWrapper getSession(boolean create) {
            HttpSessionWrapper currentSession = getCurrentSession();
            if (currentSession != null) {
                return currentSession;
            }
            String requestedSessionId = getRequestedSessionId();
            if (requestedSessionId != null
                    && getAttribute(INVALID_SESSION_ID_ATTR) == null) {
                S session = getSession(requestedSessionId);
至此,代理的問題得到了解答:
spring-session 通過過濾器實作 HttpServletRequest 代理;
在代理對象中調用會話管理器進一步進行Session的操作。
這是一個代理模式的巧妙應用!
C. 資料老化
我們注意到在檢視Redis資料時發現了這樣的 Key
1) "spring:session:app:sessions:expires:732134b2-2fa5-438d-936d-f23c9a384a46"
2) "spring:session:app:expirations:1543930260000"
這看上去與 Session 資料的老化應該有些關系,而實際上也是如此。
我們從RedisSessionExpirationPolicy可以找到答案:
當 Session寫入或更新時,邏輯代碼如下:
public void onExpirationUpdated(Long originalExpirationTimeInMilli,
            ExpiringSession session) {
        String keyToExpire = "expires:" + session.getId();
        //指定目标過期時間的分鐘刻度(下一分鐘)
        long toExpire = roundUpToNextMinute(expiresInMillis(session));

        ...

        long sessionExpireInSeconds = session.getMaxInactiveIntervalInSeconds();

        //spring:session:app:sessions:expires:xxx"
        String sessionKey = getSessionKey(keyToExpire);
        ...
        //spring:session:app:expirations:1543930260000
        String expireKey = getExpirationKey(toExpire);
        BoundSetOperations<Object, Object> expireOperations = this.redis
                .boundSetOps(expireKey);
        //将session标記放入集合
        expireOperations.add(keyToExpire);

             //設定過期時間5分鐘後再淘汰
        long fiveMinutesAfterExpires = sessionExpireInSeconds
                + TimeUnit.MINUTES.toSeconds(5);

        expireOperations.expire(fiveMinutesAfterExpires, TimeUnit.SECONDS);
        ...
            this.redis.boundValueOps(sessionKey).expire(sessionExpireInSeconds,
                    TimeUnit.SECONDS);
        }
        //設定會話内容資料(HASH)的過期時間
        this.redis.boundHashOps(getSessionKey(session.getId()))
                .expire(fiveMinutesAfterExpires, TimeUnit.SECONDS);
而為了達到清除的效果,會話子產品啟用了定時删除邏輯:
public void cleanExpiredSessions() {
        long now = System.currentTimeMillis();
        //目前刻度
        long prevMin = roundDownMinute(now);
        String expirationKey = getExpirationKey(prevMin);
        //擷取到點過期的會話表
        Set<Object> sessionsToExpire = this.redis.boundSetOps(expirationKey).members();
        this.redis.delete(expirationKey);
        //逐個清理
        for (Object session : sessionsToExpire) {
            String sessionKey = getSessionKey((String) session);
            touch(sessionKey); //觸發exist指令,提醒redis進行資料清理
        }
    }
于是,會話清理的邏輯大緻如下:
- 在寫入會話時設定逾時時間,并将該會話記錄到時間槽形式的逾時記錄集合中;
- 啟用定時器,定時清理屬于目前時間槽的會話資料。
這裡 存在一個疑問:
既然 使用了時間槽集合,那麼集合中可以直接存放的是 會話ID,為什麼會多出一個"expire:{sessionID}"的鍵值。
在定時器執行清理時并沒有涉及會話資料(HASH)的處理,而僅僅是對Expire鍵做了操作,是否目前存在的BUG?
有了解的朋友歡迎留言讨論
小結
分布式會話解決了分布式系統中會話共享的問題,集中式的會話管理相比會話同步(Tomcat的機制)更具優勢,而這也早已成為了常見的做法。
SpringBoot 中推薦使用Redis 作為分布式會話的解決方案,利用spring-session元件可以快速的完成分布式會話功能。
這裡除了提供一個樣例,還對spring-session的序列化、代理等機制做了梳理,希望能對讀者有所啟發。
歡迎繼續關注"美碼師的補習系列-springboot篇" ,期待更多精彩内容^-^
同步連結:
https://www.cnblogs.com/littleatp/p/10128852.html