原文: WPF: FishEyePanel/FanPanel - 自定義Panel 原文來自 CodeProject
,主要介紹如何建立自定義的Panel,如同Grid和StackPanel。
1) Introduction
文中介紹了兩種Panel:FishPanel(魚眼面闆,點選時目前面闆變大,其它面闆變小,但整體寬度不變),FanPanel(帆面闆,不知如何翻譯比較貼切,就這樣吧;子面闆位置,大小都可以改變,同樣整體寬度不變)。
2)Using the Code
最低版本VS2005,.Net 3.0;
3)Writing a custom panel
建立自定義的窗體,需要從System.Windows.Controls.Panel派生新類,然後重寫:MeasureOverride和LayoutOverride。在計算階段,調用者可以确認它需要多大的空間;也幫助我們确認子控件的大小;接下來就是把最終的大小參數傳遞到ArrangeOverride方法;每次我們隊Layout有改變時,上面的兩步操作會重複發生的。
protected override Size MeasureOverride(Size availableSize)
{
    Size idealSize = new Size(0, 0);

    // Allow children as much room as they want - then scale them
    Size size = new Size(Double.PositiveInfinity, Double.PositiveInfinity);
    foreach (UIElement child in Children)
    {
        child.Measure(size);
        idealSize.Width += child.DesiredSize.Width;
        idealSize.Height = Math.Max(idealSize.Height,
                           child.DesiredSize.Height);
    }

    // EID calls us with infinity, but framework
    // doesn't like us to return infinity
    if (double.IsInfinity(availableSize.Height) ||
        double.IsInfinity(availableSize.Width))
        return idealSize;
    else
        return availableSize;
}
在MeasureOverride中,讓子控件來決定我們所需的空間大小,這是通過屬性Child.DesiredSize來獲得的;接下來就是調整比例大小,使其适應整個窗體。
protected override Size ArrangeOverride(Size finalSize)
{
    if (this.Children == null || this.Children.Count == 0)
        return finalSize;

    ourSize = finalSize;
    totalWidth = 0;

    foreach (UIElement child in this.Children)
    {
        // If this is the first time
        // we've seen this child, add our transforms
        if (child.RenderTransform as TransformGroup == null)
        {
            child.RenderTransformOrigin = new Point(0, 0.5);
            TransformGroup group = new TransformGroup();
            child.RenderTransform = group;
            group.Children.Add(new ScaleTransform());
            group.Children.Add(new TranslateTransform());
            //group.Children.Add(new RotateTransform());
        }

        child.Arrange(new Rect(0, 0, child.DesiredSize.Width,
                      child.DesiredSize.Height));

        totalWidth += child.DesiredSize.Width;
    }

    AnimateAll();

    return finalSize;
}
在ArrangeOverride中,添加了比例計算,對每一個子控件都做變換,再統計總寬度;可以實作不同子控件變為相同寬度,或選擇同樣比例變成不同寬度,這是通過屬性ScaleToFit來實作(代碼中沒看到?)。現在,我們隻是把控件放在(0,0)處,接下來就是使用RenderTransoforms來移動控件。
魚眼面闆:設定3個子控件比其它的都大,所選哪3個控件是取決于目前滑鼠的位置,其它的控件會填充餘下的空間;
範面闆:對子控件的旋轉,縮放,平移來使控件以這三種方式排列:堆疊(stacked up),爆炸(exploded),包裹(wrap)
無論是魚眼面闆還是範面闆,核心的處理過程都在AnimateAll(),可以檢視它們的源代碼。
4)Points of interest
無法在設計時直接以ItemControl方式顯示,我們不能隻指定一個名字就行,這是由于這兩個控件隻是一個模闆,并不是真正的控件。作者想到了一個方法是:與Loaded事件相關聯,然後把Sender轉化為相關的面闆模式。
為了示範界面效果,由于使用XPath和Binding不是很友善,作者使用了XmlDataProvider來加載所有圖像。可在項目中先單獨加載圖像到一個Images檔案夾,在TestData.xaml中我們看到:
<XmlDataProvider x:Key="Things" XPath="Things/Thing">
 <x:XData>
  <Things xmlns="">
    <Thing Image="Aquarium.jpg"/>
    <Thing Image="Ascent.jpg"/>
    <Thing Image="Autumn.jpg"/>
    <Thing Image="Crystal.jpg"/>
    <Thing Image="DaVinci.jpg"/>
    <Thing Image="Follow.jpg"/>
    <Thing Image="Friend.jpg"/>
    <Thing Image="Home.jpg"/>
    <Thing Image="Moon flower.jpg"/>
  </Things>
 </x:XData>
</XmlDataProvider>
在App.xaml中引用這些資源,使它們在整個項目中都可見。
<ResourceDictionary>
      <ResourceDictionary.MergedDictionaries>

        <ResourceDictionary Source="Resources/TestData.xaml" />

      </ResourceDictionary.MergedDictionaries>
      <local:ImagePathConverter x:Key="ImagePathConverter" />
</ResourceDictionary>
5)FishEye Panel Demo
5.1)設定界面背景色:
<Window.Background>
    <ImageBrush ImageSource="Images/Azul.jpg" />
</Window.Background>
5.2)設定7行:
<Grid>
    <Grid.RowDefinitions>
      <RowDefinition Height="*"/>
      <RowDefinition Height="2*"/>
      <RowDefinition Height="*"/>
      <RowDefinition Height="2*"/>
      <RowDefinition Height="*"/>
      <RowDefinition Height="2*"/>
      <RowDefinition Height="*"/>
    </Grid.RowDefinitions>
 </Grid>
5.3)設定第二行:
<Border CornerRadius="10" Background="#99ffffff" Grid.Row="1">
      <ItemsControl DataContext="{Binding Source={StaticResource Things}}" ItemsSource="{Binding}" Margin="0">
        <ItemsControl.ItemsPanel>
          <ItemsPanelTemplate>
            <local:FishEyePanel Loaded="FishEye_Loaded" Magnification="3" AnimationMilliseconds="150" ScaleToFit="true"/>
          </ItemsPanelTemplate>
        </ItemsControl.ItemsPanel>

        <ItemsControl.ItemContainerStyle>
          <Style TargetType="{x:Type ContentPresenter}">
            <Setter Property="ContentTemplate">
              <Setter.Value>
                <DataTemplate>
                  <!-- This could obviously be any XAML. In our POC we dropped in entire UI pages and used it like a Vista taskbar -->
                  <Image Source="{Binding Converter={StaticResource ImagePathConverter}, XPath=@Image}" Width="{Binding XPath=@Width}" Margin="5"/>
                </DataTemplate>
              </Setter.Value>
            </Setter>
          </Style>
        </ItemsControl.ItemContainerStyle>

      </ItemsControl>
 </Border>
上面設定了FishEyePanel的Loaded事件,及Image Source。
5.4)在主窗體cs檔案中添加Loaded事件處理過程:
void FishEye_Loaded(object sender, RoutedEventArgs e)
{
      fish = (FishEyePanel)sender;
}
5.5)示範界面(除去了後面兩行的圖像顯示);點選其中的一張照片,左右的照片也一起變大,其餘的照片不變;
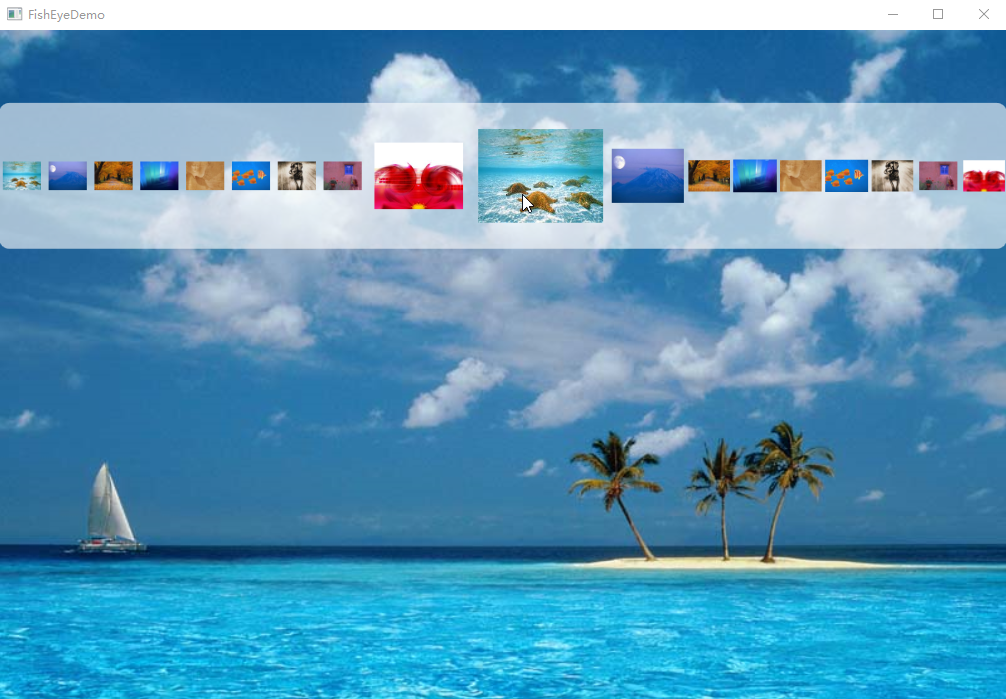
實際上還有很多疑問,如不知如何改變圖檔的高度等。
附上
FishEyePanel的源代碼
5.6)FanPanel示範:預設狀态

滑鼠放在其上:
滑鼠點選:
改變Detail Level值後的效果:
的源代碼。