原文: AvalonDock的基本用法 AvalonDock是優秀的開源項目,用于建立可停靠式布局,能夠在WPF中友善開發出類似VS2010的軟體界面。對于複雜的軟體系統,大量控件的使用會使的界面變得難以管理。AvalonDock幫我們解決了這一問題。想要在WPF項目中使用AvalonDock的功能,首先要加載AvalonDock所提供的動态庫,下載下傳位址: http://avalondock.codeplex.com/releases/view/107371 ,目前最新的庫版本為2.02。下載下傳AvalonDock的動态庫與主題庫,解壓後如圖所示: 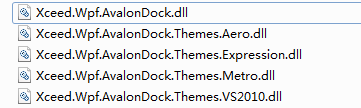
,便可以在WPF中開發AvalonDock應用程式了。
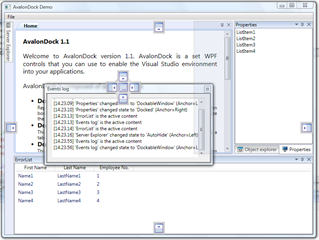
下圖是AvalonDock首頁展示的示例截圖。
AvalonDock庫中提供了一些基本的類,熟悉這些類的功能是使用AvalonDock的第一步。
DockingManager : 停靠管理器類,是AvalonDock中的核心控件之一,負責管理浮動窗體、布局存儲、恢複,樣式主題等。在XAML中,是AvaDock元素的根節點。
LayoutRoot : 布局根節點類,DockingManager中的内容控件完全占滿DockingManager中的空間。LayoutRoot包含四個屬性,LeftSide,RightSide,TopSide,BottomSide,分别用于展示DockingManager中左右上下四個位置的内容,但初始狀态為隐藏狀态。另外兩個屬性FloatingWindows,Hidden分别為浮動窗體集合和隐藏窗體集合。當一個窗格浮動時,AvalonDock會将其從其所在組中删除,然後放置到FloatingWindows集合中。當一個窗格關閉時,會将其放置在Hidden集合中。
LayoutPanel:布局面闆類,LayoutRoot中的内容控件,完全占滿LayoutRoot中的空間,在LayoutPanel中,可以有多個LayoutGroup,可以設定Orientation 屬性,控件布局組的浮動方向。實際的窗格都位于LayoutPanel節點下。
LayoutAnchorablePane:可停靠窗格類,浮動窗格是可停靠控件LayoutAnchorable的容器。一個窗格中,可以有多個可停靠控件。浮動窗格中的可停靠控件隻能是LayoutAnchorable.窗格大小設定後,不能自動改變。
LayoutDocumentPane:文檔窗格類,與LayoutAnchorablePane類似,也是可停靠控件的容器,文檔窗格類中可以放置可停靠控件LayoutAnchorable,也可以放置文檔控件LayoutDocument,LayoutDocunemtPane會自動占滿窗體的窗體布局中的剩餘空間。
LayoutAnchorablePaneGroup:可停靠窗格組類,是可停靠窗格LayoutAnchorablePane的容器。通過設定Orientation 屬性,用于管理多個可停靠窗格的浮動方向。
LayoutDocumentPaneGroup:文檔窗格組類,是文檔窗格LayoutDocumentPane的容器。通過設定Orientation 屬性,用于管理多個文檔窗格的浮動方向。
LayoutAnchorable:可停靠内容類,一般放置在LayoutAnchorablePane中,其内容可以是使用者自定義控件類型,比如,在UserControl中設定好WPF基礎控件布局,然後将整個UserControl放置在LayoutAnchorable中,這樣,整個UserControl内容就可以随着可停靠控件一起浮動或者停靠。
LayoutDocument:文檔類,與LayoutAnchorable功能類似,差別在于LayoutDoucument會随着LayoutDocumentPane一起占滿窗體剩餘空間。
介紹了這麼多内容,目的隻是為了讓大家對AvalonDock中的類有個簡單的了解。其實AvalonDock中的類有着明顯的層次結構,其實就是容器的嵌套。DockingManager作為頂層容器,然後包含一個LayoutRoot對象,LayoutRoot中又包含一個LayoutPanel對象。LayoutPanel中便是LayoutAnchroablePane對象和LayouDocumentPane對象的集合。同時,可以對LayoutAnchroablePane對象和LayouDocumentPane對象進行分組,每個組可以單獨設定組内的浮動方向。LayoutAnchorablePane又是LayoutAnchorable的容器,LayioutDocumanePane又是LayoutDocument的容器。一層一層進行嵌套,在最後的LayoutAnchorable中或者LayoutDocument中,我們放入我們真正的控件對象,這樣,就可以對他們進行分類擺放布局。
下面介紹具體的用法。
1.窗體布局存儲與恢複
DockingManager中提供了将窗體布局序列化為xml檔案内容的方法,同時提供了從xml布局檔案中恢複布局的方法。
(1)儲存布局
XmlLayoutSerializer serializer = new XmlLayoutSerializer(DockManager);
 using (var stream = new StreamWriter("Layout.xml"))
 {
         serializer.Serialize(stream);
}
(2)恢複布局
XmlLayoutSerializer serializer = new XmlLayoutSerializer(DockManager);
 using (var stream = new StreamReader("Layout.xml"))
{
     serializer.Deserialize(stream);
 }
恢複布局時,有一點需要注意,需要為LayoutAnchrobale對象和LayoutDocument對象設定ContentId屬性,否則,DockingManager會忽略内容的恢複。
2.主題更換
AvalonDock中提供了六種主題樣式,要使用這些主題,需要在程式中導入主題庫。DockManger為DockingManager對象,通過改變DockingManager中的Theme屬性,便可以改變整個界面的樣式。
DockManager.Theme = new GenericTheme();
//DockManager.Theme = new AeroTheme();
//DockManager.Theme = new ExpressionDarkTheme();
//DockManager.Theme = new ExpressionLightTheme();
//DockManager.Theme = new MetroTheme();
//DockManager.Theme = new VS2010Theme();
3.RootSide操作
動态改變LayoutRoot.LeftSide對象内容。
(1)xaml中的代碼
<avalon:LayoutRoot.LeftSide>
       <avalon:LayoutAnchorSide>
                <avalon:LayoutAnchorGroup x:Name="LeftGroup">

                  </avalon:LayoutAnchorGroup>
       </avalon:LayoutAnchorSide>
</avalon:LayoutRoot.LeftSide>
(2)背景代碼
private void miLeft_Click_1(object sender, RoutedEventArgs e)
 {
            try
            {
                LayoutAnchorable anchorable = new LayoutAnchorable();
                anchorable.Title = "Left";
                LeftGroup.Children.Add(anchorable);
            }
            catch (Exception ex)
            {
                MessageBox.Show(ex.Message, "[MainWindow][miLeft_Click_1]");
            }
 }
4.Pane操作
動态改變軟體中的窗格布局。
<avalon:DockingManager x:Name="DockManager">
                <avalon:DockingManager.Theme>
                    <avalon:ExpressionDarkTheme/>
                </avalon:DockingManager.Theme>

                <avalon:LayoutRoot x:Name="Root">
                    <avalon:LayoutPanel x:Name="Panel" >
                        <avalon:LayoutAnchorablePaneGroup x:Name="LeftAnchorableGroup" DockWidth="300">
                            <avalon:LayoutAnchorablePane x:Name="LeftPane">
                                <avalon:LayoutAnchorable x:Name="Solution" Title="解決方案" ContentId="Solution"/>
                            </avalon:LayoutAnchorablePane>
                        </avalon:LayoutAnchorablePaneGroup>

                        <avalon:LayoutAnchorablePane>
                            <avalon:LayoutAnchorable ></avalon:LayoutAnchorable>
                        </avalon:LayoutAnchorablePane>
                        <avalon:LayoutDocumentPane>
                            <avalon:LayoutDocument></avalon:LayoutDocument>
                        </avalon:LayoutDocumentPane>

                        <avalon:LayoutDocumentPaneGroup x:Name="DocumentGroup">
                            <avalon:LayoutDocumentPane x:Name="DocumentPane">
                                <avalon:LayoutDocument Title="document" ContentId="document">

                                </avalon:LayoutDocument>
                            </avalon:LayoutDocumentPane>
                        </avalon:LayoutDocumentPaneGroup>

                        <avalon:LayoutAnchorablePaneGroup x:Name="RightAnchorableGroup" Orientation="Vertical" DockWidth="300">
                            <avalon:LayoutAnchorablePane x:Name="RightPane" >
                                <avalon:LayoutAnchorable Title="屬性" ContentId="Property"/>
                            </avalon:LayoutAnchorablePane>
                        </avalon:LayoutAnchorablePaneGroup>


                    </avalon:LayoutPanel>
    </avalon:LayoutRoot>
 </avalon:DockingManager>
(2)添加水準AnchorablePane
private void miAnchorPane_Click_1(object sender, RoutedEventArgs e)
 {
            try
            {
                LayoutAnchorablePane pane = new LayoutAnchorablePane();
                LayoutAnchorable anchorable = new LayoutAnchorable();
                anchorable.Title="水準方向";
                pane.Children.Add(anchorable);
                LeftAnchorableGroup.Children.Add(pane);
            }
            catch(Exception ex)
            {
                MessageBox.Show(ex.Message,"[MainWindow][miAnchorPane_Click_1]");
            }

 }
(3)添加豎直AnchorablePane
private void miAnchorVerticalPane_Click_1(object sender, RoutedEventArgs e)
{
           try
            {
                LayoutAnchorablePane pane = new LayoutAnchorablePane();
                LayoutAnchorable anchorable = new LayoutAnchorable();
                anchorable.Title = "豎直方向";
                pane.Children.Add(anchorable);
                RightAnchorableGroup.Children.Add(pane);
            }
            catch (Exception ex)
            {
                MessageBox.Show(ex.Message, "[MainWindow][miAnchorVerticalPane_Click_1]");
            }
 }
(4)添加DocumentPane
private void miDocumentPane_Click_1(object sender, RoutedEventArgs e)
 {
            try
            {
                LayoutDocumentPane documentPane = new LayoutDocumentPane();
                LayoutDocument document = new LayoutDocument();
                document.Title = "document";
                document.Content = new RichTextBox();
                documentPane.Children.Add(document);
                DocumentGroup.Children.Add(documentPane);
            }
            catch (Exception ex)
            {
                MessageBox.Show(ex.Message, "[MainWindow][miDocumentPane_Click_1]");
            }
 }
5.浮動窗體顯示
private void miSearchWnd_Click_1(object sender, RoutedEventArgs e)
 {
            LayoutAnchorable anchorable = new LayoutAnchorable();
            anchorable.Title = "查詢";
            anchorable.FloatingWidth = 300;
            anchorable.FloatingHeight = 300;
            anchorable.FloatingTop = 200;
            anchorable.FloatingLeft = 300;

            Button button = new Button();
            button.Content = "查詢";
            button.Width = 80;
            button.Height = 40;

            anchorable.Content = button;
            LeftPane.Children.Add(anchorable);
            anchorable.Float();     //調用Float方法,使窗體浮動顯示
}
6.隐藏窗體顯示
private void miRestoreHideWnd_Click_1(object sender, RoutedEventArgs e)
{
            try
            {
                if (Root.Hidden != null)
                {
                    while (Root.Hidden.Count > 0)
                    {
                        Root.Hidden[0].Show();//調用show方法,恢複窗體顯示。
                    }
                }
            }
            catch(Exception ex)
            {
                MessageBox.Show(ex.Message, "[MainWindow][miRestoreHideWnd_Click_1]");
            }
}
7.窗體操作
(1)添加Anchorable
private void miAddAnchroable_Click_1(object sender, RoutedEventArgs e)
 {
            LayoutAnchorable anchorable = new LayoutAnchorable();
            anchorable.Title = "工具";
            Button btn = new Button();
            btn.Content = "this is a test button";
            anchorable.Content = btn;
            btn.Height = 30;
            btn.Width = 150;
            anchorable.IsActive = true;
            RightPane.Children.Add(anchorable);
}
(2)添加Document
private void miAddDocument_Click_1(object sender, RoutedEventArgs e)
{
            LayoutDocument document = new LayoutDocument();
            document.Title = "doc";
            document.Content = new RichTextBox();
            document.IsActive = true;
            DocumentPane.Children.Add(document);
}
(3)添加并顯示窗體
private void miOutPutWnd_Click_1(object sender, RoutedEventArgs e)
{
            LayoutAnchorable anchorable = new LayoutAnchorable();
            anchorable.Title = "輸出";
            anchorable.Content = new RichTextBox();
            anchorable.AddToLayout(DockManager, AnchorableShowStrategy.Bottom);
}
(4)窗體切換自動隐藏
private void miAutoHide_Click_1(object sender, RoutedEventArgs e)
 {
            if (Solution != null)
            {
                Solution.ToggleAutoHide();
            }
 }
至此,AvalonDock的基礎用法,至于更改AvalonDock的外觀樣式,使用MVVM模式等進階的用法,需要自己慢慢去學習了。
完整的源碼下載下傳:
http://download.csdn.net/detail/tianwenxue/8871487本文原創,轉載請注明出處。
![SIP Presence SUBSCRIBE-NOTIFY[圖]](data:image/gif;base64,R0lGODlhAQABAIAAAP///wAAACwAAAAAAQABAAACAkQBADs=)