庭院深深深幾許,楊柳堆煙,簾幕無重數。玉勒雕鞍遊冶處,樓高不見章台路。
雨橫風狂三月暮,門掩黃昏,無計留春住。淚眼問花花不語,亂紅飛過秋千去。
一、 通過Threading的local實作的本地存儲隔離
- 當我們開啟多線程來執行func函數,通過自定義的Foo類來存儲資料時,我們發現最終的輸出結果是全部的線程列印的都是一個最終的數字10,這是因為這樣存儲的資料線程之間是共享的,當最後一個線程執行func函數時,由于func函數time.sleep了1秒鐘,第一個線程還沒有來得及列印資料呢,就被最後一個線程傳的參數給覆寫了,進而線程們列印的結果都是相同的。
from threading import local
import threading
import time

class Foo(object):
    pass

def func(num):
    Foo.num = num
    time.sleep(1)
    print(Foo.num,threading.current_thread().ident)


for i in range(1,11):
    th = threading.Thread(target=func,args=(i,))
    th.start()
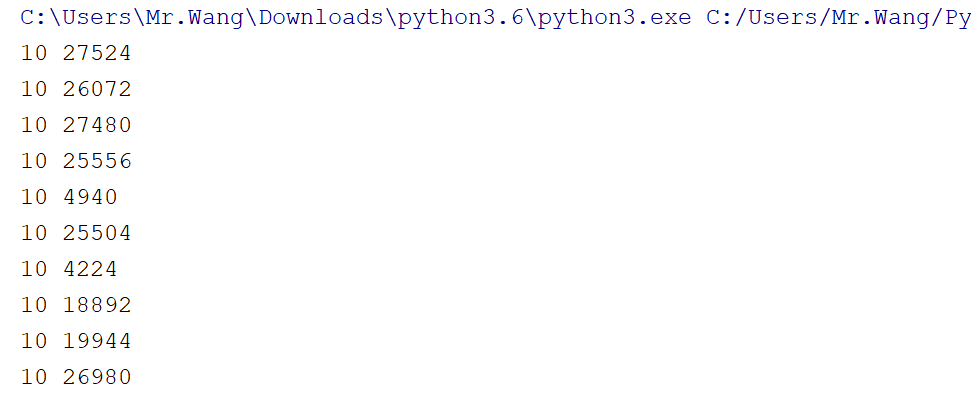
輸出結果.png
- 我們使用Threading中的local來存儲資料就可以做到資料線上程之間資料隔離。進而就可以了解為什麼flask的上下文管理是基于local來實作的資料存儲了。
from threading import local
import threading
import time

foo = local()

def func(num):
    foo.num = num
    time.sleep(1)
    print(foo.num,threading.current_thread().ident)


for i in range(1,11):
    th = threading.Thread(target=func,args=(i,))
    th.start()

二、執行個體化一個Flask應用
使用
app = Flask(__name__)
,可以執行個體化一個Flask應用。執行個體化的Flask應用有一些要點或特性需要注意一下:
- 對于請求和響應的處理,Flask使用
werkzeug
Request
Response
- 對于URL模式的處理,Flask應用使用
werkzeug
Map
Rule
Rule
Rule
Map
- 當執行個體化一個Flask應用
app
route
'/'
index()
Rule
Map
'/'
index()
- 執行個體化Flask應用時,會創造一個
Jinja
- 執行個體化的Flask應用是一個可調用對象。在前面講到,Web應用要遵循
WSGI
webapp(environ, start_response)
__call__(environ, start_response)
方法可以讓它被伺服器或網關調用。
注意到調用該方法會執行
wsgi_app(environ, start_response)
- Flask應用還有一些其他的屬性或方法,用于整個請求和響應過程。
三、調用Flask應用時會發生什麼
上面部分分析了執行個體化的Flask應用長什麼樣子。當一個完整的Flask應用執行個體化後,可以通過調用app.run()方法運作這個應用。
Flask應用的run()方法會調用werkzeug.serving子產品中的run_simple方法。這個方法會建立一個本地的測試伺服器,并且在這個伺服器中運作Flask應用。
當伺服器開始調用Flask應用後,便會觸發Flask應用的_call_(environ, start_response)方法。其中environ由伺服器産生,start_response在伺服器中定義。
上面我們分析到當Flask應用被調用時會執行wsgi_app(environ, start_response)方法。可以看出,wsgi_app是真正被調用的WSGI應用,之是以這樣設計,就是為了在應用正式處理請求之前,wsgi_app可以被一些“中間件”裝飾,以便先行處理一些操作。
四、上下文(application context 和 request context)
在 flask 中,視圖函數需要知道它執行情況的請求資訊(請求的 url,參數,方法等)以及應用資訊(應用中初始化的資料庫等),才能夠正确運作。
最直覺地做法是把這些資訊封裝成一個對象,作為參數傳遞給視圖函數。但是這樣的話,所有的視圖函數都需要添加對應的參數,即使該函數内部并沒有使用到它。
flask 的做法是把這些資訊作為類似全局變量的東西,視圖函數需要的時候,可以使用
from flask import request
擷取。但是這些對象和全局變量不同的是——它們必須是動态的,因為在多線程或者多協程的情況下,每個線程或者協程擷取的都是自己獨特的對象,不會互相幹擾。
那麼如何實作這種效果呢?如果對 python 多線程比較熟悉的話,應該知道多線程中有個非常類似的概念
threading.local
,可以實作多線程通路某個變量的時候隻看到自己的資料。内部的原理說起來也很簡單,這個對象有一個字典,儲存了線程 id 對應的資料,讀取該對象的時候,它動态地查詢目前線程 id 對應的資料。
flask 中有兩種上下文:application context 和 request context。上下文有關的内容定義在 globals.py 檔案。
from functools import partial
from werkzeug.local import LocalStack, LocalProxy


_request_ctx_err_msg = '''\
Working outside of request context.

This typically means that you attempted to use functionality that needed
an active HTTP request.  Consult the documentation on testing for
information about how to avoid this problem.\
'''
_app_ctx_err_msg = '''\
Working outside of application context.

This typically means that you attempted to use functionality that needed
to interface with the current application object in some way. To solve
this, set up an application context with app.app_context().  See the
documentation for more information.\
'''
def _lookup_req_object(name):
    top = _request_ctx_stack.top
    if top is None:
        raise RuntimeError(_request_ctx_err_msg)
    return getattr(top, name)

def _lookup_app_object(name):
    top = _app_ctx_stack.top
    if top is None:
        raise RuntimeError(_app_ctx_err_msg)
    return getattr(top, name)

def _find_app():
    top = _app_ctx_stack.top
    if top is None:
        raise RuntimeError(_app_ctx_err_msg)
    return top.app

# context locals
_request_ctx_stack = LocalStack()  #  {"__storage__":{ },"__ident_func__" : get_ident}
_app_ctx_stack = LocalStack()
current_app = LocalProxy(_find_app)
request = LocalProxy(partial(_lookup_req_object, 'request'))
session = LocalProxy(partial(_lookup_req_object, 'session'))
g = LocalProxy(partial(_lookup_app_object, 'g'))
flask 提供兩種上下文:application context 和 request context 。application context 又演化出來兩個變量 current_app 和 g,而 request context 則演化出來 request 和 session。
這裡的實作用到了兩個東西:LocalStack 和 LocalProxy。它們兩個的結果就是我們可以動态地擷取兩個上下文的内容,在并發程式中每個視圖函數都會看到屬于自己的上下文,而不會出現混亂。
LocalStack 和 LocalProxy 都是 werkzeug 提供的,定義在 local.py 檔案中。在分析這兩個類之前,我們先介紹這個檔案另外一個基礎的類 Local。Local 就是實作了類似 threading.local 的效果——多線程或者多協程情況下全局變量的隔離效果。下面是它的代碼:
import copy
from functools import update_wrapper
from werkzeug.wsgi import ClosingIterator
from werkzeug._compat import PY2, implements_bool

try:
    from greenlet import getcurrent as get_ident
except ImportError:
    try:
        from thread import get_ident
    except ImportError:
        from _thread import get_ident

class Local(object):
    __slots__ = ('__storage__', '__ident_func__')

    def __init__(self):
        // 資料儲存在 __storage__ 中,後續通路都是對該屬性的操作
        object.__setattr__(self, '__storage__', {})  // {"__storage__":{}}
        object.__setattr__(self, '__ident_func__', get_ident)   //  {"__storage__":{} , "__ident_func__" : get_ident}

    def __iter__(self):
        return iter(self.__storage__.items())

    def __call__(self, proxy):
        """Create a proxy for a name."""
        return LocalProxy(self, proxy)

    // 清空目前線程/協程儲存的所有資料
    def __release_local__(self):
        self.__storage__.pop(self.__ident_func__(), None)

    // 下面三個方法實作了屬性的通路、設定和删除。
    // 注意到,内部都調用 `self.__ident_func__` 擷取目前線程或者協程的 id,然後再通路對應的内部字典。
    // 如果通路或者删除的屬性不存在,會抛出 AttributeError。
    // 這樣,外部使用者看到的就是它在通路執行個體的屬性,完全不知道字典或者多線程/協程切換的實作
    def __getattr__(self, name):
        try:
            return self.__storage__[self.__ident_func__()][name]
        except KeyError:
            raise AttributeError(name)

    def __setattr__(self, name, value):
        ident = self.__ident_func__()
        storage = self.__storage__
        try:
            storage[ident][name] = value
        except KeyError:
            storage[ident] = {name: value}

    def __delattr__(self, name):
        try:
            del self.__storage__[self.__ident_func__()][name]
        except KeyError:
            raise AttributeError(name)
可以看到,Local 對象内部的資料都是儲存在 _storage_ 屬性的,這個屬性變量是個嵌套的字典:{"ident":{"key1":"value1","key2":"value2",...}}。最外面字典 key 是線程或者協程的 identity,value 是另外一個字典,這個内部字典就是使用者自定義的 key-value 鍵值對。
使用者通路執行個體的屬性,就變成了通路内部的字典,外面字典的 key 是自動關聯的。self._ident_func_() 就是執行get_ident(),得到的是協程的 get_current 或者線程的 get_ident,進而擷取目前代碼所線上程或者協程的 id。
除了這些基本操作之外,Local 還實作了_release_local_ ,用來清空(析構)目前線程或者協程的資料(狀态)。_call_ 操作來建立一個 LocalProxy 對象,LocalProxy 會在下面講到。
了解了 Local,我們繼續回來看另外兩個類。
LocalStack 是基于 Local 實作的棧結構。如果說 Local 提供了多線程或者多協程隔離的屬性通路,那麼 LocalStack 就提供了隔離的棧通路。下面是它的實作代碼,可以看到它提供了 push、pop 和 top 方法。
_release_local_ 可以用來清空目前線程或者協程的棧資料,_call_ 方法傳回目前線程或者協程棧頂元素的代理對象。
class LocalStack(object):

    def __init__(self):
        self._local = Local()  //  {"__storage__":{},"__ident_func__":get_ident}

    def __release_local__(self):
        self._local.__release_local__()

    def __call__(self):
        def _lookup():
            rv = self.top
            if rv is None:
                raise RuntimeError('object unbound')
            return rv
        return LocalProxy(_lookup)


    //  push、pop 和 top 三個方法實作了棧的操作,
    //  可以看到棧的資料是儲存在 self._local.stack 屬性中的
    def push(self, obj):
        """Pushes a new item to the stack"""
        rv = getattr(self._local, 'stack', None)  //  {"__storage__":{},"__ident_func__":get_ident}
        if rv is None:
            self._local.stack = rv = []
        rv.append(obj)
        return rv

    def pop(self):
        stack = getattr(self._local, 'stack', None)
        if stack is None:
            return None
        elif len(stack) == 1:
            release_local(self._local)
            return stack[-1]
        else:
            return stack.pop()

    @property
    def top(self):
        try:
            return self._local.stack[-1]
        except (AttributeError, IndexError):
            return None
我們在之前看到了 request context 的定義,它就是一個 LocalStack 的執行個體:
_request_ctx_stack = LocalStack() // {"__storage__":{},"__ident_func__":get_ident}
它會把目前線程或者協程的請求都儲存在棧裡,等使用的時候再從裡面讀取。
LocalProxy 是一個 Local 對象的代理,負責把所有對自己的操作轉發給内部的 Local 對象。LocalProxy 的構造函數介紹一個 callable 的參數,這個 callable 調用之後需要傳回一個 Local 執行個體,後續所有的屬性操作都會轉發給 callable 傳回的對象。
@implements_bool
class LocalProxy(object):

    __slots__ = ('__local', '__dict__', '__name__', '__wrapped__')

    def __init__(self, local, name=None):
        object.__setattr__(self, '_LocalProxy__local', local)
        object.__setattr__(self, '__name__', name)
        if callable(local) and not hasattr(local, '__release_local__'):
            # "local" is a callable that is not an instance of Local or
            # LocalManager: mark it as a wrapped function.
            object.__setattr__(self, '__wrapped__', local)

    def _get_current_object(self):
        """Return the current object"""
        if not hasattr(self.__local, '__release_local__'):
            return self.__local()
        try:
            return getattr(self.__local, self.__name__)
        except AttributeError:
            raise RuntimeError('no object bound to %s' % self.__name__)

    @property
    def __dict__(self):
        try:
            return self._get_current_object().__dict__
        except RuntimeError:
            raise AttributeError('__dict__')

    def __getattr__(self, name):
        if name == '__members__':
            return dir(self._get_current_object())
        return getattr(self._get_current_object(), name)

    def __setitem__(self, key, value):
        self._get_current_object()[key] = value

    def __delitem__(self, key):
        del self._get_current_object()[key]
這裡實作的關鍵是把通過參數傳遞進來的 Local 執行個體儲存在 __local 屬性中,并定義了 _get_current_object() 方法擷取目前線程或者協程對應的對象。
看下面這段代碼就能看明白,由于_request_ctx_stack 是多線程或者協程隔離的棧結構,request 每次都會調用 _lookup_req_object 棧頭部的資料來擷取儲存在裡面的 requst context。
_request_ctx_stack = LocalStack()  // {"__storage__":{},"__ident_func__":get_ident}
request = LocalProxy(partial(_lookup_req_object, 'request'))
session = LocalProxy(partial(_lookup_req_object, 'session'))
那麼請求上下文資訊是什麼時候被放在 stack 中呢?還記得之前介紹的 wsgi_app() 方法有下面代碼嗎?
def __call__(self, environ, start_response):
    return self.wsgi_app(environ, start_response)


def wsgi_app(self, environ, start_response):
    ctx = self.request_context(environ)
    error = None
    try:
        try:
            ctx.push()
            response = self.full_dispatch_request()
        except Exception as e:
            error = e
            response = self.handle_exception(e)
        except:
            error = sys.exc_info()[1]
            raise
        return response(environ, start_response)
    finally:
        if self.should_ignore_error(error):
            error = None
        ctx.auto_pop(error)
每次在調用 app._call_ 的時候,都會把對應的請求資訊壓棧,最後執行完請求的處理之後把它出棧。
我們來看看request_context, 這個 方法隻有一行代碼:
def request_context(self, environ):

    return RequestContext(self, environ)
它調用了 RequestContext,并把 self 和請求資訊的字典 environ 當做參數傳遞進去。追蹤到 RequestContext 定義的地方,它出現在 ctx.py 檔案中,代碼如下:
class RequestContext(object):

    def __init__(self, app, environ, request=None):
        self.app = app
        if request is None:
            request = app.request_class(environ)
        self.request = request
        self.url_adapter = app.create_url_adapter(self.request)
        self.flashes = None
        self.session = None

    def match_request(self):
        """Can be overridden by a subclass to hook into the matching
        of the request.
        """
        try:
            url_rule, self.request.view_args = \
                self.url_adapter.match(return_rule=True)
            self.request.url_rule = url_rule
        except HTTPException as e:
            self.request.routing_exception = e

    def push(self):
        top = _request_ctx_stack.top # {"__storage__":{},"__ident_func__":get_ident}
        if top is not None and top.preserved:
            top.pop(top._preserved_exc)

        # Before we push the request context we have to ensure that there
        # is an application context.
        app_ctx = _app_ctx_stack.top
        if app_ctx is None or app_ctx.app != self.app:
            app_ctx = self.app.app_context()
            app_ctx.push()
            self._implicit_app_ctx_stack.append(app_ctx)
        else:
            self._implicit_app_ctx_stack.append(None)

        if hasattr(sys, 'exc_clear'):
            sys.exc_clear()

        _request_ctx_stack.push(self)

        if self.session is None:
            session_interface = self.app.session_interface
            self.session = session_interface.open_session(
                self.app, self.request
            )

            if self.session is None:
                self.session = session_interface.make_null_session(self.app)

    def pop(self, exc=_sentinel):
        app_ctx = self._implicit_app_ctx_stack.pop()

        try:
            clear_request = False
            if not self._implicit_app_ctx_stack:
                self.preserved = False
                self._preserved_exc = None
                if exc is _sentinel:
                    exc = sys.exc_info()[1]
                self.app.do_teardown_request(exc)
                if hasattr(sys, 'exc_clear'):
                    sys.exc_clear()

                request_close = getattr(self.request, 'close', None)
                if request_close is not None:
                    request_close()
                clear_request = True
        finally:
            rv = _request_ctx_stack.pop()

            if clear_request:
                rv.request.environ['werkzeug.request'] = None
            if app_ctx is not None:
                app_ctx.pop(exc)

            assert rv is self, 'Popped wrong request context.  ' \
                '(%r instead of %r)' % (rv, self)

    def auto_pop(self, exc):
        if self.request.environ.get('flask._preserve_context') or \
           (exc is not None and self.app.preserve_context_on_exception):
            self.preserved = True
            self._preserved_exc = exc
        else:
            self.pop(exc)

    def __enter__(self):
        self.push()
        return self

    def __exit__(self, exc_type, exc_value, tb):
        self.auto_pop(exc_value)

        if BROKEN_PYPY_CTXMGR_EXIT and exc_type is not None:
            reraise(exc_type, exc_value, tb)

    def __repr__(self):
        return '<%s \'%s\' [%s] of %s>' % (
            self.__class__.__name__,
            self.request.url,
            self.request.method,
            self.app.name,
        )
每個 request context 都儲存了目前請求的資訊,比如 request 對象和 app 對象。在初始化的最後,還調用了
match_request
實作了路由的比對邏輯。
push 操作就是把該請求的 ApplicationContext(如果 _app_ctx_stack 棧頂不是目前請求所在 app ,需要建立新的 app context) 和 RequestContext 有關的資訊儲存到對應的棧上,壓棧後還會儲存 session 的資訊; pop 則相反,把 request context 和 application context 出棧,做一些清理性的工作。
到這裡,上下文的實作就比較清晰了:每次有請求過來的時候,flask 會先建立目前線程或者程序需要處理的兩個重要上下文對象,把它們儲存到隔離的棧裡面,這樣視圖函數進行處理的時候就能直接從棧上擷取這些資訊。