Hystrix儀表盤
通過上一篇我們已經成功的實作了spring cloud對Hystrix的整合了。除此之外,spring cloud還完美的整合了Hystrix的儀表盤元件Hystrix Dashboard。該元件主要是用來實時監控Hystrix的各項訓示資訊的。通過Hystrix Dashboard回報的資訊,可以幫助我們快速的發現系統中存在的問題,進而即使采取應對方法。
快速入門(單執行個體監控)
先示範針對單個應用的監控
建立一個module命名為"eureka-hystrix-dashboard",建立時選擇對應的元件
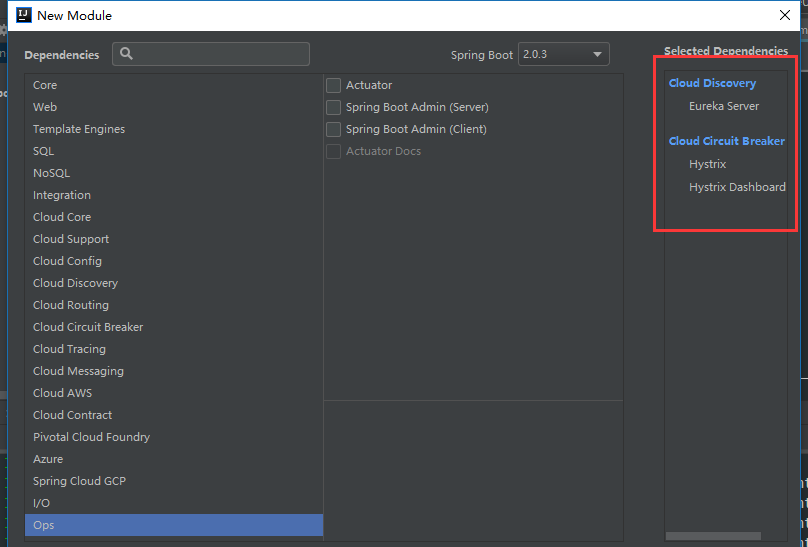
1532502505125.png
建立成功後,我們還需要在pom.xml中添加actuator的依賴:
<?xml version="1.0" encoding="UTF-8"?>
<project xmlns="http://maven.apache.org/POM/4.0.0" xmlns:xsi="http://www.w3.org/2001/XMLSchema-instance"
         xsi:schemaLocation="http://maven.apache.org/POM/4.0.0 http://maven.apache.org/xsd/maven-4.0.0.xsd">
    <modelVersion>4.0.0</modelVersion>

    <groupId>com.example</groupId>
    <artifactId>eureka-hystrix-dashboard</artifactId>
    <version>0.0.1-SNAPSHOT</version>
    <packaging>jar</packaging>

    <name>eureka-hystrix-dashboard</name>
    <description>Demo project for Spring Boot</description>

    <parent>
        <groupId>org.springframework.boot</groupId>
        <artifactId>spring-boot-starter-parent</artifactId>
        <version>2.0.3.RELEASE</version>
        <relativePath/> <!-- lookup parent from repository -->
    </parent>

    <properties>
        <project.build.sourceEncoding>UTF-8</project.build.sourceEncoding>
        <project.reporting.outputEncoding>UTF-8</project.reporting.outputEncoding>
        <java.version>1.8</java.version>
        <spring-cloud.version>Finchley.RELEASE</spring-cloud.version>
    </properties>

    <dependencies>
        <dependency>
            <groupId>org.springframework.cloud</groupId>
            <artifactId>spring-cloud-starter-netflix-eureka-server</artifactId>
        </dependency>
        <dependency>
            <groupId>org.springframework.cloud</groupId>
            <artifactId>spring-cloud-starter-netflix-hystrix</artifactId>
        </dependency>
        <dependency>
            <groupId>org.springframework.cloud</groupId>
            <artifactId>spring-cloud-starter-netflix-hystrix-dashboard</artifactId>
        </dependency>
        <dependency>
            <groupId>org.springframework.boot</groupId>
            <artifactId>spring-boot-starter-actuator</artifactId>
        </dependency>

        <dependency>
            <groupId>org.springframework.boot</groupId>
            <artifactId>spring-boot-starter-test</artifactId>
            <scope>test</scope>
        </dependency>
    </dependencies>

    <dependencyManagement>
        <dependencies>
            <dependency>
                <groupId>org.springframework.cloud</groupId>
                <artifactId>spring-cloud-dependencies</artifactId>
                <version>${spring-cloud.version}</version>
                <type>pom</type>
                <scope>import</scope>
            </dependency>
        </dependencies>
    </dependencyManagement>

    <build>
        <plugins>
            <plugin>
                <groupId>org.springframework.boot</groupId>
                <artifactId>spring-boot-maven-plugin</artifactId>
            </plugin>
        </plugins>
    </build>
</project>
application.yml配置:
spring:
  application:
    name: hystrix-dashboard
server:
  port: 2001
eureka:
  client:
    serviceUrl:
      defaultZone: http://peer1:8762/eureka/,http://peer2:8763/eureka/
在主類"EurekaHystrixDashboardApplication",添加@EnableHystrixDashboard注解,表示開啟Hystrix儀表盤監控
@SpringBootApplication
@EnableDiscoveryClient
@EnableHystrixDashboard
public class EurekaHystrixDashboardApplication {

    public static void main(String[] args) {
        SpringApplication.run(EurekaHystrixDashboardApplication.class, args);
    }
}
配置完成啟動項目後,通路位址:
http://localhost:2001/hystrix如果看也下面的頁面就說明項目正常的:

1532502951844.png
通過 Hystrix Dashboard 首頁面的文字介紹,我們可以知道,Hystrix Dashboard 共支援三種不同的監控方式:
預設的叢集監控:通過 URL:
http://turbine-hostname:port/turbine.stream開啟,實作對預設叢集的監控。
指定的叢集監控:通過 URL:
http://turbine-hostname:port/turbine.stream?cluster=[clusterName]開啟,實作對 clusterName 叢集的監控。
單體應用的監控: 通過 URL:
http://hystrix-app:port/hystrix.stream開啟 ,實作對具體某個服務執行個體的監控。(現在這裡的 URL 應該為
http://hystrix-app:port/actuator/hystrix.stream,Actuator 2.x 以後endpoints 全部在/actuator下,可以通過management.endpoints.web.base-path修改)。
前兩者都對叢集的監控,需要整合 Turbine 才能實作。
因為我們目前先做實作對單體應用的監控,是以這裡的單體應用就用使用 Hystrix 實作的服務提供者"eureka-bussniss-service-user-client-ribbon"
頁面上的另外兩個參數:
Delay:控制伺服器上輪詢監控資訊的延遲時間,預設為 2000 毫秒,可以通過配置該屬性來降低用戶端的網絡和 CPU 消耗。
Title:該參數可以展示合适的标題。
配置服務提供者
Hystrix Dashboard 監控單執行個體節點需要通過通路執行個體的/actuator/hystrix.stream接口來實作,是以我們需要為服務提供者做一下配置。 在"eureka-bussniss-service-user-client-ribbon"項目的pom檔案添加autuator和hystrix的依賴。
<!--添加Hystrix依賴 斷路器容錯保護-->
 <dependency>
   <groupId>org.springframework.cloud</groupId>
   <artifactId>spring-cloud-starter-netflix-hystrix</artifactId>
 </dependency>
 <!--監控中心-->
  <dependency>
    <groupId>org.springframework.boot</groupId>
    <artifactId>spring-boot-starter-actuator</artifactId>
 </dependency>
修改application.yml配置
添加management.endpoints.web.exposure.include=hystrix.stream屬性,表示暴露hystrix.stream的監控點位址。
spring:
  application:
    name: service-user-ribbon
server:
  port: 8901
eureka:
  client:
    serviceUrl:
      defaultZone: http://peer1:8762/eureka/,http://peer2:8763/eureka/
management:
  endpoints:
    web:
      exposure:
        include: hystrix.stream
接着在主類名"EurekaBussnissServiceUserClientRibbonApplication"添加@EnableCircuitBreaker 表示啟動Hystrix儀表盤 服務熔斷(ribbon 單服務執行個體監控)
@SpringBootApplication
@EnableEurekaClient
@EnableHystrix
@EnableCircuitBreaker //Hystrix儀表盤 服務熔斷(ribbon 單服務執行個體監控)
public class EurekaBussnissServiceUserClientRibbonApplication {

    public static void main(String[] args) {
        SpringApplication.run(EurekaBussnissServiceUserClientRibbonApplication.class, args);
    }

    @Bean
    @LoadBalanced //開啟用戶端負載均衡
    RestTemplate restTemplate() {
        return new RestTemplate();
    }
}
重新開機"eureka-bussniss-service-user-client-ribbon"項目。
1532504332432.png
在2001項目頁面中輸入"
http://localhost:8901/actuator/hystrix.stream",點選"Monitor Stream ",注意:(spring boot 2.x)監控位址需要加上actuator的路徑。看到下圖,顯示loding...
1532504462251.png
一直顯示loding...這是因為還沒有檢測到請求,我們通路一下位址:
http://localhost:8901/listUsersByRibbon,然後就可以看到下面的資訊了。
1532504537311.png
頁面上面的資訊就是顯示服務的具體情況,具體的資訊可以去spring cloud的官網深入了解。這裡就不過多解釋了。
到這裡我們就已經實作了Hystrix dashboard對單個應用的儀表監控了。
快速入門 (叢集監控)
建立一個新的module命名為"eureka-hystrix-dashboard-turbine"。建立時選擇對應的元件依賴
1532505439252.png
pom.xml如下:
<?xml version="1.0" encoding="UTF-8"?>
<project xmlns="http://maven.apache.org/POM/4.0.0" xmlns:xsi="http://www.w3.org/2001/XMLSchema-instance"
         xsi:schemaLocation="http://maven.apache.org/POM/4.0.0 http://maven.apache.org/xsd/maven-4.0.0.xsd">
    <modelVersion>4.0.0</modelVersion>

    <groupId>com.example</groupId>
    <artifactId>eureka-hystrix-dashboard-turbine</artifactId>
    <version>0.0.1-SNAPSHOT</version>
    <packaging>jar</packaging>

    <name>eureka-hystrix-dashboard-turbine</name>
    <description>Demo project for Spring Boot</description>

    <parent>
        <groupId>org.springframework.boot</groupId>
        <artifactId>spring-boot-starter-parent</artifactId>
        <version>2.0.3.RELEASE</version>
        <relativePath/> <!-- lookup parent from repository -->
    </parent>

    <properties>
        <project.build.sourceEncoding>UTF-8</project.build.sourceEncoding>
        <project.reporting.outputEncoding>UTF-8</project.reporting.outputEncoding>
        <java.version>1.8</java.version>
        <spring-cloud.version>Finchley.RELEASE</spring-cloud.version>
    </properties>

    <dependencies>
        <dependency>
            <groupId>org.springframework.cloud</groupId>
            <artifactId>spring-cloud-starter-netflix-turbine</artifactId>
        </dependency>
        <dependency>
            <groupId>org.springframework.boot</groupId>
            <artifactId>spring-boot-starter-actuator</artifactId>
        </dependency>

        <dependency>
            <groupId>org.springframework.boot</groupId>
            <artifactId>spring-boot-starter-test</artifactId>
            <scope>test</scope>
        </dependency>
    </dependencies>

    <dependencyManagement>
        <dependencies>
            <dependency>
                <groupId>org.springframework.cloud</groupId>
                <artifactId>spring-cloud-dependencies</artifactId>
                <version>${spring-cloud.version}</version>
                <type>pom</type>
                <scope>import</scope>
            </dependency>
        </dependencies>
    </dependencyManagement>

    <build>
        <plugins>
            <plugin>
                <groupId>org.springframework.boot</groupId>
                <artifactId>spring-boot-maven-plugin</artifactId>
            </plugin>
        </plugins>
    </build>
</project>
application.yml配置如下:
spring:
  application:
    name: turbine
server:
  port: 8989
management:
  server:
    port: 8990
eureka:
  client:
    serviceUrl:
      defaultZone: http://peer1:8762/eureka/,http://peer2:8763/eureka/
turbine:
  appConfig: service-user-ribbon
  clusterNameExpression: new String("default")
  combineHostPort: true
turbine.appConfig表示監控的服務執行個體(通過serviceId;多個服務執行個體以逗号分隔)
項目的主類名EurekaHystrixDashboardTurbineApplication添加@EnableTurbine注解
@SpringBootApplication
@EnableTurbine
@EnableEurekaClient
public class EurekaHystrixDashboardTurbineApplication {

    public static void main(String[] args) {
        SpringApplication.run(EurekaHystrixDashboardTurbineApplication.class, args);
    }
}
然後service-user項目pom添加hystrix依賴以及主類添加@EnableHystrix@EnableCircuitBreaker注解。
@SpringBootApplication
@EnableEurekaClient
@EnableHystrix
@EnableCircuitBreaker //Hystrix儀表盤 服務熔斷(ribbon 單服務執行個體監控)
public class EurekaBussnissServiceUserApplication {

    public static void main(String[] args) {
        SpringApplication.run(EurekaBussnissServiceUserApplication.class, args);
    }
}
pom.xml
<?xml version="1.0" encoding="UTF-8"?>
<project xmlns="http://maven.apache.org/POM/4.0.0" xmlns:xsi="http://www.w3.org/2001/XMLSchema-instance"
         xsi:schemaLocation="http://maven.apache.org/POM/4.0.0 http://maven.apache.org/xsd/maven-4.0.0.xsd">
    <modelVersion>4.0.0</modelVersion>

    <groupId>com.example</groupId>
    <artifactId>eureka-bussniss-service-user</artifactId>
    <version>0.0.1-SNAPSHOT</version>
    <packaging>jar</packaging>

    <name>eureka-bussniss-service-user</name>
    <description>Demo project for Spring Boot</description>

    <parent>
        <groupId>org.springframework.boot</groupId>
        <artifactId>spring-boot-starter-parent</artifactId>
        <version>2.0.3.RELEASE</version>
        <relativePath/> <!-- lookup parent from repository -->
    </parent>

    <properties>
        <project.build.sourceEncoding>UTF-8</project.build.sourceEncoding>
        <project.reporting.outputEncoding>UTF-8</project.reporting.outputEncoding>
        <java.version>1.8</java.version>
        <spring-cloud.version>Finchley.RELEASE</spring-cloud.version>
    </properties>

    <dependencies>
        <dependency>
            <groupId>org.springframework.cloud</groupId>
            <artifactId>spring-cloud-starter-netflix-eureka-server</artifactId>
        </dependency>

        <!--添加Hystrix依賴 斷路器容錯保護-->
        <dependency>
            <groupId>org.springframework.cloud</groupId>
            <artifactId>spring-cloud-starter-netflix-hystrix</artifactId>
        </dependency>

        <dependency>
            <groupId>org.springframework.boot</groupId>
            <artifactId>spring-boot-starter-web</artifactId>
        </dependency>

        <dependency>
            <groupId>org.projectlombok</groupId>
            <artifactId>lombok</artifactId>
        </dependency>

        <dependency>
            <groupId>org.springframework.boot</groupId>
            <artifactId>spring-boot-starter-test</artifactId>
            <scope>test</scope>
        </dependency>
    </dependencies>

    <dependencyManagement>
        <dependencies>
            <dependency>
                <groupId>org.springframework.cloud</groupId>
                <artifactId>spring-cloud-dependencies</artifactId>
                <version>${spring-cloud.version}</version>
                <type>pom</type>
                <scope>import</scope>
            </dependency>
        </dependencies>
    </dependencyManagement>

    <build>
        <plugins>
            <plugin>    <groupId>org.springframework.boot</groupId>
                <artifactId>spring-boot-maven-plugin</artifactId>
            </plugin>
        </plugins>
    </build>
</project>
重新開機相關的服務。同樣是在2001頁面輸入對應的位址
http://localhost:8989/turbine.stream點選Monitor Stream 我們也同樣是可以實作對服務執行個體的監控。
1532507114614.png
1532507184545.png
如果aplication.yml中的appConfig是配置了多個的,就會對顯示相應的儀表盤資料。
github 項目源碼到這裡Hystrix儀表盤監控服務執行個體就基本實作了。接下來我們會用Fegin元件以聲明式服務調用的方式實作Ribbon+Hystrix(負載均衡+服務容錯保護)的功能。