前面 13 篇博文從源碼層次分析了 IOC 整個初始化過程,這篇就這些内容做一個總結将其連貫起來。
在前文提過,IOC 容器的初始化過程分為三步驟:Resource 定位、BeanDefinition 的載入和解析,BeanDefinition 注冊。
- Resource 定位。我們一般用外部資源來描述 Bean 對象,是以在初始化 IOC 容器的第一步就是需要定位這個外部資源。
- BeanDefinition 的載入和解析。裝載就是 BeanDefinition 的載入。BeanDefinitionReader 讀取、解析 Resource 資源,也就是将使用者定義的 Bean 表示成 IOC 容器的内部資料結構:BeanDefinition。在 IOC 容器内部維護着一個 BeanDefinition Map 的資料結構,在配置檔案中每一個都對應着一個BeanDefinition對象。
- BeanDefinition 注冊。向IOC容器注冊在第二步解析好的 BeanDefinition,這個過程是通過 BeanDefinitionRegistery 接口來實作的。在 IOC 容器内部其實是将第二個過程解析得到的 BeanDefinition 注入到一個 HashMap 容器中,IOC 容器就是通過這個 HashMap 來維護這些 BeanDefinition 的。在這裡需要注意的一點是這個過程并沒有完成依賴注入,依賴注冊是發生在應用第一次調用
getBean()
還記得在部落格
【死磕 Spring】----- IOC 之 加載 Bean中提供的一段代碼嗎?這裡我們同樣也以這段代碼作為我們研究 IOC 初始化過程的開端,如下:
-
ClassPathResource resource = new ClassPathResource("bean.xml");
-
DefaultListableBeanFactory factory = new DefaultListableBeanFactory();
-
XmlBeanDefinitionReader reader = new XmlBeanDefinitionReader(factory);
-
reader.loadBeanDefinitions(resource);
剛剛開始的時候可能對上面這幾行代碼不知道什麼意思,現在應該就一目了然了。
-
ClassPathResourceresource=newClassPathResource("bean.xml");
-
DefaultListableBeanFactoryfactory=newDefaultListableBeanFactory();
-
XmlBeanDefinitionReaderreader=newXmlBeanDefinitionReader(factory);
-
reader.loadBeanDefinitions(resource);
Spring 為了解決資源定位的問題,提供了兩個接口:Resource、ResourceLoader,其中 Resource 接口是 Spring 統一資源的抽象接口,ResourceLoader 則是 Spring 資源加載的統一抽象。關于Resource、ResourceLoader 的更多知識請關注
【死磕 Spring】----- IOC 之 Spring 統一資源加載政策Resource 資源的定位需要 Resource 和 ResourceLoader 兩個接口互相配合,在上面那段代碼中
newClassPathResource("bean.xml")
為我們定義了資源,那麼 ResourceLoader 則是在什麼時候初始化的呢?看 XmlBeanDefinitionReader 構造方法:
-
public XmlBeanDefinitionReader(BeanDefinitionRegistry registry) {
-
super(registry);
-
}
直接調用父類 AbstractBeanDefinitionReader :
-
protected AbstractBeanDefinitionReader(BeanDefinitionRegistry registry) {
-
Assert.notNull(registry, "BeanDefinitionRegistry must not be null");
-
this.registry = registry;
-
// Determine ResourceLoader to use.
-
if (this.registry instanceof ResourceLoader) {
-
this.resourceLoader = (ResourceLoader) this.registry;
-
}
-
else {
-
this.resourceLoader = new PathMatchingResourcePatternResolver();
-
}
-
// Inherit Environment if possible
-
if (this.registry instanceof EnvironmentCapable) {
-
this.environment = ((EnvironmentCapable) this.registry).getEnvironment();
-
}
-
else {
-
this.environment = new StandardEnvironment();
-
}
-
}
核心在于設定 resourceLoader 這段,如果設定了 ResourceLoader 則用設定的,否則使用 PathMatchingResourcePatternResolver ,該類是一個集大成者的 ResourceLoader。
BeanDefinition 的載入和解析reader.loadBeanDefinitions(resource);
開啟 BeanDefinition 的解析過程。如下:
-
public int loadBeanDefinitions(Resource resource) throws BeanDefinitionStoreException {
-
return loadBeanDefinitions(new EncodedResource(resource));
-
}
在這個方法會将資源 resource 包裝成一個 EncodedResource 執行個體對象,然後調用
loadBeanDefinitions()
方法,而将 Resource 封裝成 EncodedResource 主要是為了對 Resource 進行編碼,保證内容讀取的正确性。
-
public int loadBeanDefinitions(EncodedResource encodedResource) throws BeanDefinitionStoreException {
-
// 省略一些代碼
-
try {
-
// 将資源檔案轉為 InputStream 的 IO 流
-
InputStream inputStream = encodedResource.getResource().getInputStream();
-
try {
-
// 從 InputStream 中得到 XML 的解析源
-
InputSource inputSource = new InputSource(inputStream);
-
if (encodedResource.getEncoding() != null) {
-
inputSource.setEncoding(encodedResource.getEncoding());
-
}
-
// 具體的讀取過程
-
return doLoadBeanDefinitions(inputSource, encodedResource.getResource());
-
}
-
finally {
-
inputStream.close();
-
}
-
}
-
// 省略一些代碼
-
}
從 encodedResource 源中擷取 xml 的解析源,調用
doLoadBeanDefinitions()
執行具體的解析過程。
-
protected int doLoadBeanDefinitions(InputSource inputSource, Resource resource)
-
throws BeanDefinitionStoreException {
-
try {
-
Document doc = doLoadDocument(inputSource, resource);
-
return registerBeanDefinitions(doc, resource);
-
}
-
// 省略很多catch代碼
在該方法中主要做兩件事:1、根據 xml 解析源擷取相應的 Document 對象,2、調用
registerBeanDefinitions()
開啟 BeanDefinition 的解析注冊過程。
轉換為 Document 對象調用
doLoadDocument()
會将 Bean 定義的資源轉換為 Document 對象。
-
protected Document doLoadDocument(InputSource inputSource, Resource resource) throws Exception {
-
return this.documentLoader.loadDocument(inputSource, getEntityResolver(), this.errorHandler,
-
getValidationModeForResource(resource), isNamespaceAware());
-
}
loadDocument()
方法接受五個參數:
- inputSource:加載 Document 的 Resource 源
- entityResolver:解析檔案的解析器
- errorHandler:處理加載 Document 對象的過程的錯誤
- validationMode:驗證模式
- namespaceAware:命名空間支援。如果要提供對 XML 名稱空間的支援,則為true
對于這五個參數,有兩個參數需要重點關注下:entityResolver、validationMode。這兩個參數分别在
【死磕Spring】----- IOC 之 擷取 Document 對象、
【死磕Spring】----- IOC 之 擷取驗證模型中有詳細的講述。
loadDocument()
在類 DefaultDocumentLoader 中提供了實作,如下:
-
public Document loadDocument(InputSource inputSource, EntityResolver entityResolver,
-
ErrorHandler errorHandler, int validationMode, boolean namespaceAware) throws Exception {
-
// 建立檔案解析工廠
-
DocumentBuilderFactory factory = createDocumentBuilderFactory(validationMode, namespaceAware);
-
if (logger.isDebugEnabled()) {
-
logger.debug("Using JAXP provider [" + factory.getClass().getName() + "]");
-
}
-
// 建立文檔解析器
-
DocumentBuilder builder = createDocumentBuilder(factory, entityResolver, errorHandler);
-
// 解析 Spring 的 Bean 定義資源
-
return builder.parse(inputSource);
-
}
這到這裡,就已經将定義的 Bean 資源檔案,載入并轉換為 Document 對象了,那麼下一步就是如何将其解析為 Spring IOC 管理的 Bean 對象并将其注冊到容器中。這個過程有方法
registerBeanDefinitions()
實作。如下:
-
public int registerBeanDefinitions(Document doc, Resource resource) throws BeanDefinitionStoreException {
-
// 建立 BeanDefinitionDocumentReader 來對 xml 格式的BeanDefinition 解析
-
BeanDefinitionDocumentReader documentReader = createBeanDefinitionDocumentReader();
-
// 獲得容器中注冊的Bean數量
-
int countBefore = getRegistry().getBeanDefinitionCount();
-
// 解析過程入口,這裡使用了委派模式,BeanDefinitionDocumentReader隻是個接口,
-
// 具體的解析實作過程有實作類DefaultBeanDefinitionDocumentReader完成
-
documentReader.registerBeanDefinitions(doc, createReaderContext(resource));
-
return getRegistry().getBeanDefinitionCount() - countBefore;
-
}
首先建立 BeanDefinition 的解析器 BeanDefinitionDocumentReader,然後調用
documentReader.registerBeanDefinitions()
開啟解析過程,這裡使用的是委派模式,具體的實作由子類 DefaultBeanDefinitionDocumentReader 完成。
-
public void registerBeanDefinitions(Document doc, XmlReaderContext readerContext) {
-
// 獲得XML描述符
-
this.readerContext = readerContext;
-
logger.debug("Loading bean definitions");
-
// 獲得Document的根元素
-
Element root = doc.getDocumentElement();
-
// 解析根元素
-
doRegisterBeanDefinitions(root);
-
}
從 Document 對象中擷取根元素 root,然後調用
doRegisterBeanDefinitions()
開啟真正的解析過程。
-
protected void doRegisterBeanDefinitions(Element root) {
-
BeanDefinitionParserDelegate parent = this.delegate;
-
this.delegate = createDelegate(getReaderContext(), root, parent);
-
// 省略部分代碼
-
preProcessXml(root);
-
parseBeanDefinitions(root, this.delegate);
-
postProcessXml(root);
-
this.delegate = parent;
-
}
preProcessXml()
postProcessXml()
為前置、後置增強處理,目前 Spring 中都是空實作,
parseBeanDefinitions()
是對根元素 root 的解析注冊過程。
-
protected void parseBeanDefinitions(Element root, BeanDefinitionParserDelegate delegate) {
-
// Bean定義的Document對象使用了Spring預設的XML命名空間
-
if (delegate.isDefaultNamespace(root)) {
-
// 擷取Bean定義的Document對象根元素的所有子節點
-
NodeList nl = root.getChildNodes();
-
for (int i = 0; i < nl.getLength(); i++) {
-
Node node = nl.item(i);
-
// 獲得Document節點是XML元素節點
-
if (node instanceof Element) {
-
Element ele = (Element) node;
-
// Bean定義的Document的元素節點使用的是Spring預設的XML命名空間
-
if (delegate.isDefaultNamespace(ele)) {
-
// 使用Spring的Bean規則解析元素節點(預設解析規則)
-
parseDefaultElement(ele, delegate);
-
}
-
else {
-
// 沒有使用Spring預設的XML命名空間,則使用使用者自定義的解析規則解析元素節點
-
delegate.parseCustomElement(ele);
-
}
-
}
-
}
-
}
-
else {
-
// Document 的根節點沒有使用Spring預設的命名空間,則使用使用者自定義的解析規則解析
-
delegate.parseCustomElement(root);
-
}
-
}
疊代 root 元素的所有子節點,對其進行判斷,若節點為預設命名空間,則ID調用
parseDefaultElement()
開啟預設标簽的解析注冊過程,否則調用
parseCustomElement()
開啟自定義标簽的解析注冊過程。
标簽解析若定義的元素節點使用的是 Spring 預設命名空間,則調用
parseDefaultElement()
進行預設标簽解析,如下:
-
private void parseDefaultElement(Element ele, BeanDefinitionParserDelegate delegate) {
-
// 如果元素節點是<Import>導入元素,進行導入解析
-
if (delegate.nodeNameEquals(ele, IMPORT_ELEMENT)) {
-
importBeanDefinitionResource(ele);
-
}
-
// 如果元素節點是<Alias>别名元素,進行别名解析
-
else if (delegate.nodeNameEquals(ele, ALIAS_ELEMENT)) {
-
processAliasRegistration(ele);
-
}
-
// 如果元素節點<Bean>元素,則進行Bean解析注冊
-
else if (delegate.nodeNameEquals(ele, BEAN_ELEMENT)) {
-
processBeanDefinition(ele, delegate);
-
}
-
// // 如果元素節點<Beans>元素,則進行Beans解析
-
else if (delegate.nodeNameEquals(ele, NESTED_BEANS_ELEMENT)) {
-
// recurse
-
doRegisterBeanDefinitions(ele);
-
}
-
}
對四大标簽:import、alias、bean、beans 進行解析,其中 bean 标簽的解析為核心工作。關于各個标簽的解析過程見如下文章:
- 【死磕Spring】----- IOC 之解析Bean:解析 import 标簽
- 【死磕 Spring】—– IOC 之解析 bean 标簽:開啟解析程序
- 【死磕 Spring】—– IOC 之解析 bean 标簽:BeanDefinition
- 【死磕 Spring】—– IOC 之解析 bean 标簽:meta、lookup-method、replace-method
- 【死磕 Spring】—– IOC 之解析 bean 标簽:constructor-arg、property 子元素
- 【死磕 Spring】—– IOC 之解析 bean 标簽:解析自定義标簽
對于預設标簽則由
parseCustomElement()
負責解析。
-
public BeanDefinition parseCustomElement(Element ele) {
-
return parseCustomElement(ele, null);
-
}
-
public BeanDefinition parseCustomElement(Element ele, @Nullable BeanDefinition containingBd) {
-
String namespaceUri = getNamespaceURI(ele);
-
if (namespaceUri == null) {
-
return null;
-
}
-
NamespaceHandler handler = this.readerContext.getNamespaceHandlerResolver().resolve(namespaceUri);
-
if (handler == null) {
-
error("Unable to locate Spring NamespaceHandler for XML schema namespace [" + namespaceUri + "]", ele);
-
return null;
-
}
-
return handler.parse(ele, new ParserContext(this.readerContext, this, containingBd));
-
}
擷取節點的 namespaceUri,然後根據該 namespaceuri 擷取相對應的 Handler,調用 Handler 的
parse()
方法即完成自定義标簽的解析和注入。想了解更多參考:
【死磕Spring】----- IOC 之解析自定義标簽 注冊 BeanDefinition經過上面的解析,則将 Document 對象裡面的 Bean 标簽解析成了一個個的 BeanDefinition ,下一步則是将這些 BeanDefinition 注冊到 IOC 容器中。動作的觸發是在解析 Bean 标簽完成後,如下:
-
protected void processBeanDefinition(Element ele, BeanDefinitionParserDelegate delegate) {
-
BeanDefinitionHolder bdHolder = delegate.parseBeanDefinitionElement(ele);
-
if (bdHolder != null) {
-
bdHolder = delegate.decorateBeanDefinitionIfRequired(ele, bdHolder);
-
try {
-
// Register the final decorated instance.
-
BeanDefinitionReaderUtils.registerBeanDefinition(bdHolder, getReaderContext().getRegistry());
-
}
-
catch (BeanDefinitionStoreException ex) {
-
getReaderContext().error("Failed to register bean definition with name '" +
-
bdHolder.getBeanName() + "'", ele, ex);
-
}
-
// Send registration event.
-
getReaderContext().fireComponentRegistered(new BeanComponentDefinition(bdHolder));
-
}
-
}
BeanDefinitionReaderUtils.registerBeanDefinition()
注冊,其實這裡面也是調用 BeanDefinitionRegistry 的
registerBeanDefinition()
來注冊 BeanDefinition ,不過最終的實作是在 DefaultListableBeanFactory 中實作,如下:
-
@Override
-
public void registerBeanDefinition(String beanName, BeanDefinition beanDefinition)
-
throws BeanDefinitionStoreException {
-
// 省略一堆校驗
-
BeanDefinition oldBeanDefinition;
-
oldBeanDefinition = this.beanDefinitionMap.get(beanName);
-
// 省略一堆 if
-
this.beanDefinitionMap.put(beanName, beanDefinition);
-
}
-
else {
-
if (hasBeanCreationStarted()) {
-
// Cannot modify startup-time collection elements anymore (for stable iteration)
-
synchronized (this.beanDefinitionMap) {
-
this.beanDefinitionMap.put(beanName, beanDefinition);
-
List<String> updatedDefinitions = new ArrayList<>(this.beanDefinitionNames.size() + 1);
-
updatedDefinitions.addAll(this.beanDefinitionNames);
-
updatedDefinitions.add(beanName);
-
this.beanDefinitionNames = updatedDefinitions;
-
if (this.manualSingletonNames.contains(beanName)) {
-
Set<String> updatedSingletons = new LinkedHashSet<>(this.manualSingletonNames);
-
updatedSingletons.remove(beanName);
-
this.manualSingletonNames = updatedSingletons;
-
}
-
}
-
}
-
else {
-
// Still in startup registration phase
-
this.beanDefinitionMap.put(beanName, beanDefinition);
-
this.beanDefinitionNames.add(beanName);
-
this.manualSingletonNames.remove(beanName);
-
}
-
this.frozenBeanDefinitionNames = null;
-
}
-
if (oldBeanDefinition != null || containsSingleton(beanName)) {
-
resetBeanDefinition(beanName);
-
}
-
}
這段代碼最核心的部分是這句
this.beanDefinitionMap.put(beanName,beanDefinition)
,是以注冊過程也不是那麼的高大上,就是利用一個 Map 的集合對象來存放,key 是 beanName,value 是 BeanDefinition。
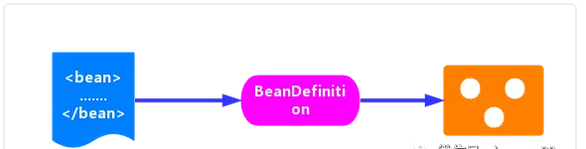
至此,整個 IOC 的初始化過程就已經完成了,從 Bean 資源的定位,轉換為 Document 對象,接着對其進行解析,最後注冊到 IOC 容器中,都已經完美地完成了。現在 IOC 容器中已經建立了整個 Bean 的配置資訊,這些 Bean 可以被檢索、使用、維護,他們是控制反轉的基礎,是後面注入 Bean 的依賴。最後用一張流程圖來結束這篇總結之文。

更多閱讀:
- 【死磕 Spring】----- IOC 之深入了解 Spring IoC
- 【死磕 Spring】----- IOC 之 擷取驗證模型
- 【死磕 Spring】----- IOC 之 擷取 Document 對象
- 【死磕 Spring】----- IOC 之 注冊 BeanDefinition
- 【死磕 Spring】----- IOC 之注冊解析的 BeanDefinition
- 【死磕 Spring】----- IOC 之解析自定義标簽
原文釋出時間為:2018-09-9
本文作者:
Java技術驿站本文來自雲栖社群合作夥伴“
”,了解相關資訊可以關注“
”。