25.1 MySQL資料庫
/*
但是我在虛拟機上安裝的時候居然不提示輸入密碼。
這個可以參考
http://blog.csdn.net/sinat_21302587/article/details/76870457導緻登入的時候不知道賬号密碼。
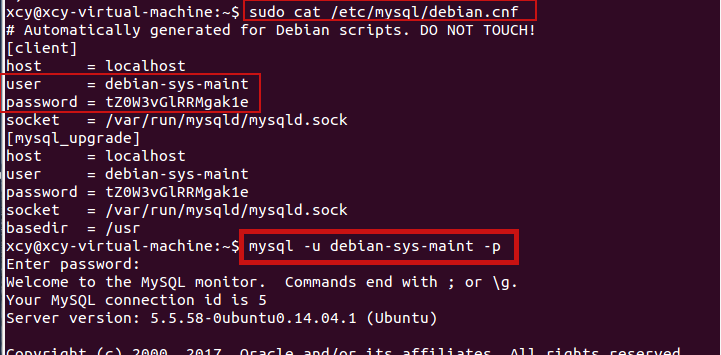
預設的賬号密碼在 /etc/mysql/debian.cnf上。如下圖,user和password就是賬号密碼。然後就可以登入了。
重新開機/打開/關閉MySQL的方法是:sudo service mysql restart/start/stop
*/
1. 我是直接這麼裝的(在公司的伺服器上):
$sudo apt-get install mysql-server
之後會提示要輸密碼(會有界面出來),我這裡輸的是123456.
問題:mysql中建立一個表提示這樣的錯誤ERROR 1046(3D000): No Database Selected 怎麼解決???
解決方法:
先建立資料庫,并使用。
create database mytest
use mytest
create table xcytb(id int, name varchar(30));

2. 下面介紹一種自動登入的方法,在我的虛拟機上測試的。
如之前所說賬号密碼在 /etc/mysql/debian.cnf中。并且賬号密碼特别不好記。我們的目的的直接在指令行輸入mysql就可以登入。
參考:
http://www.jb51.net/article/116488.htm1)在home目錄下建立一個目錄 .my.cnf 。格式如下:
[client]
password=your_pass
user=your_user
2)改個權限 chmod 400 .my.cnf 。 (我後來把它改成了777的權限就無法登入了)
3)指令行輸入mysql就可以登入了。如下圖:
25.1.1 使用MySQL
1.連接配接到伺服器
上面已經介紹過了。
2.MySQL指令
對于新手來說還需要再去了解關系型資料庫的基本知識。這裡隻是大概寫一些指令。
; 分号 表明指令的結束
1)show指令:可以用來提取MySQL伺服器的相關資訊
show databases; 顯示目前在MySQL伺服器上配置過的伺服器。
use databaseName; 連接配接單個資料庫。MySQL會話一次隻能連接配接一個資料庫
show tables; 顯示已連接配接的資料庫上的表。需要先連接配接資料庫
3. 建立資料庫
create databases mytest;
然後可以檢視一下
show databases;
再連接配接上剛剛建立的資料庫
use mytest;
然後就可以建立表,進行增删改查了。
4.建立使用者賬戶
我們已經知道了如何用root管理者賬戶連接配接到MySQL伺服器。這個賬戶可以完全控制所有的MySQL伺服器對象(就跟linux的root賬戶可以完全控制linux系統一樣)
這樣比較危險
需要在MySQL上建立一個僅對應用中所涉及的資料庫有權限的獨立使用者賬戶。
語句:GRANT SQL語句可以完成
mysql> GRANT SELECT,INSERT,DELETE,UPDATE, ON mytest.* TO test IDENTIFIED by 'test';
ERROR 1064 (42000): You have an error in your SQL syntax; check the manual that corresponds to your MySQL server version for the right syntax to use near 'ON mytest.* TO test IDENTIFIED by 'test'' at line 1
就像上面黃色高亮部分一樣,書上這麼寫,但是我運作一直報錯,不知道什麼原因。
關于grant可以參考這裡:
https://www.cnblogs.com/hcbin/archive/2010/04/23/1718379.html後面的建立表 删除表 插入資料 删除資料 更新資料跟sqlite3類似,有人看再寫。
25.1.2 在腳本中使用資料庫
25.2 使用web
Lynx程式允許你直接從終端會話中通路網站。隻不過圖檔會被替換成标簽。
lynx指令行指令及其擅長從遠端網站上提取資訊。
25.3 使用電子郵件
可以用來從shell腳本中發送電子郵件的主要工具是Mailx程式。不僅可以用它互動地讀取和發送消息,還可以用指令行參數指定如何發送消息
Mailx程式發送消息的指令行格式為:
main [-eIinv] [-a header] [-b addr] [-c addr] [-s subj] to-addr
關于使用電子郵件:
1.在公司伺服器上
sudo apt-get install mailutils
這裡安裝時會有一些配置(有界面的)。我也不是很懂。就看着配置了一下。
之後就可以發送了。(發送給别人還是收不到)
xiaochongyong@sam-server:~/\u684c\u9762/xcyNote$ echo "test,hahah222" | mail -s "xcytest" xiaochongyong
xiaochongyong@sam-server:~/\u684c\u9762/xcyNote$ mail
"/var/mail/xiaochongyong": 1 message 1 new
>N 1 xiaochongyong \u4e00 12\u6708 4 10: 13/471 xcytest
?
Return-Path: <xiaochongyong@sam-server>
X-Original-To: xiaochongyong@sam-server
Delivered-To: xiaochongyong@sam-server
Received: by sam-server (Postfix, from userid 1011)
id 296B35E024E; Mon, 4 Dec 2017 10:12:41 +0800 (CST)
Subject: xcytest
To: <xiaochongyong@sam-server>
X-Mailer: mail (GNU Mailutils 2.99.98)
Message-Id: <20171204021241.296B35E024E@sam-server>
Date: Mon, 4 Dec 2017 10:12:41 +0800 (CST)
From: xiaochongyong@sam-server (xiaochongyong)
test,hahah222
No applicable message
? quit
Saved 1 message in /home/xiaochongyong/mbox
Held 0 messages in /var/mail/xiaochongyong
xiaochongyong@sam-server:~/\u684c\u9762/xcyNote$
2.在我的虛拟機上
安裝時也沒有配置。之後直接發送,結果報錯了:
xcy@xcy-virtual-machine:~$ echo "hahah,test" | mail -s "test"
[email protected]mail: cannot send message: Process exited with a non-zero status
然後參考了:
http://mars914.iteye.com/blog/1470961接着安裝了
sudo apt-get install sendmail
sudo apt-get install sendmail-cf
sudo apt-get install sharutils
然後發送:
xcy@xcy-virtual-machine:~$ echo "hahaha" | mail -s "testxcy"
[email protected]xcy@xcy-virtual-machine:~$ echo "hahaha2" | mail -s "testxcy"
xcy@xcy-virtual-machine:~$ echo "hahaha2" | mail -s "testxcy" xcy
xcy@xcy-virtual-machine:~$
每次都運作特别久。看樣子的報錯了。在home目錄報錯了一個mbox檔案,裡面記錄了一些資訊。
xcy@xcy-virtual-machine:/etc/mail$ mail
"/var/mail/xcy": 3 messages 3 new
>N 1 Mail Delivery Subs 一 12月 4 09: 65/2297 Returned mail: see transc
N 2 Mail Delivery Subs 一 12月 4 10: 65/2297 Returned mail: see transc
N 3 xcy 一 12月 4 10: 15/607 testxcy
Return-Path: <MAILER-DAEMON>
Received: from localhost (localhost)
by xcy-virtual-machine (8.14.4/8.14.4/Debian-4.1ubuntu1) id vB41nPSx0083
15;
Mon, 4 Dec 2017 09:49:25 +0800
Date: Mon, 4 Dec 2017 09:49:25 +0800
From: Mail Delivery Subsystem <MAILER-DAEMON>
Message-Id: <201712040149.vB41nPSx008315@xcy-virtual-machine>
To: <xcy@xcy-virtual-machine>
MIME-Version: 1.0
Content-Type: multipart/report; report-type=delivery-status;
boundary="vB41nPSx008315.1512352165/xcy-virtual-machine"
Subject: Returned mail: see transcript for details
Auto-Submitted: auto-generated (failure)
This is a MIME-encapsulated message
--vB41nPSx008315.1512352165/xcy-virtual-machine
The original message was received at Mon, 4 Dec 2017 09:48:22 +0800
from localhost [127.0.0.1]
----- The following addresses had permanent fatal errors -----
<
>
(reason: 550 Failed to connect remote host.)
----- Transcript of session follows -----
... while talking to mx3.qq.com.:
<<< 550 Failed to connect remote host.
... while talking to mx2.qq.com.:
于是把機器重新開機了一下。就可以了
xcy@xcy-virtual-machine:/var/mail$ echo "20171204tete" | mail -s "test2" xcy
xcy@xcy-virtual-machine:/var/mail$ mail
"/var/mail/xcy": 3 messages 1 new 2 unread
U 1 Mail Delivery Subs 一 12月 4 10: 68/2341 Returned mail: see transc
U 2 xcy 一 12月 4 10: 17/626 testxcy
>N 3 xcy 一 12月 4 10: 15/610 test2
Return-Path: <xcy@xcy-virtual-machine>
Received: from xcy-virtual-machine (localhost [127.0.0.1])
by xcy-virtual-machine (8.14.4/8.14.4/Debian-4.1ubuntu1) with ESMTP id vB42Yuhw003098
for <xcy@xcy-virtual-machine>; Mon, 4 Dec 2017 10:34:56 +0800
Received: (from xcy@localhost)
by xcy-virtual-machine (8.14.4/8.14.4/Submit) id vB42YuqW003093;
Mon, 4 Dec 2017 10:34:56 +0800
Date: Mon, 4 Dec 2017 10:34:56 +0800
From: xcy <xcy@xcy-virtual-machine>
Message-Id: <201712040234.vB42YuqW003093@xcy-virtual-machine>
Subject: test2
20171204tete
但是發送給别人還是無法收到。