其實與spring+springmvc+mybatis內建swagger沒什麼差別,隻是之前寫的太不好了,是以這次決定詳細寫。
提到swagger不得不提rest,rest是一種架構風格,裡面有對不同的資源有不同的請求辨別。例如PUT,POST,GET,DELETE,OPTIONS,HEAD,PATCH等。
對于技術的初學,最好的話還是建議去官網,官網最詳細也最權威,雖然不少部落格對此有挺好的解說,但還是強烈建議去官網,不要求仔仔細細閱讀,至少讀個大概。
對于目前,有人要問我swagger能做什麼,可以解決什麼問題?我不能詳細的給你一一道來,因為我對此不是十分精通,至少它解決了我兩個問題,第一個,接口文檔的編寫,之前通過接口文檔,但是随着後續接口是越來越多,文檔也需要變來變去,本來就力不從心,又是一大堆接口要寫,又是文檔要寫,swagger就可以輕松的解決這個問題,通過swagger注解可以讓安卓方面清楚看到這個接口的作用是什麼,還可以線上測試,傳回資料;第二個問題,就是接口管理,通過swagger我可以根據接口類型,比如有使用者管理,文章管理等等,我通過swagger注解可以輕松的給它們分累以友善我下次編寫或修改。
pom依賴:
<!-- swagger -->
        <dependency>
            <groupId>com.mangofactory</groupId>
            <artifactId>swagger-springmvc</artifactId>
            <version>1.0.2</version>
        </dependency>
就是上述這一個,我的MP實戰系列(一)中pom就有這個。
要內建swagger導入上述的依賴之外,還要添加一個類并在springmvc.xml中配置
<!-- 将 springSwaggerConfig加載到spring容器 -->
    <bean class="com.mangofactory.swagger.configuration.SpringSwaggerConfig" />
    <!-- 将自定義的swagger配置類加載到spring容器 -->
    <bean class="com.lms.swagger.SwaggerConfig" />
SwaggerConfig.java
package com.lms.swagger;

import org.springframework.beans.factory.annotation.Autowired;
import org.springframework.context.annotation.Bean;

import com.mangofactory.swagger.configuration.SpringSwaggerConfig;
import com.mangofactory.swagger.models.dto.ApiInfo;
import com.mangofactory.swagger.plugin.EnableSwagger;
import com.mangofactory.swagger.plugin.SwaggerSpringMvcPlugin;

@EnableSwagger
public class SwaggerConfig {

    private SpringSwaggerConfig springSwaggerConfig;

    /**
     * Required to autowire SpringSwaggerConfig
     */
    @Autowired
    public void setSpringSwaggerConfig(SpringSwaggerConfig springSwaggerConfig)
    {
        this.springSwaggerConfig = springSwaggerConfig;
    }

    /**
     * Every SwaggerSpringMvcPlugin bean is picked up by the swagger-mvc
     * framework - allowing for multiple swagger groups i.e. same code base
     * multiple swagger resource listings.
     */
    @Bean
    public SwaggerSpringMvcPlugin customImplementation()
    {
        return new SwaggerSpringMvcPlugin(this.springSwaggerConfig)
                .apiInfo(apiInfo())
                .includePatterns(".*?");
    }

    private ApiInfo apiInfo()
    {
        ApiInfo apiInfo = new ApiInfo(
                "springmvc搭建swagger",
                "spring-API swagger測試",
                "My Apps API terms of service",
                "19****81**@qq.com",
                "web app",
                "My Apps API License URL");
        return apiInfo;
    }
}
上述的步驟可以解說為:導入swagger-springmvc依賴并在springmvc.xml中配置,編寫對應的配置類,就算完成springmvc內建swagger的第一大步了,當然這還遠遠不夠,還需要導入一個很重要的那就是swagger相關的類庫(js,css等之類的)
可從github上下載下傳:https://github.com/swagger-api/swagger-ui
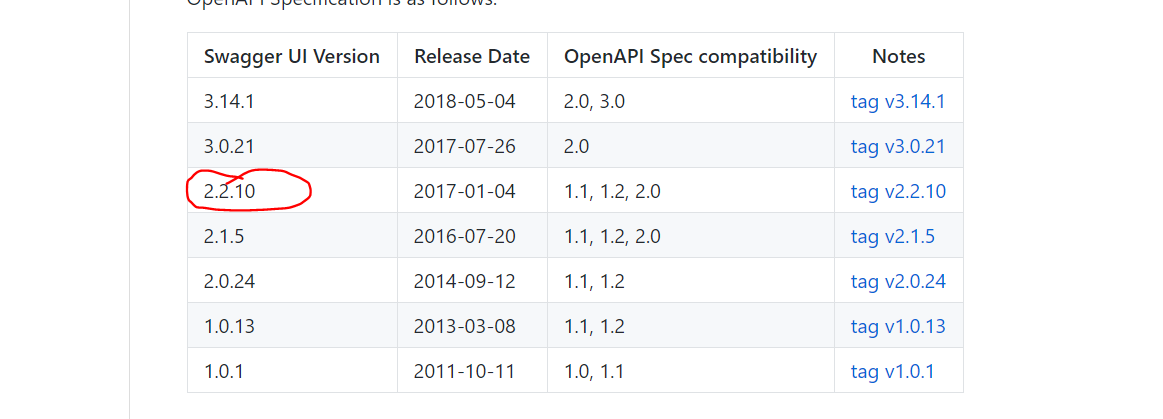
本人使用的是2.2.10版本
下載下傳完成後,進行解壓,解壓後的目錄為:

将紅色标記處的dist檔案夾裡面的js,css之類的全部導入webapp目錄下
dist目錄圖為:
index.html中有一處位址需要修改
将此處的url替換為自己本地項目位址,例如http://localhost:8080/blog/api-docs
然後在對應的Controller添加如下注解,此處以我部落格系統的UserController作為示範示例:
package com.blog.controller;

import java.util.HashMap;
import java.util.Map;

import org.springframework.beans.factory.annotation.Autowired;
import org.springframework.http.MediaType;
import org.springframework.web.bind.annotation.PostMapping;
import org.springframework.web.bind.annotation.RequestMapping;
import org.springframework.web.bind.annotation.RequestMethod;
import org.springframework.web.bind.annotation.RequestParam;
import org.springframework.web.bind.annotation.ResponseBody;
import org.springframework.web.bind.annotation.RestController;

import com.alibaba.fastjson.JSON;
import com.baomidou.mybatisplus.mapper.EntityWrapper;
import com.blog.entity.UserEntity;
import com.blog.service.UserService;
import com.wordnik.swagger.annotations.Api;
import com.wordnik.swagger.annotations.ApiImplicitParam;
import com.wordnik.swagger.annotations.ApiImplicitParams;
import com.wordnik.swagger.annotations.ApiOperation;
import com.wordnik.swagger.annotations.ApiParam;


/**
 *
 *
 * @author youcong
 * @email ${email}
 * @date 2018-04-21 15:27:01
 */
@Api(value="部落格使用者管理")
@RestController
@RequestMapping("user")
public class UserController {


    @Autowired
    private UserService userService;


    @ApiOperation(value = "獲得使用者清單", notes = "清單資訊", httpMethod = "POST", produces = MediaType.APPLICATION_JSON_VALUE)
    @PostMapping(value="/getById")
    public String list(
            @ApiParam(value = "使用者ID", required = true) @RequestParam Integer id) {

       EntityWrapper<UserEntity> wrapper = new EntityWrapper<UserEntity>();
       wrapper.eq("user_id", id);
       UserEntity userEntity = userService.selectOne(wrapper);
       return JSON.toJSONString(userEntity);
    }

}
效果圖如下:
可線上進行接口測試,對于背景開發者來說,之前沒有使用swagger通常使用postMan測試post請求,現在使用了swagger友善管理接口,又可以線上測試。
swagger常用注解:
最常用的5個注解
(1)@Api:修飾整個類,描述Controller的作用
(2)@ApiOperation:描述一個類的一個方法,或者說一個接口
(3)@ApiParam:單個參數描述
@ApiModel::描述一個Model的資訊(這種一般用在post建立的時候,使用@RequestBody這樣的場景,請求參數無法使用@ApiImplicitParam注解進行描述的時候;
@ApiProperty:描述一個model的屬性。
其他注解:
- @ApiImplicitParams:用在方法上包含一組參數說明
- @ApiImplicitParam:用在@ApiImplicitParams注解中,指定一個請求參數的各個方面
- paramType:參數放在哪個地方
- header-->請求參數的擷取:@RequestHeader
- query-->請求參數的擷取:@RequestParam
- path(用于restful接口)-->請求參數的擷取:@PathVariable
- body(不常用)
- form(不常用)
- name:參數名
- dataType:參數類型
- required:參數是否必須傳
- value:參數的意思
- defaultValue:參數的預設值
- paramType:參數放在哪個地方
- @ApiResponses:用于表示一組響應
- @ApiResponse:用在@ApiResponses中,一般用于表達一個錯誤的響應資訊
- code:數字,例如400
- message:資訊,例如"請求參數沒填好"
- response:抛出異常的類
更詳細的可參考此網址:https://github.com/swagger-api/swagger-core/wiki/Annotations#apimodel
許多注解多用用自然知道,熟能生巧。