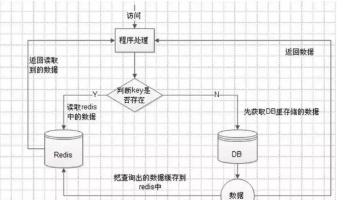
Redis是一種nosql資料庫,以鍵值對<key,value>的形式存儲資料,其速度相比于MySQL之類的資料庫,相當于記憶體讀寫與硬碟讀寫的差别,是以常常用作緩存,用于少寫多讀的場景下,直接從緩存拿資料比從資料庫(資料庫要I/O操作)拿要快得多。Redis目前幾乎無處不在,大公司小公司都在用。
Spring cloud 2.x版本後預設Redis用戶端連接配接池類型使用的是lettuce,而Sping cloud 1.5.x使用的jedis。Lettuce 和 Jedis 的都是連接配接Redis Server的用戶端程式。Jedis在實作上是直連redis server,多線程環境下非線程安全,除非使用連接配接池,為每個Jedis執行個體增加實體連接配接;Lettuce基于Netty的連接配接執行個體(StatefulRedisConnection),可以在多個線程間并發通路,且線程安全,滿足多線程環境下的并發通路,同時它是可伸縮的設計,一個連接配接執行個體不夠的情況也可以按需增加連接配接執行個體。
1、建立項目sc-redis,對應的pom.xml檔案如下
<project xmlns="http://maven.apache.org/POM/4.0.0" xmlns:xsi="http://www.w3.org/2001/XMLSchema-instance"
xsi:schemaLocation="http://maven.apache.org/POM/4.0.0http://maven.apache.org/xsd/maven-4.0.0.xsd">

   <modelVersion>4.0.0</modelVersion>

   <groupId>spring-cloud</groupId>

   <artifactId>sc-redis</artifactId>

   <version>0.0.1-SNAPSHOT</version>

   <packaging>jar</packaging>


   <name>sc-redis</name>

   <url>http://maven.apache.org</url>

   <parent>

      <groupId>org.springframework.boot</groupId>

      <artifactId>spring-boot-starter-parent</artifactId>

      <version>2.0.4.RELEASE</version>

   </parent>

   <dependencyManagement>

      <dependencies>

        <dependency>

           <groupId>org.springframework.cloud</groupId>

           <artifactId>spring-cloud-dependencies</artifactId>

           <version>Finchley.RELEASE</version>

           <type>pom</type>

           <scope>import</scope>

        </dependency>


      </dependencies>

   </dependencyManagement>


   <properties>

      <project.build.sourceEncoding>UTF-8</project.build.sourceEncoding>

      <maven.compiler.source>1.8</maven.compiler.source>

      <maven.compiler.target>1.8</maven.compiler.target>

   </properties>

   <dependencies>

      <dependency>

        <groupId>org.springframework.boot</groupId>

        <artifactId>spring-boot-starter-data-redis</artifactId>

      </dependency>

      <dependency>

          <groupId>org.apache.commons</groupId>

          <artifactId>commons-pool2</artifactId>

      </dependency>

      <dependency>

        <groupId>org.springframework.boot</groupId>

        <artifactId>spring-boot-starter-web</artifactId>

      </dependency>

   </dependencies>

</project> 
2、建立spring boot啟動類
package sc.redis;
import org.springframework.boot.SpringApplication;
import
 org.springframework.boot.autoconfigure.SpringBootApplication;

@SpringBootApplication

public class RedisApplication {

public static void main(String[] args) {

       SpringApplication.run(RedisApplication.class,args);

}


}
3、建立配置檔案application.yml
server:

  port: 9004

spring:

  application:

    name: sc-redis

  redis:

    host: 127.0.0.1

    password:

    port: 6379

    timeout: 10000 # 連接配接逾時時間(毫秒)

    database: 0 # Redis預設情況下有16個分片,這裡配置具體使用的分片,預設是0

    lettuce:

      pool:

        max-active: 8 # 連接配接池最大連接配接數(使用負值表示沒有限制)預設 8

        max-wait: -1 # 連接配接池最大阻塞等待時間(使用負值表示沒有限制)預設 -1

        max-idle: 8 # 連接配接池中的最大空閑連接配接預設 8

        min-idle: 0 # 連接配接池中的最小空閑連接配接預設 0
備注:reids對用的所有配置項可以在以下類檢視
org.springframework.boot.autoconfigure.data.redis.RedisProperties 4、自定義Reids的Template
預設情況下的模闆隻能支援RedisTemplate<String, String>,也就是隻能存入字元串,這在開發中是不友好的,是以自定義模闆是很有必要的,當自定義了模闆又想使用String存儲這時候就可以使用StringRedisTemplate的方式,它們之間并不沖突。
package sc.redis.config;

import java.io.Serializable;

import org.springframework.boot.autoconfigure.AutoConfigureAfter;

import org.springframework.boot.autoconfigure.data.redis.RedisAutoConfiguration;

import org.springframework.context.annotation.Bean;

import org.springframework.context.annotation.Configuration;

import org.springframework.data.redis.connection.lettuce.LettuceConnectionFactory;

import org.springframework.data.redis.core.RedisTemplate;

import

 org.springframework.data.redis.serializer.GenericJackson2JsonRedisSerializer;

import org.springframework.data.redis.serializer.StringRedisSerializer;

@Configuration

@AutoConfigureAfter(RedisAutoConfiguration.class)

public class RedisCacheAutoConfiguration {

    @Bean

    public RedisTemplate<String, Serializable> redisCacheTemplate(LettuceConnectionFactoryredisConnectionFactory) {

       RedisTemplate<String, Serializable> template = newRedisTemplate<>();

        //鍵的序列化方式

        template.setKeySerializer(newStringRedisSerializer());

        //值的序列化方式

        template.setValueSerializer(newGenericJackson2JsonRedisSerializer());

        template.setConnectionFactory(redisConnectionFactory);

        returntemplate;

    }

}
5、建立一個模拟的Controller類
packagesc.redis.config;

import java.io.Serializable;

import java.util.HashMap;

import java.util.Map;

import org.springframework.beans.factory.annotation.Autowired;

import org.springframework.data.redis.core.RedisTemplate;

import org.springframework.web.bind.annotation.GetMapping;

import org.springframework.web.bind.annotation.PathVariable;

import org.springframework.web.bind.annotation.ResponseBody;

import org.springframework.web.bind.annotation.RestController;

import sc.redis.model.User;

@RestController
publicclassUserCacheController {
   //@Autowired

   //private StringRedisTemplate stringRedisTemplate;

   @Autowired

   privateRedisTemplate<String, Serializable> redisCacheTemplate;

   @GetMapping(value = "/cache/user/cacheUser")

   @ResponseBody

   public Map<String, Object> cacheUser() {

      Map<String,Object> result = new HashMap<String, Object>();

      result.put("code", "000000");

      result.put("msg", "success");

      User u = new User();

      u.setId(1L);

      u.setAge(23);

      u.setUserName("huangjinjin");

      u.setPosition("cto");

      result.put("body", u);
      redisCacheTemplate.opsForValue().set(String.valueOf(u.getId()), u);

      returnresult;
   }

   /**

    * 擷取緩存資訊

    * @param id

    * @return

    */

   @GetMapping(value = "/cache/user/getCacheUser/{id}")

   @ResponseBody

   public Map<String, Object> getCacheUser(@PathVariable Long id) {

      Map<String,Object> result = new HashMap<String, Object>();

      result.put("code", "000000");

      result.put("msg", "success");

      User u =  (User) redisCacheTemplate.opsForValue().get(String.valueOf(1));

      System.out.println(u.getUserName());

      result.put("body", u);

      returnresult;

   }

}
6、啟動sc-redis項目,并驗證是否啟動成功
7、使用postman通路接口
(1)存儲值到redis
http://127.0.0.1:9004/cache/user/cacheUser
(2)從redis擷取存貯的值
http://127.0.0.1:9004/cache/user/getCacheUser/1
使用redis用戶端redis-cli檢視是否把相關資料存貯到redis
下列的就是Redis其它類型所對應的操作方式:
opsForValue:對應 String(字元串)
opsForZSet:對應 ZSet(有序集合)
opsForHash:對應 Hash(哈希)
opsForList:對應 List(清單)
opsForSet:對應 Set(集合)
opsForGeo:對應 GEO(地理位置)
源碼:
https://gitee.com/hjj520/spring-cloud-2.x 原文釋出時間:2018-9-24
本文作者:java樂園
本文來自雲栖社群合作夥伴“
java樂園”,了解相關資訊可以關注“
”