layui已經提供了一整套的UI布局及相關元件,并且有相當完善的api文檔,本文重點在于thymeleaf中如何使用layui,包括公用部分的提取,而非簡單的layui的用法。
先上兩個效果圖
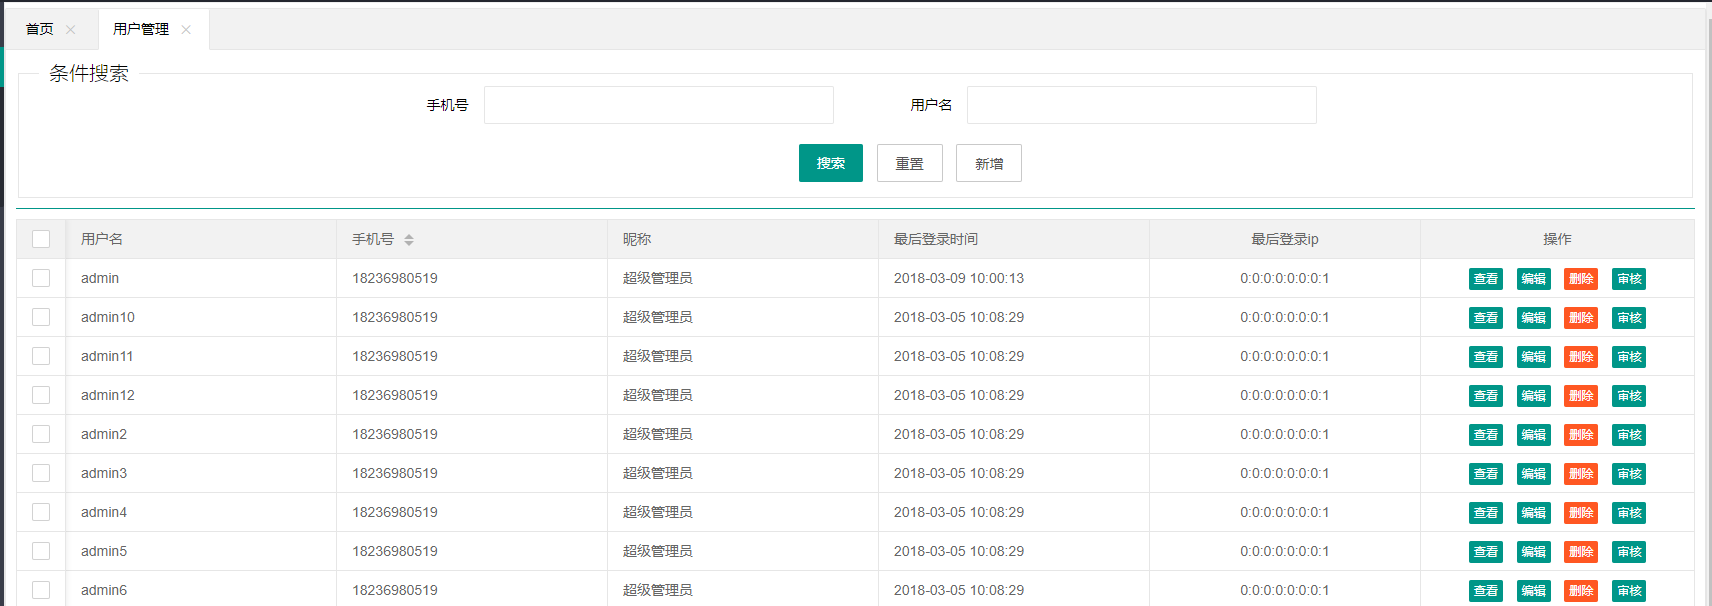
清單.png

表單.png
一、思路
1.像傳統的一樣建檔案頭和尾(但是又和傳統的寫法不同,見下面代碼)
2.定義公用js--common.js
3.定義公用css--用來重寫一些樣式或者自定義樣式
4.編寫清單頁
5.編寫表單頁
二、檔案頭和尾
頭部引入css,尾部引入js,定義兩個模闆(一個也可以,裡面的碎片分開寫,我喜歡寫兩個分别引入),注意th:fragment,fragment即碎片,可以在模闆任何位置引入,此處為分别定義名為header和js_footer的碎片,以供後面引用
樣式檔案 link.html
<!DOCTYPE html>
<html lang="en" xmlns="http://www.w3.org/1999/xhtml"
      xmlns:th="http://www.thymeleaf.org">
<div th:fragment="header">
    <meta charset="utf-8"/>
    <meta http-equiv="X-UA-Compatible" content="IE=edge"/>
    <!-- Tell the browser to be responsive to screen width -->
    <meta content="width=device-width, initial-scale=1, maximum-scale=1, user-scalable=no" name="viewport"/>
    <link rel="stylesheet" th:href="@{/js/layui/css/layui.css}"/>
    <link rel="stylesheet" th:href="@{/css/common.css}"/>
</div>
</html>
js檔案 script.html
<!DOCTYPE html>
<html lang="en" xmlns="http://www.w3.org/1999/xhtml"
      xmlns:th="http://www.thymeleaf.org">
<div th:fragment="js_footer">
    <script th:src="@{/js/layui/layui.all.js}"></script>
    <script th:src="@{/js/common/common.js}"></script>
    <!-- 讓IE8/9支援媒體查詢,進而相容栅格 -->
    <!--[if lt IE 9]>
    <script src="https://cdn.staticfile.org/html5shiv/r29/html5.min.js"></script>
    <script src="https://cdn.staticfile.org/respond.js/1.4.2/respond.min.js"></script>
    <![endif]-->
</div>
<script>
    var basePath='http://www.baidu.com';
</script>
</html>
三、公用js
該檔案包含幾個方法:
1.initTable 初始化帶分頁的table,注意其中的request屬性,可以配置和你背景Page對象對應的屬性,具體可以參考layui官方文檔
2.searchTable table的搜尋功能,調用layui table子產品的的重載功能,參數組建思路:擷取序列化的表單,組裝成json對象
3.upload 檔案上傳
4.openFrame 打開彈出層,基于最頂層彈出
var Common = function () {
    var initTable = function (ele, url, cols, table, doneCallBack) {
        return table.render({
            elem: ele
            , url: url
            , method: 'POST'
            , cellMinWidth: 80 //全局定義正常單元格的最小寬度,layui 2.2.1 新增
            , cols: cols
            , page: {
                limits: [10, 20, 50, 100]
            },
            request: {
                pageName: 'current',
                limitName: 'size'
            },
            done: function (res, curr, count) {
                if (typeof(doneCallBack) === "function") {
                    doneCallBack(res);
                }
            }
        });
    };

    var searchTable = function (formId, tableIns) {
        var queryParams = getParams(formId);
        tableIns.reload({
            where: {condition: queryParams},
            page: {
                curr: 1 //重新從第 1 頁開始
            }
        });
    };

    var getParams = function (formId) {
        var $ = layui.jquery;
        var _params = {};
        $.each($('#' + formId).serializeArray(), function (i, field) {
            if (null != field.value && "" != field.value) {
                _params[field.name] = field.value;
            }
        });
        return _params;
    };

    var upload = function (eleId, layUpload, done, error, accept, exts) {
        layUpload.render({
            elem: eleId //綁定元素
            , url: '/upload/' //上傳接口
            , accept: accept === undefined ? 'file' : accept
            , exts: exts === undefined ? 'jpg|png|gif|bmp|jpeg' : exts
            , done: function (res) {
                //上傳完畢回調
                if (typeof (done) === 'function') {
                    done(res)
                }
            }
            , error: function () {
                //請求異常回調
                if (typeof (error) === 'function') {
                    error()
                }
            }
        });
    };

    var openFrame = function (url, title, width, height) {
        width = width === undefined ? '900px' : width;
        height = height === undefined ? '500px' : height;
        return top.layer.open({
            area: [width, height],
            type: 2,
            title: title,
            content: url //這裡content是一個URL,如果你不想讓iframe出現滾動條,你還可以content: ['http://sentsin.com', 'no']
        });
    };
    return {
        initTable: function (ele, url, cols, table, doneCallBack) {
            return initTable(ele, url, cols, table, doneCallBack);
        },
        searchTable: function (formId, table) {
            searchTable(formId, table);
        },
        uploadFile: function (eleId, layUpload, done, error, accept, exts) {
            upload(eleId, layUpload, done, error, accept, exts);
        },
        openFrame: function (url, title, width, height) {
            return openFrame(url, title, width, height);
        }
    }
}();
四、公用css
這個可以根據個人喜好或者項目實際情況自己定義
.form-body{
    margin-top: 4%
}
.layui-input-inline{
    width: 350px !important;
}
五、清單頁
整個html除了頭部的引入,整體分為三部分:
1.上面form為搜尋内容部分
2.中間一個table為主視窗
3.注意一個id="toolBars"的js,為工具條,用于追加在每一列的後面
4.可以看到下面頁面初始化等都調用了Common.js中的對應方法
<!DOCTYPE html>
<html lang="en" xmlns="http://www.w3.org/1999/xhtml"
      xmlns:th="http://www.thymeleaf.org">
<head>
    <title>Title</title>
    <div th:replace="common/links::header"></div>
    <div th:replace="common/script::js_footer"></div>
</head>
<body>
<fieldset class="layui-elem-field">
    <legend>條件搜尋</legend>
<form class="layui-form" style="text-align: center" id="searchForm">
    <div class="layui-form-item">
        <div class="layui-inline">
            <label class="layui-form-label">手機号</label>
            <div class="layui-input-inline">
                <input type="tel" name="mobile"  autocomplete="off" class="layui-input">
            </div>
        </div>
        <div class="layui-inline">
            <label class="layui-form-label">使用者名</label>
            <div class="layui-input-inline">
                <input type="text" name="username"  autocomplete="off" class="layui-input">
            </div>
        </div>
    </div>
    <div class="layui-form-item">
        <div class="layui-input-block">
            <button class="layui-btn" id="searchBtn" type="button">搜尋</button>
            <button type="reset" class="layui-btn layui-btn-primary">重置</button>
            <button type="reset" class="layui-btn layui-btn-primary">新增</button>
        </div>
    </div>
</form>
</fieldset>
<hr class="layui-bg-green">
<table class="layui-hide" id="userTable" lay-filter="userFilter"></table>
<script type="text/html" id="toolBars">
    <a class="layui-btn layui-btn-xs" lay-event="detail">檢視</a>
    <a class="layui-btn layui-btn-xs" lay-event="edit">編輯</a>
    <a class="layui-btn layui-btn-danger layui-btn-xs" lay-event="del">删除</a>

    <!-- 這裡同樣支援 laytpl 文法,如: -->
    <a class="layui-btn layui-btn-xs" lay-event="check">稽核</a>
</script>
<script>
    cols=[[
        {checkbox: true, fixed: true}
        ,{field:'username', title: '使用者名'} //width 支援:數字、百分比和不填寫。你還可以通過 minWidth 參數局部定義目前單元格的最小寬度,layui 2.2.1 新增
        ,{field:'mobile', title: '手機号', sort: true}
        ,{field:'nickname', title: '昵稱'}
        ,{field:'lastLoginTime', title: '最後登入時間'}
        ,{field:'ip', title: '最後登入ip', align: 'center'} //單元格内容水準居中
        ,{field:'op',title: '操作', align:'center', toolbar: '#toolBars'} //這裡的toolbar值是模闆元素的選擇器
    ]];

    layui.use('table', function(){
        var table = layui.table,$ = layui.jquery;
        table.on('tool(userFilter)', function(obj){
            var data = obj.data; //獲得目前行資料
            var layEvent = obj.event; //獲得 lay-event 對應的值(也可以是表頭的 event 參數對應的值)
            if(layEvent === 'detail'){ //檢視
                //TODO detail
            } else if(layEvent === 'del'){ //删除
                top.layer.confirm('真的删除行麼', function(index){
                    //TODO do delete
                });
            } else if(layEvent === 'edit'){ //編輯
                Common.openFrame('/sys/user/to-edit?id=' + data.id,'修改使用者資訊');
            }
        });
        var initTable = Common.initTable('#userTable','/sys/user/query-page',cols,table);
        $('#searchBtn').on('click',function () {
            Common.searchTable('searchForm',initTable);
        })
    });
</script>
</body>
</html>
六、表單頁
清單出來之後表單就更簡單了,隻需要去layui官網找個表單,根據自己的實際情況布局即可,特别說明的是校驗,即verify.js,用于自己對驗證方法的擴充
form.html
<!DOCTYPE html>
<html lang="en" xmlns="http://www.w3.org/1999/xhtml"
xmlns:th="http://www.thymeleaf.org">
<head>
<title>Title</title>
<div th:replace="common/links::header"></div>
<div th:replace="common/script::js_footer"></div>
<script th:src="@{/js/common/verify.js}"></script>
</head>
<body class="form-body">
<form class="layui-form " action="">
<div class="layui-form-item layui-col-md6 layui-col-md-offset2">
<label class="layui-form-label">使用者名</label>
<div class="layui-input-inline form-length350">
<input type="text" name="username" th:value="${user.username}" lay-verify="required|username" placeholder="請輸入使用者名" autocomplete="off" class="layui-input">
</div>
<div class="layui-form-mid layui-word-aux">*6-12個字元</div>
</div>
<div class="layui-form-item layui-col-md4 layui-col-md-offset2">
<label class="layui-form-label">密碼框</label>
<div class="layui-input-inline">
<input type="password" name="password" lay-verify="required|password" placeholder="請輸入密碼" autocomplete="off" class="layui-input">
</div>
<div class="layui-form-mid layui-word-aux">*包含a_z、A_Z、1-9中的兩種,且長度6-20</div>
</div>
<div class="layui-form-item layui-col-md4 layui-col-md-offset2">
<label class="layui-form-label">手機号</label>
<div class="layui-input-inline">
<input type="text" name="mobile" th:value="${user.mobile}" lay-verify="required|phone" placeholder="請輸入手機号" autocomplete="off" class="layui-input">
</div>
<div class="layui-form-mid layui-word-aux">*手機号</div>
</div>
<div class="layui-form-item layui-col-md4 layui-col-md-offset2">
<label class="layui-form-label">昵稱</label>
<div class="layui-input-inline">
<input type="text" name="nickname" th:value="${user.nickname}" lay-verify="required" placeholder="請輸入昵稱" autocomplete="off" class="layui-input">
</div>
<div class="layui-form-mid layui-word-aux">*不多于30個字元</div>
</div>
<div class="layui-form-item">
<div class="layui-col-md4 layui-col-md-offset2">
<label class="layui-form-label">頭像</label>
<div class="layui-input-inline">
<button type="button" class="layui-btn" id="test1">
<i class="layui-icon"></i>上傳圖檔
</button>
</div>
</div>
</div>
<div class="layui-form-item layui-col-md-offset4">
<div class="layui-input-block">
<button class="layui-btn" lay-submit lay-filter="formDemo">立即送出</button>
<button type="reset" class="layui-btn layui-btn-primary">重置</button>
</div>
</div>
</form>
<script>
layui.use('form', function () {
var form = layui.form, upload = layui.upload;
form.render();
Common.uploadFile('#test1', upload, function (data) {
console.log(data);
});
//監聽送出
form.on('submit(formDemo)', function (data) {
layer.msg(JSON.stringify(data.field));
//TODO ajax送出表單
return false;
});
});
</script>
</body>
</html>
verify.js
layui.use('form', function () {
    var form = layui.form;
    //自定義驗證規則
    form.verify({
        username: function (value) {
            if (value.length < 6 || value.length > 12) {
                return '請輸入6到12位的使用者名';
            }
        }, password: function (value) {
            if (value.length < 4) {
                return '内容請輸入至少4個字元';
            }
        }
        , phone: [/^1[3|4|5|7|8]\d{9}$/, '手機必須11位,隻能是數字!']
        , email: [/^[a-z0-9._%-]+@([a-z0-9-]+\.)+[a-z]{2,4}$|^1[3|4|5|7|8]\d{9}$/, '郵箱格式不對']
    });
})
其他小技巧:
idea使用thymeleaf模闆時,頁面取值總提示無法解析變量,但是又不影響實際應用,據說idea2017.3已經解決了,但是我現在用的2017.2,沒有更新,但是同樣可以解決。錯誤提示如圖
波浪線提示.png
解決方法也很簡單:File--settings--Editor--Inspections--Thymeleaf,去掉第一個校驗即可。
去掉波浪線提示.png