原文位址 MySQL + Atlas --- 部署讀寫分離
序章
Atlas是360團隊弄出來的一套基于MySQL-Proxy基礎之上的代理,修改了MySQL-Proxy的一些BUG,并且優化了很多東西。而且安裝友善。
Atlas官方連結:
https://github.com/Qihoo360/Atlas/blob/master/README_ZH.mdAtlas下載下傳連結:
https://github.com/Qihoo360/Atlas/releases環境:
| 系統 | IP | 配置 |
| CentOS 7.0 | 192.168.1.40 | Atlas代理服務 |
| 192.168.1.50 | 主MySQL資料庫 | |
| 192.168.1.41 | 從MySQL資料庫 |
1. 資料庫的配置
需要進入50與41資料庫中配置使用者名與密碼,使用者必須是遠端可以通路的使用者,配置方法如下:
首先進入到50的MySQL資料庫中,建立使用者“buck”設定密碼為“hello”下列标紅的是使用者與密碼。
mysql> grant all on *.* to buck@'127.0.0.1' identified by "hello";
Query OK, 0 rows affected (0.00 sec)
修改buck的通路權限,首先得進入mysql資料庫,才能修改host權限的資訊
# 進入資料庫
mysql> use mysql
Database changed

# 修改host權限為"%"
mysql> update user set host = '%' where user = 'buck';
Query OK, 1 row affected (0.00 sec)
Rows matched: 1  Changed: 1  Warnings: 0
檢視一下user表,看看修改成功了沒有。可以看到,buck的使用者,host已經修改成百分号了。
mysql> select user, host from user;
+------+-----------------------+
| user | host                  |
+------+-----------------------+
| buck | %                     |
| root | 127.0.0.1             |
|      | localhost             |
| root | localhost             |
|      | localhost.localdomain |
| root | localhost.localdomain |
+------+-----------------------+
6 rows in set (0.00 sec)
更新資料庫資訊,如果沒更新資料庫的資訊,修改不會立即生效,那就需要重新開機資料庫了。這邊直接更新資料庫的資訊,可以避免重新開機。
mysql>  flush privileges;
Query OK, 0 rows affected (0.00 sec)
主從MySQL都需要建立一個資料庫,我這建立的資料庫是“test”,為了友善測試讀寫分離
mysql> create database test;
Query OK, 1 row affected (0.00 sec)
【注解:50資料庫與41的資料庫同樣配置】
2. 主從資料庫連接配接
配置主從伺服器需要編寫MySQL的配置檔案,詳情配置步驟如下:
主伺服器 ( 192.168.1.50 ),使用vim進行配置
[mysqld]
datadir=/data/mysql
socket=/var/lib/mysql/mysql.sock
user=mysql

#主從複制配置
innodb_flush_log_at_trx_commit=1
sync_binlog=1
#需要備份的資料庫
binlog-do-db=test
#不需要備份的資料庫
binlog-ignore-db=mysql

#啟動二進制檔案
log-bin=mysql-bin

#伺服器ID
server-id=1

# Disabling symbolic-links is recommended to prevent assorted security risks
symbolic-links=0

[mysqld_safe]
log-error=/var/log/mysqld.log
pid-file=/var/run/mysqld/mysqld.pid
【主意:若沒有配置binlog-do-db和binlog_ignore_db,表示備份全部資料庫。】
重新開機mysqld服務
[root@localhost bin]# /etc/init.d/mysqld restart 進入資料庫,配置主從複制的權限
mysql> grant replication slave on *.* to 'buck'@'127.0.0.1' identified by 'hello';
Query OK, 0 rows affected (0.00 sec)
鎖定資料庫
mysql> flush tables with read lock;
Query OK, 0 rows affected (0.00 sec)
檢視主資料庫資訊,記住下面的“File”與“Position”的資訊,它們是用來配置從資料庫的關鍵資訊。可以看到下面同步的資料庫的“test”資料庫,主從資料庫如果資料不一樣,首先需要手動去同步一下資料,我在Windows環境下隻用Navicat複制的資料,這裡就不示範了。
mysql> show master status;
+------------------+----------+--------------+------------------+
| File             | Position | Binlog_Do_DB | Binlog_Ignore_DB |
+------------------+----------+--------------+------------------+
| mysql-bin.000001 | 589      | test         | mysql            |
+------------------+----------+--------------+------------------+
1 row in set (0.00 sec)
從伺服器 ( 192.168.1.41 ),也需要使用vim進行配置,隻需要在[mysqld]下面加入server-id=2就可以,全部配置如下:
[mysqld]
datadir=/var/lib/mysql
socket=/var/lib/mysql/mysql.sock
user=mysql

server-id=2

# Disabling symbolic-links is recommended to prevent assorted security risks
symbolic-links=0

[mysqld_safe]
log-error=/var/log/mysqld.log
pid-file=/var/run/mysqld/mysqld.pid
進入資料庫,配置從資料庫的資訊,這裡輸入剛才記錄下來的“File”與“Position”的資訊,并且在從伺服器上執行:
| mysql> change master to master_host='192.168.246.134' | 主伺服器的IP |
| master_user='buck' | 配置主伺服器的使用者名 |
| master_password='hello' | 對應使用者的密碼 |
| master_port=3306 | 主伺服器的mysql端口 |
| master_log_file='mysql-bin.000001' | 日志檔案的名稱,需要與主伺服器對應 |
| master_log_pos=589 | 日志位置,需要與主伺服器對應 |
| master_connect_retry=20 | 重連次數 |
mysql> change master to master_host='192.168.1.50',
    -> master_user='buck',
    -> master_password='hello',
    -> master_port=3306,
    -> master_log_file='mysql-bin.000001',
    -> master_log_pos=589,
    -> master_connect_retry=20;
Query OK, 0 rows affected (0.01 sec)
啟動程序
mysql> start slave;
Query OK, 0 rows affected (0.00 sec)
檢查主從複制狀态,要看到下列标紅的資訊中,兩個都是Yes,才說明主從連接配接正确,如果有一個是No,需要重新确定剛才記錄的日志資訊,停掉“stop slave”重新進行配置主從連接配接。
mysql> show slave status \G;
*************************** 1. row ***************************
               Slave_IO_State: Waiting for master to send event
                  Master_Host: 192.168.246.134
                  Master_User: buck
                  Master_Port: 3306
                Connect_Retry: 10
              Master_Log_File: mysql-bin.000001
          Read_Master_Log_Pos: 589
               Relay_Log_File: mysqld-relay-bin.000001
                Relay_Log_Pos: 251
        Relay_Master_Log_File: mysql-bin.000001
             Slave_IO_Running: Yes
            Slave_SQL_Running: Yes
              Replicate_Do_DB:
          Replicate_Ignore_DB:
           Replicate_Do_Table:
       Replicate_Ignore_Table:
      Replicate_Wild_Do_Table:
  Replicate_Wild_Ignore_Table:
                   Last_Errno: 0
                   Last_Error:
                 Skip_Counter: 0
          Exec_Master_Log_Pos: 17620976
              Relay_Log_Space: 407
              Until_Condition: None
               Until_Log_File:
                Until_Log_Pos: 0
           Master_SSL_Allowed: No
           Master_SSL_CA_File:
           Master_SSL_CA_Path:
              Master_SSL_Cert:
            Master_SSL_Cipher:
               Master_SSL_Key:
        Seconds_Behind_Master: 0
Master_SSL_Verify_Server_Cert: No
                Last_IO_Errno: 0
                Last_IO_Error:
               Last_SQL_Errno: 0
               Last_SQL_Error:
1 row in set (0.00 sec)

ERROR:
No query specified
可以進入主資料庫,運作以下指令,測試主從服務的實際效果。
mysql> use test;
mysql> create table wl(id int(4),sex varchar(255),birthday date);
進入從庫
mysql> show tables;
+----------------+
| Tables_in_test |
| wl |
1 row in set (0.00 sec)
mysql>
3. Atlas配置
下載下傳Atlas會有兩個版本,其中有個分表的版本,但是這個需要其他的依賴,我這邊不需要分表這種需求,是以安裝普通的版本
Atlas (普通) : Atlas-2.2.1.el6.x86_64.rpm Atlas (分表) : Atlas-sharding_1.0.1-el6.x86_64.rpm
首先進入Linux的Home目錄下,下載下傳非分表的安裝包
[root@localhost ~]# mkdir /demo/atlas
[root@localhost ~]# cd /demo/atlas
[root@localhost home]# wget         https:            //github.com/Qihoo360/Atlas/releases/download/2.2.1/Atlas-2.2.1.el6.x86_64.rpm
下載下傳好了之後,進行安裝
[root@localhost home]# rpm -ivh Atlas-2.2.1.el6.x86_64.rpm
Preparing...                ########################################### [100%]
   1:Atlas                  ########################################### [100%]
安裝好了,它會預設在”/usr/local/mysql-proxy”下給你生成4個檔案夾,以及需要配置的檔案,如下:
[root@localhost home]# ll /usr/local/mysql-proxy/
total 16
drwxr-xr-x. 2 root root 4096 Dec 28 10:47 bin
drwxr-xr-x. 2 root root 4096 Dec 28 10:47 conf
drwxr-xr-x. 3 root root 4096 Dec 28 10:47 lib
drwxr-xr-x. 2 root root 4096 Dec 17  2014 log
bin目錄下放的都是可執行檔案
1. “encrypt”是用來生成MySQL密碼加密的,在配置的時候會用到
2. “mysql-proxy”是MySQL自己的讀寫分離代理
3. “mysql-proxyd”是360弄出來的,後面有個“d”,服務的啟動、重新開機、停止。都是用他來執行的
conf目錄下放的是配置檔案
1. “test.cnf”隻有一個檔案,用來配置代理的,可以使用vim來編輯
lib目錄下放的是一些包,以及Atlas的依賴
log目錄下放的是日志,如報錯等錯誤資訊的記錄
進入bin目錄,使用encrypt來對資料庫的密碼進行加密,我的MySQL資料的使用者名是buck,密碼是hello,我需要對密碼進行加密
[root@localhost bin]# ./encrypt 123456
/iZxz+0GRoA=
配置Atlas,使用vim進行編輯
[root@localhost conf]# cd /usr/local/mysql-proxy/conf/
[root@localhost conf]# vim test.cnf
進入後,可以在Atlas進行配置,360寫的中文注釋都很詳細,根據注釋來配置資訊,其中比較重要,需要說明的配置如下:
這是用來登入到Atlas的管理者的賬号與密碼,與之對應的是“#Atlas監聽的管理接口IP和端口”,也就是說需要設定管理者登入的端口,才能進入管理者界面,預設端口是2345,也可以指定IP登入,指定IP後,其他的IP無法通路管理者的指令界面。友善測試,我這裡沒有指定IP和端口登入。這是用來配置主資料的位址與從資料庫的位址,這裡配置的主資料庫是135,從資料庫是134#管理接口的使用者名 admin-username = user #管理接口的密碼 admin-password = pwd這個是用來配置MySQL的賬戶與密碼的,我的MySQL的使用者是buck,密碼是hello,剛剛使用Atlas提供的工具生成了對應的加密密碼#Atlas後端連接配接的MySQL主庫的IP和端口,可設定多項,用逗号分隔 proxy-backend-addresses = 192.168.1.50:3306 #Atlas後端連接配接的MySQL從庫的IP和端口,@後面的數字代表權重,用來作負載均衡,若省略則預設為1,可設定多項,用逗号分隔 proxy-read-only-backend-addresses = 192.168.1.41:3306@1這是設定工作接口與管理接口的,如果ip設定的”0.0.0.0”就是說任意IP都可以通路這個接口,當然也可以指定IP和端口,友善測試我這邊沒有指定,工作接口的使用者名密碼與MySQL的賬戶對應的,管理者的使用者密碼與上面配置的管理者的使用者密碼對應。#使用者名與其對應的加密過的MySQL密碼,密碼使用PREFIX/bin目錄下的加密程式encrypt加密,下行的user1和user2為示例,将其替換為你的MySQL的使用者名和加密密碼! pwds = buck:/iZxz+0GRoA=#Atlas監聽的工作接口IP和端口 proxy-address = 0.0.0.0:1234 #Atlas監聽的管理接口IP和端口 admin-address = 0.0.0.0:2345
啟動Atlas
[root@localhost bin]# pwd
/usr/local/mysql-proxy/bin
[root@localhost bin]# ./mysql-proxyd test start
OK: MySQL-Proxy of test is started 測試一下Atlas伺服器的MySQL狀态,要确認它是關閉狀态,并且使用mysql指令,進不去資料庫,前提是Atlas伺服器也需要裝mysql,直接運作 yum -y install mysql 就可以了。我們這裡隻需要mysql這個指令好使,就可以了。
[root@localhost bin]# /etc/init.d/mysqld status
mysqld is stopped
[root@localhost bin]# mysql
ERROR 2002 (HY000): Can't connect to local MySQL server through socket '/var/lib/mysql/mysql.sock' (2)
确認系統中自帶的MySQL進不去了,使用如下指令,進入Atlas的管理模式“mysql -h127.0.0.1 -P2345 -uuser -ppwd ”,能進去說明Atlas正常運作着呢,因為它會把自己當成一個MySQL資料庫,是以在不需要資料庫環境的情況下,也可以進入到MySQL資料庫模式。
[root@localhost bin]# mysql -h127.0.0.1 -P2345 -uuser -ppwd
Welcome to the MySQL monitor. Commands end with ; or \g.
Your MySQL connection id is 1
Server version: 5.0.99-agent-admin
Copyright (c) 2000, 2013, Oracle and/or its affiliates. All rights reserved.
Oracle is a registered trademark of Oracle Corporation and/or its
affiliates. Other names may be trademarks of their respective
owners.
Type 'help;' or '\h' for help. Type '\c' to clear the current input statement.
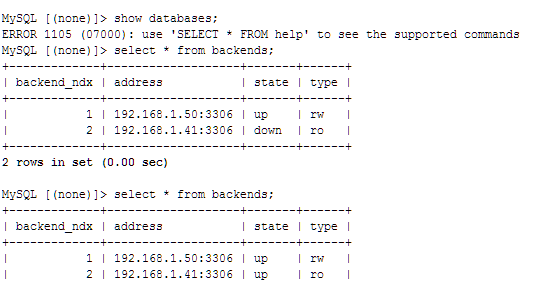
mysql> 可以通路“help”表,來看MySQL管理者模式都能做些什麼。可以使用SQL語句來通路
mysql> select * from help;
+----------------------------+---------------------------------------------------------+
| command                    | description                                             |
+----------------------------+---------------------------------------------------------+
| SELECT * FROM help         | shows this help                                         |
| SELECT * FROM backends     | lists the backends and their state                      |
| SET OFFLINE $backend_id    | offline backend server, $backend_id is backend_ndx's id |
| SET ONLINE $backend_id     | online backend server, ...                              |
| ADD MASTER $backend        | example: "add master 127.0.0.1:3306", ...               |
| ADD SLAVE $backend         | example: "add slave 127.0.0.1:3306", ...                |
| REMOVE BACKEND $backend_id | example: "remove backend 1", ...                        |
| SELECT * FROM clients      | lists the clients                                       |
| ADD CLIENT $client         | example: "add client 192.168.1.2", ...                  |
| REMOVE CLIENT $client      | example: "remove client 192.168.1.2", ...               |
| SELECT * FROM pwds         | lists the pwds                                          |
| ADD PWD $pwd               | example: "add pwd user:raw_password", ...               |
| ADD ENPWD $pwd             | example: "add enpwd user:encrypted_password", ...       |
| REMOVE PWD $pwd            | example: "remove pwd user", ...                         |
| SAVE CONFIG                | save the backends to config file                        |
| SELECT VERSION             | display the version of Atlas                            |
+----------------------------+---------------------------------------------------------+
16 rows in set (0.00 sec)

mysql>
也可以使用工作接口來通路,使用指令“mysql -h127.0.0.1 -P1234 -ubuck -phello”
[root@localhost bin]# mysql -h127.0.0.1 -P1234 -ubuck -phello
Welcome to the MySQL monitor.  Commands end with ; or \g.
Your MySQL connection id is 1
Server version: 5.0.81-log

Copyright (c) 2000, 2013, Oracle and/or its affiliates. All rights reserved.

Oracle is a registered trademark of Oracle Corporation and/or its
affiliates. Other names may be trademarks of their respective
owners.

Type 'help;' or '\h' for help. Type '\c' to clear the current input statement.

mysql>
你可以讓資料庫某一台down掉,來測試監控的可用性。從這裡可以看出我們的監控是好使的,啦啦啦啦!!
如果工作接口可以進入了,就可以在Windows平台下,使用Navicat來連接配接資料庫,填寫對應的host,Port,使用者名,密碼就可以

4. 讀寫分離測試
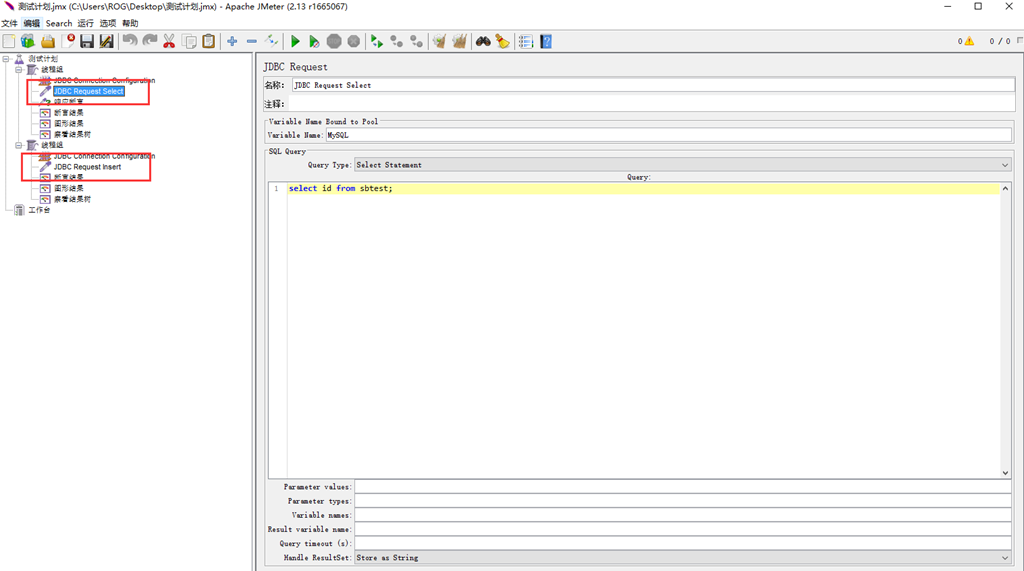
這裡測試讀寫分離需要使用到Jmeter了,它是Java寫第一套開源的壓力測試工具,因為這個比較友善。他有專門測試MySQL的子產品,需要使用MySQL的JDBC驅動jar包,配置很簡單,東西很好很強大很好用。
Jmeter下載下傳位址:
http://jmeter.apache.org/download_jmeter.cgiMySQL的JDBC :
http://dev.mysql.com/downloads/connector/j/下載下傳下來後,分别都解壓開來,打開Jmeter ( 在bin路面下的jmeter.bat ) ,在測試計劃中,導緻JDBC的jar包

配置JDBC的驅動

分别做查詢與插入語句
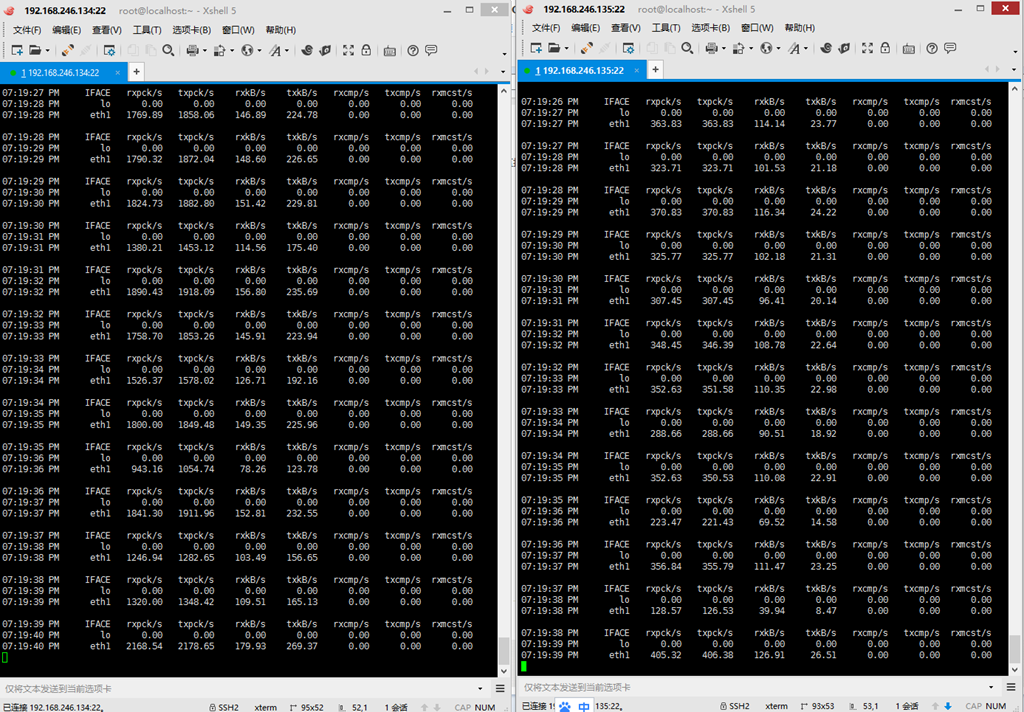
配置好了以後,就先運作查詢操作,然後分别監控主資料庫與從資料庫所在機器的流量,來确定是否讀寫,使用“sar -n DEV 1 10000”指令來監控讀寫
先來測試寫,目前資料庫裡面一條資訊都沒有,開啟配置好了的Jmeter,進行寫入資料測試

主資料庫 ( 192.168.1.50 )
從資料庫 ( 192.168.1.41 )
可以看到測試插入資料的操作時,主資料庫的網卡流量很大,從資料庫的流量很小,是應為主資料是主要負責寫入的,而從資料庫主要是負責同步的。
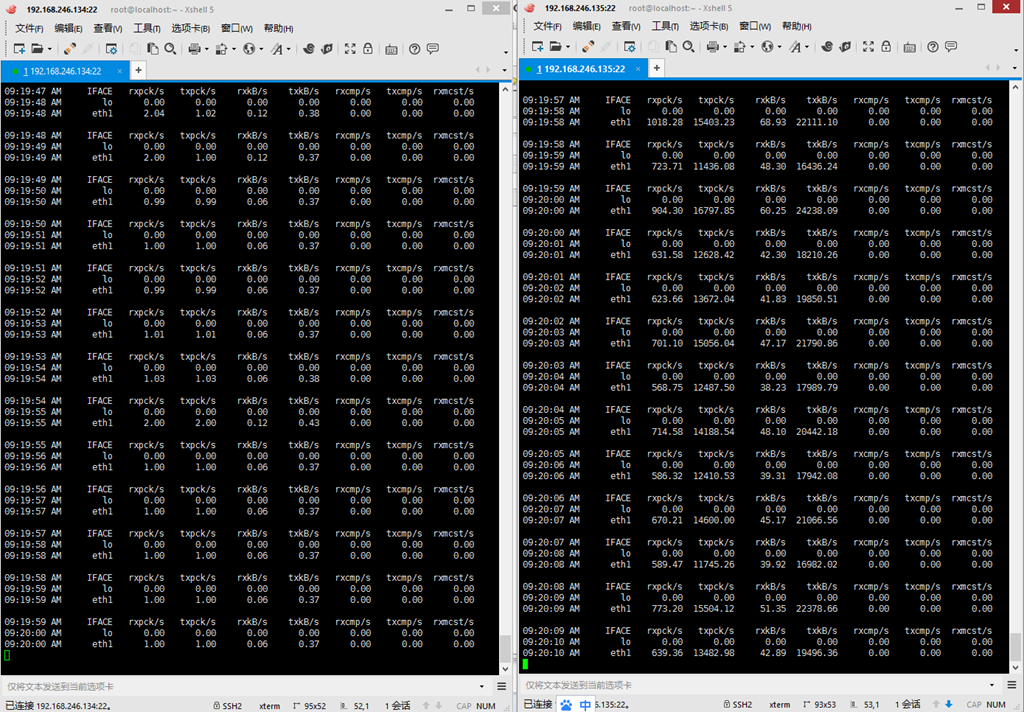
檢視資料庫,發現已經插入了6W多條資料了。

進行讀取資料的測試,隻需要執行查詢就好,執行“select *from sbtest;”來查詢資料表
可以看到135(50)資料庫的流量非常大,134(41)沒有什麼流量,這下就可以确定了資料是從資料庫讀取的。已經實作了讀寫分離。
![【MySQL資料庫】資料庫索引事務1.索引2.事務[圖]](data:image/gif;base64,R0lGODlhAQABAIAAAP///wAAACwAAAAAAQABAAACAkQBADs=)