1、ApplicationListener在使用過程中可以監聽某一事件的發生,可以做出相應的處理,這個方式不常用,但是在特殊情況下面還是有用的。
2、導包pom.xml
<project xmlns="http://maven.apache.org/POM/4.0.0" xmlns:xsi="http://www.w3.org/2001/XMLSchema-instance" xsi:schemaLocation="http://maven.apache.org/POM/4.0.0 http://maven.apache.org/xsd/maven-4.0.0.xsd">
  <modelVersion>4.0.0</modelVersion>
  <groupId>com.troy</groupId>
  <artifactId>springInit</artifactId>
  <version>0.0.1-SNAPSHOT</version>
  <packaging>war</packaging>
  <dependencies>
      <dependency>
      <groupId>org.springframework</groupId>
      <artifactId>spring-webmvc</artifactId>
      <version>3.2.8.RELEASE</version>
    </dependency>
  </dependencies>
</project>
3、web.xml配置
<?xml version="1.0" encoding="UTF-8"?>
<web-app xmlns:xsi="http://www.w3.org/2001/XMLSchema-instance" xmlns="http://java.sun.com/xml/ns/javaee" xsi:schemaLocation="http://java.sun.com/xml/ns/javaee http://java.sun.com/xml/ns/javaee/web-app_2_5.xsd" version="2.5">
  <display-name>springInit</display-name>
  <welcome-file-list>
    <welcome-file>index.html</welcome-file>
    <welcome-file>index.htm</welcome-file>
    <welcome-file>index.jsp</welcome-file>
    <welcome-file>default.html</welcome-file>
    <welcome-file>default.htm</welcome-file>
    <welcome-file>default.jsp</welcome-file>
  </welcome-file-list>
  <servlet>
      <servlet-name>springmvc</servlet-name>
      <servlet-class>org.springframework.web.servlet.DispatcherServlet</servlet-class>
      <init-param>
          <param-name>contextConfigLocation</param-name>
          <param-value>classpath:spring/spring-mvc.xml</param-value>
      </init-param>
      <load-on-startup>1</load-on-startup>
  </servlet>
  <servlet-mapping>
      <servlet-name>springmvc</servlet-name>
      <url-pattern>/</url-pattern>
  </servlet-mapping>
  <filter>
      <filter-name>encodingFilter</filter-name>
      <filter-class>org.springframework.web.filter.CharacterEncodingFilter</filter-class>
      <init-param>
          <param-name>encoding</param-name>
          <param-value>UTF-8</param-value>
      </init-param>
      <init-param>
          <param-name>forceEncoding</param-name>
          <param-value>true</param-value>
      </init-param>
  </filter>
  <filter-mapping>
      <filter-name>encodingFilter</filter-name>
      <url-pattern>/</url-pattern>
  </filter-mapping>
</web-app>
4、spring-mvc.xml配置
<?xml version="1.0" encoding="UTF-8"?>
<beans xmlns="http://www.springframework.org/schema/beans"
    xmlns:xsi="http://www.w3.org/2001/XMLSchema-instance"
    xmlns:context="http://www.springframework.org/schema/context"
    xmlns:jdbc="http://www.springframework.org/schema/jdbc"
    xmlns:jee="http://www.springframework.org/schema/jee"
    xmlns:tx="http://www.springframework.org/schema/tx"
    xmlns:aop="http://www.springframework.org/schema/aop"
    xmlns:mvc="http://www.springframework.org/schema/mvc"
    xmlns:util="http://www.springframework.org/schema/util"
    xmlns:jpa="http://www.springframework.org/schema/data/jpa"
    xsi:schemaLocation="
        http://www.springframework.org/schema/beans http://www.springframework.org/schema/beans/spring-beans-3.2.xsd
        http://www.springframework.org/schema/context http://www.springframework.org/schema/context/spring-context-3.2.xsd
        http://www.springframework.org/schema/jdbc http://www.springframework.org/schema/jdbc/spring-jdbc-3.2.xsd
        http://www.springframework.org/schema/jee http://www.springframework.org/schema/jee/spring-jee-3.2.xsd
        http://www.springframework.org/schema/tx http://www.springframework.org/schema/tx/spring-tx-3.2.xsd
        http://www.springframework.org/schema/data/jpa http://www.springframework.org/schema/data/jpa/spring-jpa-1.3.xsd
        http://www.springframework.org/schema/aop http://www.springframework.org/schema/aop/spring-aop-3.2.xsd
        http://www.springframework.org/schema/mvc http://www.springframework.org/schema/mvc/spring-mvc-3.2.xsd
        http://www.springframework.org/schema/util http://www.springframework.org/schema/util/spring-util-3.2.xsd">

    <mvc:annotation-driven/>
    <context:component-scan base-package="com.troy"/>
    <bean class="com.troy.springInit.SpringListenerEvent"/>
    <bean class="com.troy.springInit.SpringListener"/>
    <bean id="initApplicationContext" class="com.troy.springInit.InitApplicationContext"/>
</beans>
5、<bean class="com.troy.springInit.SpringListener"/>在spring的作用是為了在bean加載完成過後進行初始化加載
這裡可以參考:
http://www.cnblogs.com/ll409546297/p/6903357.html6、目錄結構,因為我用初始化加載來實作某一個事件的監聽,自己可以根據相應事件觸發來實作
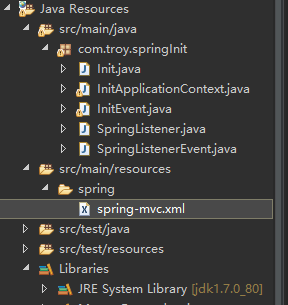
7、觸發方式
1)第一步:因為事件觸發需要用到ApplicationContext的publishEvent來觸發事件,我這裡沒有ClassPathXmlApplicationContext的方式來加載配置檔案,而是實作ApplicationContextAware這個接口來實作ApplicationContext的加載
public class InitApplicationContext implements ApplicationContextAware{

    public static ApplicationContext ac;

    public void setApplicationContext(ApplicationContext applicationContext) throws BeansException {
       this.ac = applicationContext;
    }
}
2)第二步編寫事件:繼承ApplicationEvent類會要求重寫一個構造方法
public class InitEvent extends ApplicationEvent{

    public String data;

    public InitEvent(Object source) {
        super(source);
    }
    public InitEvent(Object source,String data) {
        super(source);
        this.data = data;
    }
    public String getData() {
        return data;
    }
    public void setData(String data) {
        this.data = data;
    }

    //這裡我是利用spring初始化來實作方法的加載
    public static void execute(){
        ApplicationContext ac = InitApplicationContext.ac;
        System.out.println("test==================test");
        InitEvent ie = new InitEvent("test", "test");
        ac.publishEvent(ie);
    }

}
3)通過初始化的方式來觸發這個事件,這個可以通過其他方式,比如servlet等方式來觸發
public class SpringListener implements ApplicationListener<ContextRefreshedEvent>{

    public void onApplicationEvent(ContextRefreshedEvent event) {
        System.out.println(event.getApplicationContext());
        //判斷spring容器是否加載完成
        if (event.getApplicationContext().getParent() == null) {
            Init.init();
            InitEvent.execute();
        }
    }
}
4)上面的方式也可以觸發事件,但是寫出來比較繁瑣。我們一般通過ApplicationListener接口來實作事件的監聽,這樣來觸發事件的産生。通過ApplicationListener的泛型機制,來監聽事件的發生,這裡可以針對于時間做相對處理,實作對事件的監聽
public class SpringListenerEvent implements ApplicationListener<InitEvent>{

    public void onApplicationEvent(InitEvent event) {
        System.out.println("事件處理==================事件處理");
        System.out.println(event.getData());
    }
}
8、總體來說:ApplicationListener是對相應應用的監聽,隻是對于不同方式,通過不同方式來呈現!
![Java小案例——随機數猜測随機數猜測[圖]](data:image/gif;base64,R0lGODlhAQABAIAAAP///wAAACwAAAAAAQABAAACAkQBADs=)