作者:freewind
比原項目倉庫:
Github位址:
https://github.com/Bytom/bytom Gitee位址: https://gitee.com/BytomBlockchain/bytom在前一篇文章中,我們試圖了解比原是如何交易的,但是由于内容太多,我們把它分成了幾個小問題,并在前一篇解決了“在dashboard中如何送出交易資訊”,以及“比原背景是如何操作的”。
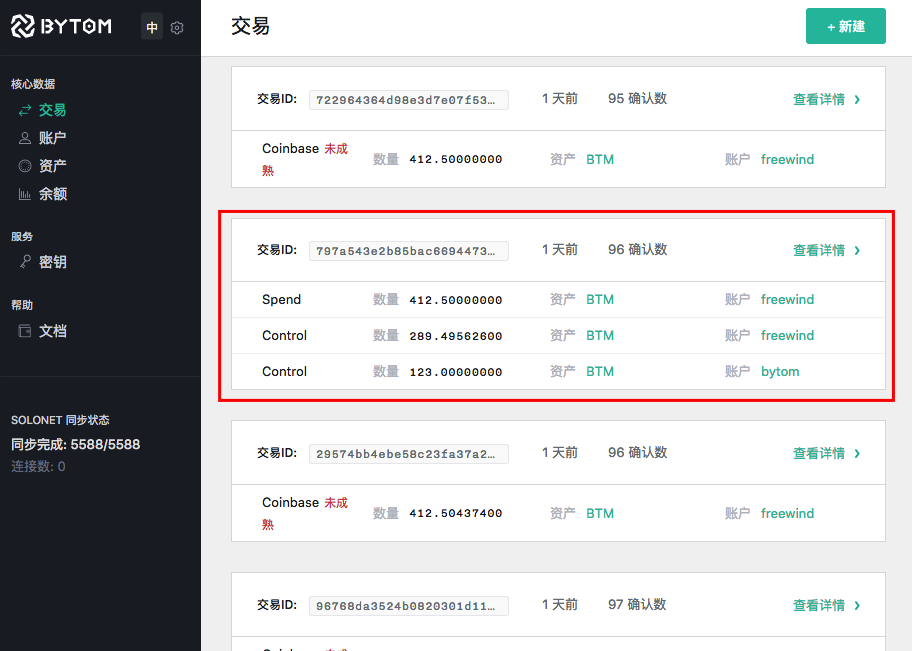
在本文我們繼續研究下一個問題:在送出的交易成功完成後,前端會以清單的方式顯示交易資訊,它是如何拿到背景的資料的?也就是下圖是如何實作的:
- 前端是如何擷取交易資料并顯示出來的?
- 後端是如何找到交易資料的?
下面依次解決。
我們先在比原的前端代碼庫中尋找。由于這個功能是“清單分頁”顯示,這讓我想起了前面有一個類似的功能是分頁顯示餘額,那裡用的是
src/features/shared/components/BaseList
提供的通用元件,是以這邊應該也是一樣。
經過檢視,果然在
src/features/transactions/components/
下面發現了
List.jsx
檔案,且目錄結構跟
src/features/balances/components/
非常相似,再大略看一下代碼,就能确定使用了一樣的方法。
但是如果回想一下,過程似乎還是有點不同。在顯示餘額那裡,是我們手動點選了左側欄的菜單,使得前端的路由轉到了
/balances
,然後由
src/features/shared/routes.js#L5-L44const makeRoutes = (store, type, List, New, Show, options = {}) => {
// ...
return {
path: options.path || type + 's',
component: RoutingContainer,
name: options.name || humanize(type + 's'),
name_zh: options.name_zh,
indexRoute: {
component: List,
onEnter: (nextState, replace) => {
loadPage(nextState, replace)
},
onChange: (_, nextState, replace) => { loadPage(nextState, replace) }
},
childRoutes: childRoutes
}
} 中的
onEnter
或者
onChange
觸發了
loadPage
,最後一步步調用了背景接口
/list-balances
。而這次在本文的例子中,它是在送出了“送出交易”表單成功後,自動轉到了“清單顯示交易”的頁面,會不會同樣觸發
onEnter
onChange
呢?
答案是會的,因為在前文中,當
submitForm
執行後,向背景的最後一個請求
/submit-transaction
成功以後,會調用
dealSignSubmitResp
這個函數,而它的定義是:
src/features/transactions/actions.js#L120-L132const dealSignSubmitResp = resp => {
// ...
dispatch(push({
pathname: '/transactions',
state: {
preserveFlash: true
}
}))
} 可以看到,它最後也會切換前端路由到
/transactions
,跟顯示餘額那裡就是完全一樣的路線了。是以按照那邊的經驗,到最後一定會通路背景的
/list-transactions
接口。
這過程中的推導就不再詳說,需要的話可以看前面講解“比原是如何顯示餘額的”那篇文章。
最後拿到了背景傳回的資料如何以表格形式顯示出來,在那篇文章中也提到,這裡也跳過。
當我們知道了前端會通路背景的
/list-transactions
接口後,我們就很容易的在比原的主項目倉庫中找到下面的代碼:
api/api.go#L164-L244func (a *API) buildHandler() {
// ...
if a.wallet != nil {
// ...
m.Handle("/list-transactions", jsonHandler(a.listTransactions))
// ...
} 可以看到,
list-transactions
對應的handler是
a.listTransactions
:
api/query.go#L83-L107func (a *API) listTransactions(ctx context.Context, filter struct {
ID string `json:"id"`
AccountID string `json:"account_id"`
Detail bool `json:"detail"`
}) Response {
transactions := []*query.AnnotatedTx{}
var err error
// 1.
if filter.AccountID != "" {
transactions, err = a.wallet.GetTransactionsByAccountID(filter.AccountID)
} else {
transactions, err = a.wallet.GetTransactionsByTxID(filter.ID)
}
// ...
// 2.
if filter.Detail == false {
txSummary := a.wallet.GetTransactionsSummary(transactions)
return NewSuccessResponse(txSummary)
}
return NewSuccessResponse(transactions)
} 從這個方法的參數可以看到,前端是可以傳過來
id
,
account_id
和
detail
這三個參數的。而在本文的例子中,因為是直接跳轉到
/transactions
的路由,是以什麼參數也沒有傳上來。
我把代碼分成了兩塊,一些錯誤處理的部分被我省略了。依次講解:
- 第1處是想根據參數來擷取
transactions
account_id
id
a.wallet.GetTransactionsByTxID
- 第2處代碼,如果
detail
false
false
transactions
我們先進第1處代碼中的
a.wallet.GetTransactionsByAccountID
func (w *Wallet) GetTransactionsByAccountID(accountID string) ([]*query.AnnotatedTx, error) {
    annotatedTxs := []*query.AnnotatedTx{}

    // 1.
    txIter := w.DB.IteratorPrefix([]byte(TxPrefix))
    defer txIter.Release()
    // 2.
    for txIter.Next() {
        // 3.
        annotatedTx := &query.AnnotatedTx{}
        if err := json.Unmarshal(txIter.Value(), &annotatedTx); err != nil {
            return nil, err
        }

        // 4.
        if findTransactionsByAccount(annotatedTx, accountID) {
            annotateTxsAsset(w, []*query.AnnotatedTx{annotatedTx})
            annotatedTxs = append(annotatedTxs, annotatedTx)
        }
    }

    return annotatedTxs, nil
}
這裡把代碼分成了4塊:
- 第1處代碼是周遊資料庫中以
TxPrefix
TxPrefix
TXS:
DB
![【MySQL資料庫】資料庫索引事務1.索引2.事務[圖]](data:image/gif;base64,R0lGODlhAQABAIAAAP///wAAACwAAAAAAQABAAACAkQBADs=)