本文首發于 my blog
在業務中一般 MVVM 架構一般都會配合上資料狀态庫(redux, mobx 等)一起使用,本文會通過一個小 demo 來講述為什麼會引人資料狀态庫。
從 MVC 到 MVVM 模式說起
傳統 MVC 架構(如 JSP)在當今移動端流量寸土寸金的年代一個比較頭疼的問題就是會進行大量的全局重複渲染。但是 MVC 架構是好東西,其對資料、視圖、邏輯有了清晰的分工,于是前端 MVC 架構(比如 backbone.js) 出來了,對于很多業務規模不大的場景,前端 MVC 架構已經夠用了,它也能做到前後端分離開發單頁面應用,那麼它的缺陷在哪呢?
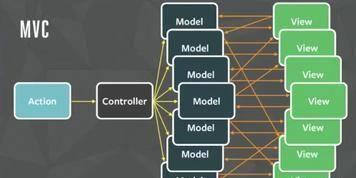
拿 backbone.js 說,它的 Model 對外暴露了 set 方法,也就是說可以在不止一個 View 裡修改同個 Model 的資料,然後一個 Model 的資料同時對應多個 View 的呈現,如下圖所示。當業務邏輯過多時,多個 Model 和多個 View 就會耦合到一塊,可以想到排查 bug 的時候會比較痛苦。
針對傳統 MVC 架構性能低(多次全局渲染)以及前端 MVC 架構耦合度高(Model 和 View) 的痛處,MVVM 架構完美地解決了以上兩點。可以參閱之前寫的
MVVM 架構解析之雙向綁定only MVVM
假設有這麼一個場景,在輸入框中查詢條件,點選查詢,然後在清單中傳回相應内容。如下圖所示:

假設用 react 實作,思路大體是先調用查詢接口,調用成功後将擷取到的資料通過
setState
存進 list 中,清單顯示部分代碼如下:
const Decorate = (ListComponent) => class extends Component {
  constructor() {
    super()
    this.state = { list: [] }
  }

  componentDidMount() {
    fetch('./list.json')
      .then((res) => res.json())
      .then(result => this.setState({ list: result.data }))
  }

  render() {
    return (
      <ListComponent data={this.state.list} />
    )
  }
}
接着往封裝的 Decorate 元件裡,傳入無狀态函數建構的 List 元件用來展示清單資料,代碼如下:
function List(props) {
  return (
    <div>
      {props.data.map(r =>
        <p key={r.id}>{r.content}</p>
      )}
    </div>
  )
}
可以看到 List 元件相當于是 View 層,而封裝的 Decorate 元件相當于是 Model 層。但是這麼做還是把業務邏輯寫進了元件當中。而我們期望的是能得到一個純粹的 Model 層和 View 層。接着一起看看 Flux 架構模式是如何解決這個問題的。
引人 Flux 架構模式
Flux 架構模式的 4 個重要組成部分以及它們的關系如上圖所示,下文會根據 dispatch,store, action, view 的順序逐漸揭開 Flux 架構模式的面紗。
從
Flux 的源碼中可以看出 Dispacher.js 是其的核心檔案,其核心是基于事件的釋出/訂閱模式完成的,核心源碼如下:
class Dispatcher {
  ...
  // 注冊回調函數,
  register(callback) {
    var id = _prefix + this._lastID++;
    this._callbacks[id] = callback;
  }

  // 當調用 dispatch 的時候會調用 register 中注冊的回調函數
  dispatch(payload) {
    this._startDispatching(payload);
    for (var id in this._callbacks) {
      this._invokeCallback(id);
    }
  }
}
回顧下之前的目的:讓 Store 層變得純粹。于是定義了一個變量 comments 用來專門存放清單資料,在了解 Dispatcher 的核心原理之後,當調用 dispatch(obj) 方法時,就可以把參數傳遞到事先注冊的 register 函數中,代碼如下:
// commentStore.js
let comments = []
const CommentStore = {
  getComment() {
    return comments
  }
}

dispathcer.register((action) => { // 調用 Dispatcher 執行個體上的 register 函數
  switch (action.type) {
    case 'GET_LIST_SUCCESS': {
      comments = action.comment
    }
  }
})
以及 action 中的函數如下:
// commentAction.js
const commentAction = {
  getList() {
    fetch('./list.json')
      .then((res) => res.json())
      .then(result =>
        dispathcer.dispatch({ // 調用 Dispatcher 執行個體上的 dispatch 函數
          type: 'GET_LIST_SUCCESS',
          comment: result.data
        }))
  }
}
但是似乎少了點什麼,當
GET_LIST_SUCCESS
成功後,發現還缺少通知到頁面再次調用 CommentStore.getComment() 的能力,是以再次引用事件釋出/訂閱模式,這次使用了 Node.js 提供的 events 子產品,對 commentStore.js 檔案進行修改,修改後代碼如下:
let comments = []
const CommentStore = Object.assign({}, EventEmitter.prototype, {
  getComment() {
    return comments
  },

  emitChange() {
    this.emit('change')
  },

  addListener(callback) { // 提供給頁面元件使用
    this.on('change', callback)
  }
})

appDispathcer.register((action) => {
  switch (action.type) {
    case 'GET_LIST_SUCCESS': {
      comments = action.comment
      CommentStore.emitChange() // 有了這行代碼,也就有了通知頁面再次進行調用 CommentStore.getComment 的能力
    }
  }
})
剩下最後一步了,就是整合 store 和 action 進頁面中,代碼如下:
class ComponentList extends Component {
  constructor() {
    super()
    this.state = {
      comment: commentStore.getComment()
    }
  }

  componentDidMount() {
    commentStore.addListener(() => this.setState({ // 注冊函數,上面已經提過,供 store 使用
      comment: commentStore.getComment()
    }))
  }

  render() {
    return (
      <div>
        {this.state.comment.map(r =>
          <p key={r.id}>{r.content}</p>
        )}
      </div>
    )
  }
}
小結
單純以 mvvm 建構應用會發現業務邏輯以及資料都耦合在元件之中,引入了 Flux 架構模式後資料和業務邏輯得到較好的分離。但是使用 Flux 有什麼缺點呢?在下篇 《聊聊 Redux 架構模式》中會進行分析,下回見。
本文實踐案例已上傳至
stateManage 系列部落格,歡迎 Star
作者:
牧雲雲出處:
http://www.cnblogs.com/MuYunyun/"本文版權歸作者和部落格園所有,歡迎轉載,轉載請标明出處。
如果您覺得本篇博文對您有所收獲,請點選右下角的 [推薦],謝謝!