該文章比較基礎, 不多說廢話了, 直接切入正題.
該文分以下幾點:
- 建立Model和資料庫
- 使用Model與資料庫互動
- 查詢和儲存關聯資料
EF Core支援情況
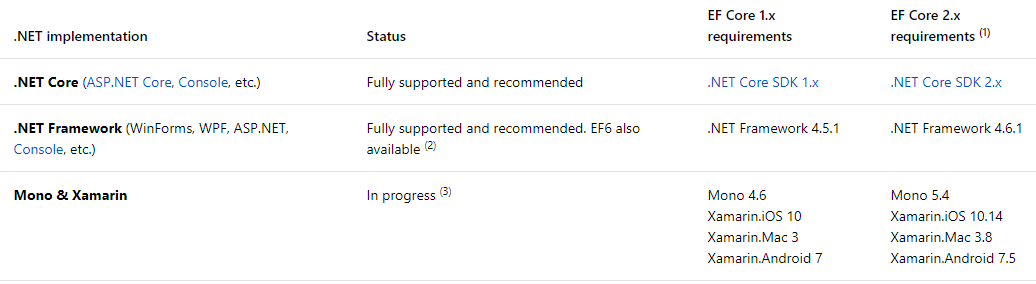
EF Core的資料庫Providers:

此外還即将支援CosmosDB和 Oracle.
EFCore 2.0新的東西:
查詢:
- EF.Functions.Like()
- Linq解釋器的改進
- 全局過濾(按類型)
- 編譯查詢(Explicitly compiled query)
- GroupJoin的SQL優化.
映射:
- Type Configuration 配置
- Owned Entities (替代EF6的複雜類型)
- Scalar UDF映射
- 分表
性能和其他
- DbContext Pooling, 這個很好
- Raw SQL插入字元串.
- Logging
- 更容易定制配置
1.建立資料庫和Model
準備.net core項目
項目結構如圖:
由于我使用的是VSCode, 是以需要使用指令行:
mkdir LearnEf && cd LearnEf
dotnet new sln // 建立解決方案

mkdir LearnEf.Domains && cd LearnEf.Domains
dotnet new classlib // 建立LearnEf.Domains項目

cd ..
mkdir LearnEf.Data && cd LearnEf.Data
dotnet new classlib // 建立LearnEf.Data項目

cd ..
mkdir LearnEf.UI && cd LearnEf.UI
dotnet new console // 建立控制台項目

cd ..
mkdir LearnEf.Tests && cd LearnEf.Tests
dotnet new xunit // 建立測試項目
為解決方案添加項目:
dotnet sln add LearnEf.UI/LearnEf.UI.csproj
dotnet sln add LearnEf.Domains/LearnEf.Domains.csproj
dotnet sln add LearnEf.Data/LearnEf.Data.csproj
dotnet sln add LearnEf.Tests/LearnEf.Tests.csproj
為項目之間添加引用:
LearnEf.Data依賴LearnEf.Domains:
cd LearnEf.Data
dotnet add reference ../LearnEf.Domains/LearnEf.Domains.csproj
LearnEf.Console依賴LearnEf.Domains和LearnEf.Data:
cd ../LearnEf.UI
dotnet add reference ../LearnEf.Domains/LearnEf.Domains.csproj ../LearnEf.Data/LearnEf.Data.csproj
LearnEf.Test依賴其它三個項目:
cd ../LearnEf.Tests
dotnet add reference ../LearnEf.Domains/LearnEf.Domains.csproj ../LearnEf.Data/LearnEf.Data.csproj ../LearnEf.UI/LearnEf.UI.csproj
(可能需要執行dotnet restore)
在Domains項目下直接建立兩個Model, 典型的一對多關系Company和Department:
using System;
using System.Collections.Generic;

namespace LearnEf.Domains
{
    public class Company
    {
        public Company()
        {
            Departments = new List<Department>();
        }

        public int Id { get; set; }
        public string Name { get; set; }
        public DateTime StartDate { get; set; }
        public List<Department> Departments { get; set; }
    }
}
namespace LearnEf.Domains
{
public class Department
{
public int Id { get; set; }
public int CompanyId { get; set; }
public Company Company { get; set; }
}
} 添加Entity Framework Core庫:
首先Data項目肯定需要安裝這個庫, 而我要使用sql server, 參照
官方文檔, 直接在解決方案下執行這個指令:
dotnet add ./LearnEf.Data package Microsoft.EntityFrameworkCore.SqlServer
dotnet restore
建立DbContext:
在Data項目下建立MyContext.cs:
using LearnEf.Domains;
using Microsoft.EntityFrameworkCore;

namespace LearnEf.Data
{
    public class MyContext : DbContext
    {
        public DbSet<Company> Companies { get; set; }
        public DbSet<Department> Departments { get; set; }
    }
}
指定資料庫Provider和Connection String:
在EFCore裡, 必須明确指定Data Provider和Connection String.
可以在Context裡面override這個Onconfiguring方法:
有一個錯誤, 應該是Server=localhost;
(這裡無需調用父類的方法, 因為父類的方法什麼也沒做).
UseSqlServer表示使用Sql Server作為Data Provider. 其參數就是Connection String.
在運作時EfCore第一次執行個體化MyContext的時候, 就會觸發這個OnConfiguring方法. 此外, Efcore的遷移Api也可以獲得該方法内的資訊.
EF Core遷移:
簡單的來說就是 Model變化 --> 建立migration檔案 --> 應用Migration到資料庫或生成執行腳本.
添加Migration (遷移):
由于我使用的是VSCode+dotnet cli的方法, 是以需要額外的步驟來使dotnet ef指令可用.
可以先試一下現在的效果:
可以看到, dotnet ef 指令還不可用.
是以參考官方文檔:
https://docs.microsoft.com/en-us/ef/core/miscellaneous/cli/dotnet可執行項目(Startup project)需要EFCore遷移引擎庫, 是以對LearnEf.UI添加這個庫:
dotnet add ./LearnEf.UI package Microsoft.EntityFrameworkCore.Design
dotnet restore
然後打開LearnEf.UI.csproj 添加這段代碼, 這個庫是EF的指令庫:
<ItemGroup>
    <DotNetCliToolReference Include="Microsoft.EntityFrameworkCore.Tools.DotNet" Version="2.0.0" />
  </ItemGroup>
最後内容如下:
然後再執行dotnet ef指令, 就應該可用了:
現在, 添加第一個遷移:
cd LearnEf.UI
dotnet ef migrations add Initial --project=../LearnEf.Data
--project參數是表示需要使用的項目是哪個.
指令執行後, 可以看到Data項目生成了Migrations目錄和一套遷移檔案和一個快照檔案:
檢查這個Migration.
前邊帶時間戳的那兩個檔案是遷移檔案.
另一個是快照檔案, EFCore Migrations用它來跟蹤所有Models的目前狀态. 這個檔案非常重要, 因為下次你添加遷移的時候, EFcore将會讀取這個快照并将它和Model的最新版本做比較, 就這樣它就知道哪些地方需要有變化.
這個快照檔案解決了老版本Entity Framework的一個頑固的團隊問題.
使用遷移檔案建立腳本或直接生成資料庫.
生成建立資料庫的SQL腳本:
dotnet ef migrations script --project=../LearnEf.Data/LearnEf.Data.csproj Sql腳本直接列印在了Command Prompt裡面. 也可以通過指定--output參數來輸出到具體的檔案.
這裡, 正常的做法是, 針對開發時的資料庫, 可以通過指令直接建立和更新資料庫. 而針對生産環境, 最好是生成sql腳本, 然後由相關人員去執行這個腳本來完成資料庫的建立或者更新.
直接建立資料庫:
dotnet ef database update --project=../LearnEf.Data/LearnEf.Data.csproj --verbose --verbose表示顯示執行的詳細過程, 其結果差不多這樣:
這裡的執行過程和邏輯是這樣的: 如果資料庫不存在, 那麼efcore會在指定的連接配接字元串的地方建立該資料庫, 并應用目前的遷移. 如果是生成的sql腳本的話, 那麼這些動作必須由您自己來完成.
然後檢視一下生成的表.
不過首先, 如果您也和我一樣, 沒有裝Sql server management studio或者 Visual Studio的話, 請您先安裝VSCode的mssql這個擴充:
重新開機後, 建立一個Sql檔案夾, 然後建立一個Tables.sql檔案, 打開指令面闆(windows: Shift+Ctrl+P, mac: Cmd+Shift+P), 選擇MS SQL: Connect.
然後選擇Create Connection Profile:
輸入Sql的伺服器位址:
再輸入資料庫名字:
選擇Sql Login(我使用的是Docker, 如果windows的話, 可能使用Integrated也可以):
輸入使用者名:
密碼:
選擇是否儲存密碼:
最後輸入檔案的名字:
随後VSCode将嘗試連接配接該資料庫, 成功後右下角會這樣顯示 (我這裡輸入有一個錯誤, 資料庫名字應該是LearnEF):
随後在該檔案中輸入下面這個sql語句來查詢所有的Table:
--  Table 清單
SELECT * FROM INFORMATION_SCHEMA.TABLES
WHERE TABLE_TYPE='BASE TABLE';
執行sql的快捷鍵是windows: Shift+Ctrp+E, mac: Cmd+Shift+E, 或者滑鼠右鍵.
結果如圖:
OK表是建立成功了(還有一個遷移曆史表, 這個您應該知道).
接下來我看看表的定義:
-- Companies表:
exec sp_help 'Companies'; 其中Name字段是可空的并且長度是-1也就是nvarchar(Max).
Departments表的Name字段也是一樣的.
再看看那個MigrationHistory表:
-- MigrationHistory:
SELECT * FROM dbo.__EFMigrationsHistory; 可以看到, efcore到migration 曆史表裡面隻儲存了MigrationId.
在老版本到ef裡, migration曆史表裡面還儲存着當時到遷移的快照, 建立遷移的時候還需要與資料庫打交道. 這就是我上面提到的如果團隊使用ef和源碼管理的話, 就會遇到這個非常令人頭疼的問題.
如果使用asp.net core的話.
在解決方案裡再建立一個asp.net core mvc項目:
mkdir LearnEf.Web && cd LearnEf.Web
dotnet new mvc
在解決方案裡添加該項目:
dotnet sln add ./LearnEf.Web/LearnEf.Web.csproj 為該項目添加必要的引用:
cd LearnEf.Web
dotnet add reference ../LearnEf.Domains/LearnEf.Domains.csproj ../LearnEf.Data/LearnEf.Data.csproj
為測試項目添加該項目引用:
cd ../*Tests
dotnet add reference ../LearnEf.Web/LearnEf.Web.csproj
操作完之後, 我們可以做以下調整, 去掉MyContext裡面的OnConfiguring方法, 因為asp.net core有内置的依賴注入機制, 我可以把已經建構好的DbContextOptions直接注入到構造函數裡:
這樣的話, 我們可以讓asp.net core來決定到底使用哪個Data Provider和Connection String:
這也就意味着, Web項目需要引用EfCore和Sql Provider等, 但是不需要, 因為asp.net core 2.0這個項目模版引用了AspNetCore.All這個megapack, 裡面都有這些東西了.
雖然這個包什麼都有, 也就是說很大, 但是如果您使用Visual Studio Tooling去部署的話, 那麼它隻會部署那些項目真正用到的包, 并不是所有的包.
接下來, 在Web項目的Startup添加EfCore相關的配置:
public void ConfigureServices(IServiceCollection services)
        {
            services.AddMvc();
            services.AddDbContext<MyContext>
                (options => options.UseSqlServer("Server=localhost; Database=LearnEf; User Id=sa; Password=Bx@steel1;"));
        }
這句話就是把MyContext注冊到了asp.net core的服務容器中, 可以供注入, 同時在這裡指定了Data Provider和Connection String.
與其把Connection String寫死在這裡, 不如使用appSettings.json檔案:
然後使用内置的方法讀取該Connection String:
public void ConfigureServices(IServiceCollection services)
        {
            services.AddMvc();
            services.AddDbContext<MyContext>
                (options => options.UseSqlServer(Configuration.GetConnectionString("DefaultConnection")));
        }
回到指令行進入Web項目, 使用dotnet ef指令:
說明需要添加上面提到的庫, 這裡就不重複了.
然後, 手動添加一個Migration叫做InitialAspNetCore:
dotnet ef migrations add InitialAspNetCore --project=../LearnEf.Data 看一下遷移檔案:
是空的, 因為我之前已經使用UI那個項目進行過遷移更新了. 是以我要把這個遷移删掉:
dotnet ef migrations remove --project=../LearnEf.Data 然後這兩個遷移檔案就删掉了:
多對多關系和一對一關系:
這部分的官方文檔在這:
https://docs.microsoft.com/en-us/ef/core/modeling/relationships對于多對多關系, efcore需要使用一個中間表, 我想基本ef使用者都知道這個了, 我就直接貼代碼吧.
建立一個City.cs:
namespace LearnEf.Domains
{
    public class City
    {
        public int Id { get; set; }
        public string Name { get; set; }
    }
}
Company和City是多對多的關系, 是以需要建立一個中間表,叫做 CompanyCity:
namespace LearnEf.Domains
{
    public class CompanyCity
    {
        public int CompanyId { get; set; }
        public int CityId { get; set; }
        public Company Company { get; set; }
        public City City { get; set; }
    }
}
修改Company:
修改City:
盡管Efcore可以推斷出來這個多對多關系, 但是我還是使用一下FluentApi來自定義配置一下這個表的主鍵:
MyContext.cs:
using LearnEf.Domains;
using Microsoft.EntityFrameworkCore;

namespace LearnEf.Data
{
    public class MyContext : DbContext
    {
        public MyContext(DbContextOptions<MyContext> options)
            : base(options)
        {

        }
        public DbSet<Company> Companies { get; set; }
        public DbSet<Department> Departments { get; set; }
        public DbSet<CompanyCity> CompanyCities { get; set; }

        protected override void OnModelCreating(ModelBuilder modelBuilder)
        {
            modelBuilder.Entity<CompanyCity>()
                .HasKey(c => new { c.CompanyId, c.CityId });
        }

        // protected override void OnConfiguring(DbContextOptionsBuilder optionsBuilder)
        // {
        //     optionsBuilder.UseSqlServer("Server=localhost; Database=LearnEf; User Id=sa; Password=Bx@steel1;");
        //     base.OnConfiguring(optionsBuilder);
        // }
    }
}
完整的寫法應該是:
其中紅框裡面的部分不寫也行.
接下來建立一個一對一關系, 建立Model叫Owner.cs:
namespace LearnEf.Domains
{
    public class Owner
    {
        public int Id { get; set;}
        public int CompanyId { get; set; }
        public string Name { get; set; }
        public Company Company { get; set; }
    }
} 配置關系:
protected override void OnModelCreating(ModelBuilder modelBuilder)
        {
            modelBuilder.Entity<CompanyCity>()
                .HasKey(c => new { c.CompanyId, c.CityId });

            modelBuilder.Entity<CompanyCity>().HasOne(x => x.Company)
                .WithMany(x => x.CompanyCities).HasForeignKey(x => x.CompanyId);

            modelBuilder.Entity<CompanyCity>().HasOne(x => x.City)
                .WithMany(x => x.CompanyCities).HasForeignKey(x => x.CityId);

            modelBuilder.Entity<Owner>().HasOne(x => x.Company).WithOne(x => x.Owner)
                .HasForeignKey<Owner>(x => x.CompanyId);
        }
這裡面呢, 這個Owner對于Company 來說 是可空的. 而對于Owner來說, Company是必須的. 如果針對Owner想讓Company是可空的, 那麼CompanyId的類型就應該設定成int?.
再添加一個遷移:
dotnet ef migrations add AddRelationships --project=../LearnEf.Data 檢視遷移檔案:
檢視一下快照;
沒問題, 那麼更新資料庫:
dotnet ef database update AddRelationships --project=../LearnEf.Data --verbose 更新成功:
對現有資料庫的反向工程.
這部分請檢視
吧, 很簡單, 我實驗了幾次, 但是目前還沒有這個需求.
輸出Sql語句.
對于asp.net core 2.0項目, 參考官方文檔:
https://docs.microsoft.com/en-us/aspnet/core/fundamentals/logging/?tabs=aspnetcore2x實際上, 項目已經配置好Logging部分了, 預設是列印到控制台和Debug視窗的. 源碼:
https://github.com/aspnet/MetaPackages/blob/dev/src/Microsoft.AspNetCore/WebHost.cs而對于console項目, 文檔在這:
https://docs.microsoft.com/en-us/ef/core/miscellaneous/logging需要對LearnEf.Data項目添加這個包:
cd LearnEf.Data
dotnet add package Microsoft.Extensions.Logging.Console
dotnet restore
然後為了使用console項目, 需要把MyContext改回來:
這部分首先是使用LoggerFactory建立了一個特殊的Console Logger. .net core的logging可以顯示很多的資訊, 這裡我放置了兩個過濾: 第一個表示隻顯示Sql指令, 第二個表示細節的顯示程度是Information級别.
最後還要在OnConfiguring方法裡告訴modelBuilder使用MyLoggerFactory作為LoggerFactory.
這就配置好了.
插入資料.
這部分很簡單, 打開UI項目的Program.cs:
這裡都懂的, 建立好model之後, 添加到context的DbSet屬性裡, 這時context就開始追蹤這個model了.
SaveChanges方法, 會檢查所有被追蹤的models, 讀取他們的狀态. 這裡用到是Add方法, context就會知道這個model的狀态是new, 是以就應該被插入到資料庫. 然後它就根據配置會生成出相應的sql語句, 然後把這個SQL語句執行到資料庫. 如果有傳回資料的話, 就取得該資料.
下面就運作一下這個console程式:
dotnet run --project=./LearnEf.UI 看下控制台:
可以看到輸出了sql語句, 而且這個出入動作後, 做了一個查詢把插入資料生成的Id取了回來.
預設情況下log不顯示傳進去的參數, 這是為了安全. 但是可以通過修改配置來顯示參數:
然後控制台就會顯示這些參數了:
批量插入操作.
可以使用AddRange添加多條資料. 其參數可以是params或者集合.
可以看到這個和之前Add的Sql語句是完全不同的:
這個語句我不是很明白.
批量添加不同類型的資料:
使用context的AddRange或Add方法, DbContext可以推斷出參數的類型, 并執行正确的操作. 上面的方法就是使用了DbContext.AddRange方法, 一次性添加了兩種不同類型的model.
這兩個方法對于寫一些通用方法或者處理複雜的情況是很有用的.
Sql Server對于批量操作的限制是, 一次隻能最多處理1000個SQL指令, 多出來的指令将會分批執行.
如果想更改這個限制, 可以這樣配置參數:
簡單查詢.
針對DbSet, 使用Linq的ToList方法, 會觸發對資料庫對查詢操作:
首先把Company的ToString方法寫上:
這樣友善輸入到控制台.
然後寫查詢方法:
看結果:
EfCore到查詢有兩類文法, 一種是Linq方法, 另一種是Linq查詢文法:
這種是Linq方法:
下面這種是Linq查詢文法:
我基本都是使用第一種方法.
除了ToList(Async)可以觸發查詢以外, 周遊foreach也可以觸發查詢:
但是這種情況下, 可能會有性能問題. 因為:
在周遊開始的時候, 資料庫連接配接打開, 并且會一直保持打開的狀态, 直到周遊結束.
是以如果這個周遊很耗時, 那麼可能會發生一些問題.
最好的辦法還是首先執行ToList, 然後再周遊.
查詢的過濾.
這部分和以前的EF基本沒啥變化.
這個很簡單, 不說了.
這裡列一下可觸發查詢的Linq方法:
還有個兩個方法是DbSet的方法, 也可以觸發查詢動作:
上面這些方法都應該很熟悉, 我就不寫了.
過濾的條件可以直接家在上面的某些方法裡面, 例如:
通過主鍵查詢, 就可以用DbSet的Find方法:
這個方法有個優點, 就是如果這條資料已經在Context裡面追蹤了, 那麼查詢的時候就不查資料庫了, 直接會傳回記憶體中的資料.
EF.Functions.Like 這個方法是新方法, 就像是Sql語句裡面的Like一樣, 或者字元串的Contains方法:
這個感覺更像Sql語句, 輸出到Console的Sql語句如下:
這裡還要談的是First/FirstOrDefault/Last/LastOrDefaut方法.
使用這些方法必須先使用OrderBy/OrderByDescending排序. 雖然不使用的話也不會報錯, 但是, 整個過程就會變成這樣, context把整個表的資料家在到記憶體裡, 然後傳回第一條/最後一條資料. 如果表的資料比較多的話, 那麼就會有性能問題了.
更新資料.
很簡單, context所追蹤的model屬性變化後, SaveChanges就會更新到資料庫.
當然, 多個更新操作和插入等操作可以批量執行.
離線更新.
就是這種情況, 新的context一開始并沒有追蹤one這個資料. 通過使用Update方法, 追蹤并設定狀态為update. 然後更新到資料庫.
可以看到, 在這種情況下, EfCore會更新該model到所有屬性.
Update同樣也有DbSet的UpdateRange方法, 也有context到Update和UpdateRange方法, 這點和Add是一樣的.
還有一種方法用于更新, 這個以後再說.
删除資料.
DbContext隻能删除它追蹤的model.
非常簡單, 從log可以看到, 删除動作隻用到了主鍵:
如果是删除的離線model, 那麼Remove方法首先會讓Dbcontext追蹤這個model, 然後設定狀态為Deleted.
删除同樣有RemoveRange方法.
Raw SQL查詢/指令:
這部分請看文檔:
指令: DbContext.Database.ExecuteSqlCommand();
查詢: DbSet.FromSql()
https://docs.microsoft.com/en-us/ef/core/querying/raw-sql;
這個方法目前還有一些限制, 它隻能傳回實體的類型, 并且得傳回domain model所有的屬性, 而且屬性的名字必須也得一一對應. SQL語句不可以包含關聯的導航屬性, 但是可以配合Include使用以達到該效果(
https://docs.microsoft.com/en-us/ef/core/querying/raw-sql#including-related-data).
更多的傳遞參數方式還需要看文檔.
查詢和儲存關聯資料.
插入關聯資料.
我之前忘記在Department裡面添加Name字段了, 現在添加一下, 具體過程就不寫了.
插入關聯資料有幾種情況:
1.直接把要添加的Model的導航屬性附上值就可以了, 這裡的Department不需要寫外鍵.
看一下Sql:
這個過程一共分兩步: 1 插入主表, 2,使用剛插入主表資料的Id, 插入子表資料.
2.為資料庫中的資料添加導航屬性.
這時, 因為該資料是被context追蹤的, 是以隻需在它的導航屬性添加新記錄, 然後儲存即可.
3.離線資料添加導航屬性.
這時候就必須使用外鍵了.
預加載關聯資料 Eager Loading.
也就是查詢的時候一次性把資料和其導航屬性的資料一同查詢出來.
看看SQL:
這個過程是分兩步實作的, 首先查詢了主表, 然後再查詢的子表. 這樣做的好處就是性能提升.
(FromSql也可以Include).
預加載子表的子表:
可以使用ThenInclude方法, 這個可以老版本ef沒有的.
這裡查詢Department的時候, 将其關聯表Company也查詢了出來, 同時也把Company的關聯表Owner也查詢了出來.
查詢中映射關聯資料.
使用Select可以傳回匿名類, 裡面可以自定義屬性.
這個匿名類隻在方法内有效.
看下SQL:
可以看到SQL中隻Select了匿名類裡面需要的字段.
如果需要在方法外使用該結果, 那麼可以使用dynamic, 或者建立一個對應的struct或者class.
使用關聯導航屬性過濾, 但是不加載它們.
SQL:
這個比較簡單. 看sql一切就明白了.
修改關聯資料.
也會分兩種情況, 被追蹤和離線資料.
被追蹤的情況下比較簡單, 直接修改關聯資料的屬性即可:
看一下SQL:
确實改了.
這種情況下, 删除關聯資料庫也很簡單:
删除了.
下面來看看離線狀态下的操作.
這裡需要使用update, 把該資料添加到context的追蹤範圍内.
這個就比較怪異了.
它update了該departmt和它的company以及company下的其他department和company的owner. 這些值倒是原來的值.
這是因為, 看上面的代碼, 查詢的時候department的關聯屬性company以及company下的departments和owner一同被加載了.
盡管我隻update了一個department, 但是efcore把其他關聯的資料都識别出來了.
從DbContext的ChangeTracker屬性下的StateManger可以看到有多少個變化.
這一點非常的重要.
如何避免這個陷阱呢?
可以這樣做: 直接設定dbContext.Entry().State的值
這時, 再看看SQL:
嗯. 沒錯, 隻更新了需要更新的對象.
2.1版本将于2018年上半年釋出, 請檢視官網的路線圖:
https://github.com/aspnet/EntityFrameworkCore/wiki/roadmap完.
下面是我的關于ASP.NET Core Web API相關技術的公衆号--草根專欄: