1.簡介
在上一篇
文章中,我分析了 Spring 是如何為目标 bean 篩選合适的通知器的。現在通知器選好了,接下來就要通過代理的方式将通知器(Advisor)所持有的通知(Advice)織入到 bean 的某些方法前後。與篩選合适的通知器相比,建立代理對象的過程則要簡單不少,本文所分析的源碼不過100行,相對比較簡單。在接下裡的章節中,我将會首先向大家介紹一些背景知識,然後再去分析源碼。那下面,我們先來了解一下背景知識。
2.背景知識
2.1 proxy-target-class
在 Spring AOP 配置中,proxy-target-class 屬性可影響 Spring 生成的代理對象的類型。以 XML 配置為例,可進行如下配置:
<aop:aspectj-autoproxy proxy-target-class="true"/>

<aop:config proxy-target-class="true">
    <aop:aspect id="xxx" ref="xxxx">
        <!-- 省略 -->
    </aop:aspect>
</aop:config>
如上,預設情況下 proxy-target-class 屬性為 false。當目标 bean 實作了接口時,Spring 會基于 JDK 動态代理為目标 bean 建立代理對象。若未實作任何接口,Spring 則會通過 CGLIB 建立代理。而當 proxy-target-class 屬性設為 true 時,則會強制 Spring 通過 CGLIB 的方式建立代理對象,即使目标 bean 實作了接口。
關于 proxy-target-class 屬性的用途這裡就說完了,下面我們來看看兩種不同建立動态代理的方式。
2.2 動态代理
2.2.1 基于 JDK 的動态代理
基于 JDK 的動态代理主要是通過 JDK 提供的代理建立類 Proxy 為目标對象建立代理,下面我們來看一下 Proxy 中建立代理的方法聲明。如下:
public static Object newProxyInstance(ClassLoader loader,
                                          Class<?>[] interfaces,
                                          InvocationHandler h)
簡單說一下上面的參數清單:
- loader - 類加載器
- interfaces - 目标類所實作的接口清單
- h - 用于封裝代理邏輯
JDK 動态代理對目标類是有一定要求的,即要求目标類必須實作了接口,JDK 動态代理隻能為實作了接口的目标類生成代理對象。至于 InvocationHandler,是一個接口類型,定義了一個 invoke 方法。使用者需要實作該方法,并在其中封裝代理邏輯。
關于 JDK 動态代理的介紹,就先說到這。下面我來示範一下 JDK 動态代理的使用方式,如下:
目标類定義:
public interface UserService {

    void save(User user);

    void update(User user);
}

public class UserServiceImpl implements UserService {

    @Override
    public void save(User user) {
        System.out.println("save user info");
    }

    @Override
    public void update(User user) {
        System.out.println("update user info");
    }
}
代理建立者定義:
public interface ProxyCreator {

    Object getProxy();
}

public class JdkProxyCreator implements ProxyCreator, InvocationHandler {

    private Object target;

    public JdkProxyCreator(Object target) {
        assert target != null;
        Class<?>[] interfaces = target.getClass().getInterfaces();
        if (interfaces.length == 0) {
            throw new IllegalArgumentException("target class don`t implement any interface");
        }
        this.target = target;
    }

    @Override
    public Object getProxy() {
        Class<?> clazz = target.getClass();
        // 生成代理對象
        return Proxy.newProxyInstance(clazz.getClassLoader(), clazz.getInterfaces(), this);
    }

    @Override
    public Object invoke(Object proxy, Method method, Object[] args) throws Throwable {

        System.out.println(System.currentTimeMillis() + " - " + method.getName() + " method start");
        // 調用目标方法
        Object retVal = method.invoke(target, args);
        System.out.println(System.currentTimeMillis() + " - " + method.getName() + " method over");

        return retVal;
    }
}
如上,invoke 方法中的代理邏輯主要用于記錄目标方法的調用時間,和結束時間。下面寫點測試代碼簡單驗證一下,如下:
public class JdkProxyCreatorTest {

    @Test
    public void getProxy() throws Exception {
        ProxyCreator proxyCreator = new JdkProxyCreator(new UserServiceImpl());
        UserService userService = (UserService) proxyCreator.getProxy();

        System.out.println("proxy type = " + userService.getClass());
        System.out.println();
        userService.save(null);
        System.out.println();
        userService.update(null);
    }
}
測試結果如下:
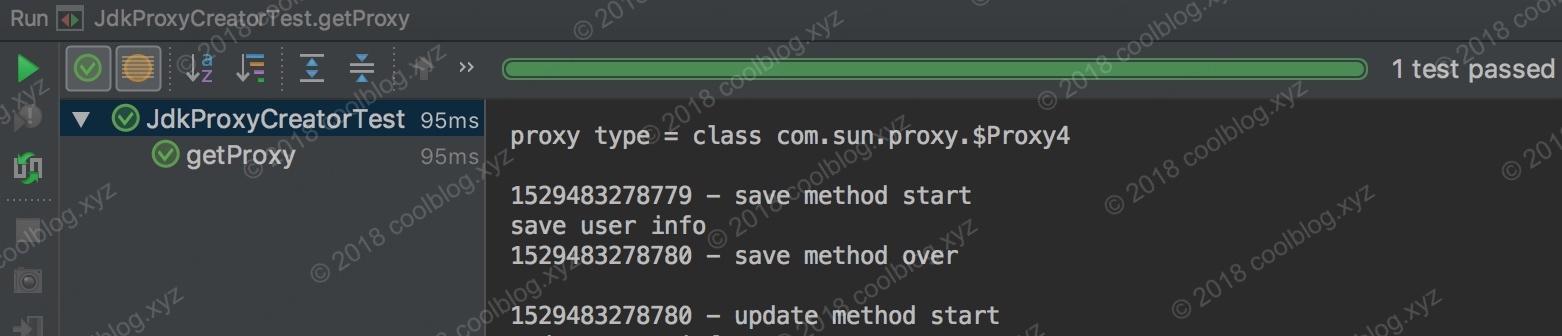
如上,從測試結果中。我們可以看出,我們的代理邏輯正常執行了。另外,注意一下 userService 指向對象的類型,并非是 xyz.coolblog.proxy.UserServiceImpl,而是 com.sun.proxy.$Proxy4。
關于 JDK 動态代理,這裡先說這麼多。下一節,我來示範一下 CGLIB 動态代理,繼續往下看吧。
2.2.2 基于 CGLIB 的動态代理
當我們要為未實作接口的類生成代理時,就無法使用 JDK 動态代理了。那麼此類的目标對象生成代理時應該怎麼辦呢?當然是使用 CGLIB 了。在 CGLIB 中,代理邏輯是封裝在 MethodInterceptor 實作類中的,代理對象則是通過 Enhancer 類的 create 方法進行建立。下面我來示範一下 CGLIB 建立代理對象的過程,如下:
本節的示範環節,打算調侃(無貶低之意)一下
59式坦克
,這是我們國家大量裝備過的一款坦克。59式坦克有很多種改款,一般把改款統稱為
59改
,59改這個梗也正是源于此。下面我們先來一覽
59式坦克
的風采:

圖檔來源:
百度圖檔搜尋下面我們的工作就是為咱們的 59 建立一個代理,即 59改。好了,開始我們的魔改吧。
目标類,59式坦克:
public class Tank59 {

    void run() {
        System.out.println("極速前行中....");
    }

    void shoot() {
        System.out.println("轟...轟...轟...轟...");
    }
}
CGLIB 代理建立者
public class CglibProxyCreator implements ProxyCreator {

    private Object target;

    private MethodInterceptor methodInterceptor;

    public CglibProxyCreator(Object target, MethodInterceptor methodInterceptor) {
        assert (target != null && methodInterceptor != null);
        this.target = target;
        this.methodInterceptor = methodInterceptor;
    }

    @Override
    public Object getProxy() {
        Enhancer enhancer = new Enhancer();
        // 設定代理類的父類
        enhancer.setSuperclass(target.getClass());
        // 設定代理邏輯
        enhancer.setCallback(methodInterceptor);
        // 建立代理對象
        return enhancer.create();
    }
}
方法攔截器 - 坦克再制造:
public class TankRemanufacture implements MethodInterceptor {

    @Override
    public Object intercept(Object o, Method method, Object[] objects, MethodProxy methodProxy) throws Throwable {
        if (method.getName().equals("run")) {
            System.out.println("正在重造59坦克...");
            System.out.println("重造成功,已擷取 59改 之 超音速飛行版");
            System.out.print("已起飛,正在突破音障。");

            methodProxy.invokeSuper(o, objects);

            System.out.println("已擊落黑鳥 SR-71,正在返航...");
            return null;
        }

        return methodProxy.invokeSuper(o, objects);
    }
}
好了,下面開始示範,測試代碼如下:
public class CglibProxyCreatorTest {

    @Test
    public void getProxy() throws Exception {
        ProxyCreator proxyCreator = new CglibProxyCreator(new Tank59(), new TankRemanufacture());
        Tank59 tank59 = (Tank59) proxyCreator.getProxy();

        System.out.println("proxy class = " + tank59.getClass() + "\n");
        tank59.run();
        System.out.println();
        System.out.print("射擊測試:");
        tank59.shoot();
    }
} 如上,"極速前行中...." 和 "轟...轟...轟...轟..." 這兩行字元串是目标對象中的方法列印出來的,其他的則是由代理邏輯列印的。由此可知,我們的代理邏輯生效了。
好了,最後我們來看一下,經過魔改後的 59,也就是
超音速59改
的效果圖:
圖檔來源:未知
本節用59式坦克舉例,僅是調侃,并無惡意。作為年輕的一代,我們應感謝那些為國防事業做出貢獻的科技人員們。沒有他們貢獻,我們怕是不會有像今天這樣安全的環境了(盡管不完美)。
到此,背景知識就介紹完了。下一章,我将開始分析源碼。源碼不是很長,主邏輯比較容易懂,是以一起往下看吧。
3.源碼分析
為目标 bean 建立代理對象前,需要先建立 AopProxy 對象,然後再調用該對象的 getProxy 方法建立實際的代理類。我們先來看看 AopProxy 這個接口的定義,如下:
public interface AopProxy {

    /** 建立代理對象 */
    Object getProxy();

    Object getProxy(ClassLoader classLoader);
}
在 Spring 中,有兩個類實作了 AopProxy,如下:
Spring 在為目标 bean 建立代理的過程中,要根據 bean 是否實作接口,以及一些其他配置來決定使用 AopProxy 何種實作類為目标 bean 建立代理對象。下面我們就來看一下代理建立的過程,如下:
protected Object createProxy(
        Class<?> beanClass, String beanName, Object[] specificInterceptors, TargetSource targetSource) {

    if (this.beanFactory instanceof ConfigurableListableBeanFactory) {
        AutoProxyUtils.exposeTargetClass((ConfigurableListableBeanFactory) this.beanFactory, beanName, beanClass);
    }

    ProxyFactory proxyFactory = new ProxyFactory();
    proxyFactory.copyFrom(this);

    /*
     * 預設配置下,或使用者顯式配置 proxy-target-class = "false" 時,
     * 這裡的 proxyFactory.isProxyTargetClass() 也為 false
     */
    if (!proxyFactory.isProxyTargetClass()) {
        if (shouldProxyTargetClass(beanClass, beanName)) {
            proxyFactory.setProxyTargetClass(true);
        }
        else {
            /*
             * 檢測 beanClass 是否實作了接口,若未實作,則将
             * proxyFactory 的成員變量 proxyTargetClass 設為 true
             */
            evaluateProxyInterfaces(beanClass, proxyFactory);
        }
    }

    // specificInterceptors 中若包含有 Advice,此處将 Advice 轉為 Advisor
    Advisor[] advisors = buildAdvisors(beanName, specificInterceptors);
    proxyFactory.addAdvisors(advisors);
    proxyFactory.setTargetSource(targetSource);
    customizeProxyFactory(proxyFactory);

    proxyFactory.setFrozen(this.freezeProxy);
    if (advisorsPreFiltered()) {
        proxyFactory.setPreFiltered(true);
    }

    // 建立代理
    return proxyFactory.getProxy(getProxyClassLoader());
}

public Object getProxy(ClassLoader classLoader) {
    // 先建立 AopProxy 實作類對象,然後再調用 getProxy 為目标 bean 建立代理對象
    return createAopProxy().getProxy(classLoader);
}
getProxy 這裡有兩個方法調用,一個是調用 createAopProxy 建立 AopProxy 實作類對象,然後再調用 AopProxy 實作類對象中的 getProxy 建立代理對象。這裡我們先來看一下建立 AopProxy 實作類對象的過程,如下:
protected final synchronized AopProxy createAopProxy() {
    if (!this.active) {
        activate();
    }
    return getAopProxyFactory().createAopProxy(this);
}

public class DefaultAopProxyFactory implements AopProxyFactory, Serializable {

    @Override
    public AopProxy createAopProxy(AdvisedSupport config) throws AopConfigException {
        /*
         * 下面的三個條件簡單分析一下:
         *
         *   條件1:config.isOptimize() - 是否需要優化,這個屬性沒怎麼用過,
         *         細節我不是很清楚
         *   條件2:config.isProxyTargetClass() - 檢測 proxyTargetClass 的值,
         *         前面的代碼會設定這個值
         *   條件3:hasNoUserSuppliedProxyInterfaces(config)
         *         - 目标 bean 是否實作了接口
         */
        if (config.isOptimize() || config.isProxyTargetClass() || hasNoUserSuppliedProxyInterfaces(config)) {
            Class<?> targetClass = config.getTargetClass();
            if (targetClass == null) {
                throw new AopConfigException("TargetSource cannot determine target class: " +
                        "Either an interface or a target is required for proxy creation.");
            }
            if (targetClass.isInterface() || Proxy.isProxyClass(targetClass)) {
                return new JdkDynamicAopProxy(config);
            }
            // 建立 CGLIB 代理,ObjenesisCglibAopProxy 繼承自 CglibAopProxy
            return new ObjenesisCglibAopProxy(config);
        }
        else {
            // 建立 JDK 動态代理
            return new JdkDynamicAopProxy(config);
        }
    }
}
如上,DefaultAopProxyFactory 根據一些條件決定生成什麼類型的 AopProxy 實作類對象。生成好 AopProxy 實作類對象後,下面就要為目标 bean 建立代理對象了。這裡以 JdkDynamicAopProxy 為例,我們來看一下,該類的 getProxy 方法的邏輯是怎樣的。如下:
public Object getProxy() {
    return getProxy(ClassUtils.getDefaultClassLoader());
}

public Object getProxy(ClassLoader classLoader) {
    if (logger.isDebugEnabled()) {
        logger.debug("Creating JDK dynamic proxy: target source is " + this.advised.getTargetSource());
    }
    Class<?>[] proxiedInterfaces = AopProxyUtils.completeProxiedInterfaces(this.advised, true);
    findDefinedEqualsAndHashCodeMethods(proxiedInterfaces);

    // 調用 newProxyInstance 建立代理對象
    return Proxy.newProxyInstance(classLoader, proxiedInterfaces, this);
}
如上,請把目光移至最後一行有效代碼上,會發現 JdkDynamicAopProxy 最終調用 Proxy.newProxyInstance 方法建立代理對象。到此,建立代理對象的整個過程也就分析完了,不知大家看懂了沒。好了,關于建立代理的源碼分析,就先說到這裡吧。
4.總結
本篇文章對 Spring AOP 建立代理對象的過程進行了較為詳細的分析,并在分析源碼前介紹了相關的背景知識。總的來說,本篇文章涉及的技術點不是很複雜,相信大家都能看懂。限于個人能力,若文中有錯誤的地方,歡迎大家指出來。好了,本篇文章到此結束,謝謝閱讀。
參考
附錄:Spring 源碼分析文章清單
Ⅰ. IOC
| 更新時間 | 标題 |
|---|---|
| 2018-05-30 | Spring IOC 容器源碼分析系列文章導讀 |
| 2018-06-01 | Spring IOC 容器源碼分析 - 擷取單例 bean |
| 2018-06-04 | Spring IOC 容器源碼分析 - 建立單例 bean 的過程 |
| 2018-06-06 | Spring IOC 容器源碼分析 - 建立原始 bean 對象 |
| 2018-06-08 | Spring IOC 容器源碼分析 - 循環依賴的解決辦法 |
| 2018-06-11 | Spring IOC 容器源碼分析 - 填充屬性到 bean 原始對象 |
| Spring IOC 容器源碼分析 - 餘下的初始化工作 |
Ⅱ. AOP
| 2018-06-17 | Spring AOP 源碼分析系列文章導讀 |
| 2018-06-20 | Spring AOP 源碼分析 - 篩選合适的通知器 |
| Spring AOP 源碼分析 - 建立代理對象 | |
| 2018-06-22 | Spring AOP 源碼分析 - 攔截器鍊的執行過程 |
Ⅲ. MVC
| 2018-06-29 | Spring MVC 原理探秘 - 一個請求的旅行過程 |
| 2018-06-30 | Spring MVC 原理探秘 - 容器的建立過程 |
本文在知識共享許可協定 4.0 下釋出,轉載需在明顯位置處注明出處
作者:coolblog.xyz
本文同步釋出在我的個人部落格:
http://www.coolblog.xyz
本作品采用
知識共享署名-非商業性使用-禁止演繹 4.0 國際許可協定進行許可。