最近研究redis-cluster,正好搭建了一個環境,遇到了很多坑,系統的總結下,等到redis3 release出來後,換掉memCache 叢集. 轉載請注明出處哈:http://hot66hot.iteye.com/admin/blogs/2050676一:關于redis cluster1:redis cluster的現狀
reids-cluster計劃在redis3.0中推出,可以看作者antirez的聲明:http://antirez.com/news/49 (ps:跳票了好久,今年貌似加快速度了),目前的最新版本見:https://raw.githubusercontent.com/antirez/redis/3.0/00-RELEASENOTES
作者的目标:Redis Cluster will support up to ~1000 nodes. 贊...
目前redis支援的cluster特性(已測試):
1):節點自動發現
2):slave->master 選舉,叢集容錯
3):Hot resharding:線上分片
4):叢集管理:cluster xxx
5):基于配置(nodes-port.conf)的叢集管理
6):ASK 轉向/MOVED 轉向機制.
2:redis cluster 架構1)redis-cluster架構圖
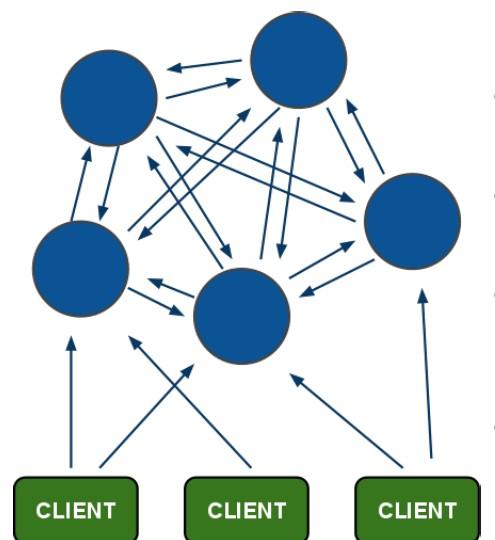
架構細節:
(1)所有的redis節點彼此互聯(PING-PONG機制),内部使用二進制協定優化傳輸速度和帶寬.
(2)節點的fail是通過叢集中超過半數的節點檢測失效時才生效.
(3)用戶端與redis節點直連,不需要中間proxy層.用戶端不需要連接配接叢集所有節點,連接配接叢集中任何一個可用節點即可
(4)redis-cluster把所有的實體節點映射到[0-16383]slot上,cluster 負責維護node<->slot<->key
2) redis-cluster選舉:容錯

(1)領着選舉過程是叢集中所有master參與,如果半數以上master節點與master節點通信超過(cluster-node-timeout),認為目前master節點挂掉.
(2):什麼時候整個叢集不可用(cluster_state:fail)?
a:如果叢集任意master挂掉,且目前master沒有slave.叢集進入fail狀态,也可以了解成叢集的slot映射[0-16383]不完成時進入fail狀态. ps : redis-3.0.0.rc1加入cluster-require-full-coverage參數,預設關閉,打開叢集相容部分失敗.
b:如果叢集超過半數以上master挂掉,無論是否有slave叢集進入fail狀态.
ps:當叢集不可用時,所有對叢集的操作做都不可用,收到((error) CLUSTERDOWN The cluster is down)錯誤
二:redis cluster的使用1:安裝redis cluster
1):安裝redis-cluster依賴:redis-cluster的依賴庫在使用時有相容問題,在reshard時會遇到各種錯誤,請按指定版本安裝.
(1)確定系統安裝zlib,否則gem install會報(no such file to load -- zlib)
Java代碼 [url=]
[/url]
#download:zlib-1.2.6.tar
./configure
make
make install
(2)安裝ruby:version(1.9.2)
# ruby1.9.2
cd /path/ruby
./configure -prefix=/usr/local/ruby
sudo cp ruby /usr/local/bin
(3)安裝rubygem:version(1.8.16)
Java代碼 [url=][/url]
# rubygems-1.8.16.tgz
cd /path/gem
sudo ruby setup.rb
sudo cp bin/gem /usr/local/bin
(4)安裝gem-redis:version(3.0.0)
gem install redis --version 3.0.0
#由于源的原因,可能下載下傳失敗,就手動下載下傳下來安裝
#download位址:http://rubygems.org/gems/redis/versions/3.0.0
gem install -l /data/soft/redis-3.0.0.gem
(5)安裝redis-cluster
cd /path/redis
sudo cp /opt/redis/src/redis-server /usr/local/bin
sudo cp /opt/redis/src/redis-cli /usr/local/bin
sudo cp /opt/redis/src/redis-trib.rb /usr/local/bin
2:配置redis cluster1)redis配置檔案結構:
使用包含(include)把通用配置和特殊配置分離,友善維護.
2)redis通用配置.
#GENERAL
daemonize no
tcp-backlog 511
timeout 0
tcp-keepalive 0
loglevel notice
databases 16
dir /opt/redis/data
slave-serve-stale-data yes
#slave隻讀
slave-read-only yes
#not use default
repl-disable-tcp-nodelay yes
slave-priority 100
#打開aof持久化
appendonly yes
#每秒一次aof寫
appendfsync everysec
#關閉在aof rewrite的時候對新的寫操作進行fsync
no-appendfsync-on-rewrite yes
auto-aof-rewrite-min-size 64mb
lua-time-limit 5000
#打開redis叢集
cluster-enabled yes
#節點互連逾時的閥值
cluster-node-timeout 15000
cluster-migration-barrier 1
slowlog-log-slower-than 10000
slowlog-max-len 128
notify-keyspace-events ""
hash-max-ziplist-entries 512
hash-max-ziplist-value 64
list-max-ziplist-entries 512
list-max-ziplist-value 64
set-max-intset-entries 512
zset-max-ziplist-entries 128
zset-max-ziplist-value 64
activerehashing yes
client-output-buffer-limit normal 0 0 0
client-output-buffer-limit slave 256mb 64mb 60
client-output-buffer-limit pubsub 32mb 8mb 60
hz 10
aof-rewrite-incremental-fsync yes
3)redis特殊配置.
#包含通用配置
include /opt/redis/redis-common.conf
#監聽tcp端口
port 6379
#最大可用記憶體
maxmemory 100m
#記憶體耗盡時采用的淘汰政策:
# volatile-lru -> remove the key with an expire set using an LRU algorithm
# allkeys-lru -> remove any key accordingly to the LRU algorithm
# volatile-random -> remove a random key with an expire set
# allkeys-random -> remove a random key, any key
# volatile-ttl -> remove the key with the nearest expire time (minor TTL)
# noeviction -> don't expire at all, just return an error on write operations
maxmemory-policy allkeys-lru
#aof存儲檔案
appendfilename "appendonly-6379.aof"
#不開啟rdb存儲,隻用于添加slave過程
dbfilename dump-6379.rdb
#cluster配置檔案(啟動自動生成)
cluster-config-file nodes-6379.conf
#部署在同一機器的redis執行個體,把auto-aof-rewrite搓開,因為cluster環境下記憶體占用基本一緻.
#防止同意機器下瞬間fork所有redis程序做aof rewrite,占用大量記憶體(ps:cluster必須開啟aof)
auto-aof-rewrite-percentage 80-100
3:cluster 操作
cluster叢集相關指令,更多redis相關指令見文檔:http://redis.readthedocs.org/en/latest/
叢集
CLUSTER INFO 列印叢集的資訊
CLUSTER NODES 列出叢集目前已知的所有節點(node),以及這些節點的相關資訊。
節點
CLUSTER MEET <ip> <port> 将 ip 和 port 所指定的節點添加到叢集當中,讓它成為叢集的一份子。
CLUSTER FORGET <node_id> 從叢集中移除 node_id 指定的節點。
CLUSTER REPLICATE <node_id> 将目前節點設定為 node_id 指定的節點的從節點。
CLUSTER SAVECONFIG 将節點的配置檔案儲存到硬碟裡面。
槽(slot)
CLUSTER ADDSLOTS <slot> [slot ...] 将一個或多個槽(slot)指派(assign)給目前節點。
CLUSTER DELSLOTS <slot> [slot ...] 移除一個或多個槽對目前節點的指派。
CLUSTER FLUSHSLOTS 移除指派給目前節點的所有槽,讓目前節點變成一個沒有指派任何槽的節點。
CLUSTER SETSLOT <slot> NODE <node_id> 将槽 slot 指派給 node_id 指定的節點,如果槽已經指派給另一個節點,那麼先讓另一個節點删除該槽>,然後再進行指派。
CLUSTER SETSLOT <slot> MIGRATING <node_id> 将本節點的槽 slot 遷移到 node_id 指定的節點中。
CLUSTER SETSLOT <slot> IMPORTING <node_id> 從 node_id 指定的節點中導入槽 slot 到本節點。
CLUSTER SETSLOT <slot> STABLE 取消對槽 slot 的導入(import)或者遷移(migrate)。
鍵
CLUSTER KEYSLOT <key> 計算鍵 key 應該被放置在哪個槽上。
CLUSTER COUNTKEYSINSLOT <slot> 傳回槽 slot 目前包含的鍵值對數量。
CLUSTER GETKEYSINSLOT <slot> <count> 傳回 count 個 slot 槽中的鍵。
4:redis cluster 運維操作1)初始化并建構叢集
(1)啟動叢集相關節點(必須是空節點,beta3後可以是有資料的節點),指定配置檔案和輸出日志
redis-server /opt/redis/conf/redis-6380.conf > /opt/redis/logs/redis-6380.log 2>&1 &
redis-server /opt/redis/conf/redis-6381.conf > /opt/redis/logs/redis-6381.log 2>&1 &
redis-server /opt/redis/conf/redis-6382.conf > /opt/redis/logs/redis-6382.log 2>&1 &
redis-server /opt/redis/conf/redis-7380.conf > /opt/redis/logs/redis-7380.log 2>&1 &
redis-server /opt/redis/conf/redis-7381.conf > /opt/redis/logs/redis-7381.log 2>&1 &
redis-server /opt/redis/conf/redis-7382.conf > /opt/redis/logs/redis-7382.log 2>&1 &
(2):使用自帶的ruby工具(redis-trib.rb)建構叢集
#redis-trib.rb的create子指令建構
#--replicas 則指定了為Redis Cluster中的每個Master節點配備幾個Slave節點
#節點角色由順序決定,先master之後是slave(為友善辨認,slave的端口比master大1000)
redis-trib.rb create --replicas 1 10.10.34.14:6380 10.10.34.14:6381 10.10.34.14:6382 10.10.34.14:7380 10.10.34.14:7381 10.10.34.14:7382
(3):檢查叢集狀态
#redis-trib.rb的check子指令建構
#ip:port可以是叢集的任意節點
redis-trib.rb check 10.10.34.14:6380
最後輸出如下資訊,沒有任何警告或錯誤,表示叢集啟動成功并處于ok狀态
[OK] All nodes agree about slots configuration.
>>> Check for open slots...
>>> Check slots coverage...
[OK] All 16384 slots covered.
2):添加新master節點
(1)添加一個master節點:建立一個空節點(empty node),然後将某些slot移動到這個空節點上,這個過程目前需要人工幹預
a):根據端口生成配置檔案(ps:establish_config.sh是我自己寫的輸出配置腳本)
sh establish_config.sh 6386 > conf/redis-6386.conf
b):啟動節點
redis-server /opt/redis/conf/redis-6386.conf > /opt/redis/logs/redis-6386.log 2>&1 &
c):加入空節點到叢集
add-node 将一個節點添加到叢集裡面, 第一個是新節點ip:port, 第二個是任意一個已存在節點ip:port
redis-trib.rb add-node 10.10.34.14:6386 10.10.34.14:6381
node:新節點沒有包含任何資料, 因為它沒有包含任何slot。新加入的加點是一個主節點, 當叢集需要将某個從節點更新為新的主節點時, 這個新節點不會被選中,同時新的主節點因為沒有包含任何slot,不參加選舉和failover。
d):為新節點配置設定slot
redis-trib.rb reshard 10.10.34.14:6386
#根據提示選擇要遷移的slot數量(ps:這裡選擇500)
How many slots do you want to move (from 1 to 16384)? 500
#選擇要接受這些slot的node-id
What is the receiving node ID? f51e26b5d5ff74f85341f06f28f125b7254e61bf
#選擇slot來源:
#all表示從所有的master重新配置設定,
#或者資料要提取slot的master節點id,最後用done結束
Please enter all the source node IDs.
Type 'all' to use all the nodes as source nodes for the hash slots.
Type 'done' once you entered all the source nodes IDs.
Source node #1:all
#列印被移動的slot後,輸入yes開始移動slot以及對應的資料.
#Do you want to proceed with the proposed reshard plan (yes/no)? yes
#結束
3):添加新的slave節點
a):前三步操作同添加master一樣
b)第四步:redis-cli連接配接上新節點shell,輸入指令:cluster replicate 對應master的node-id
cluster replicate 2b9ebcbd627ff0fd7a7bbcc5332fb09e72788835
注意:線上添加slave 時,需要bgsave整個master資料,并傳遞到slave,再由 slave加載rdb檔案到記憶體,rdb生成和傳輸的過程中消耗Master大量記憶體和網絡IO,以此不建議單執行個體記憶體過大,線上小心操作。
例如本次添加slave操作産生的rdb檔案
-rw-r--r-- 1 root root 34946 Apr 17 18:23 dump-6386.rdb
-rw-r--r-- 1 root root 34946 Apr 17 18:23 dump-7386.rdb
4):線上reshard 資料:
對于負載/資料不均勻的情況,可以線上reshard slot來解決,方法與添加新master的reshard一樣,隻是需要reshard的master節點是已存在的老節點.
5):删除一個slave節點
#redis-trib del-node ip:port '<node-id>'
redis-trib.rb del-node 10.10.34.14:7386 'c7ee2fca17cb79fe3c9822ced1d4f6c5e169e378'
6):删除一個master節點
a):删除master節點之前首先要使用reshard移除master的全部slot,然後再删除目前節點
(目前redis-trib.rb隻能把被删除master的slot對應的資料遷移到一個節點上)
#把10.10.34.14:6386目前master遷移到10.10.34.14:6380上
redis-trib.rb reshard 10.10.34.14:6380
How many slots do you want to move (from 1 to 16384)? 500(被删除master的所有slot數量)
#選擇要接受這些slot的node-id(10.10.34.14:6380)
What is the receiving node ID? c4a31c852f81686f6ed8bcd6d1b13accdc947fd2 (ps:10.10.34.14:6380的node-id)
Source node #1:f51e26b5d5ff74f85341f06f28f125b7254e61bf(被删除master的node-id)
Source node #2:done
b):删除空master節點
redis-trib.rb del-node 10.10.34.14:6386 'f51e26b5d5ff74f85341f06f28f125b7254e61bf'
三:redis cluster 用戶端(Jedis)1:用戶端基本操作使用
<span style="font-size: 16px;"> private static BinaryJedisCluster jc;
static {
//隻給叢集裡一個執行個體就可以
Set<HostAndPort> jedisClusterNodes = new HashSet<HostAndPort>();
jedisClusterNodes.add(new HostAndPort("10.10.34.14", 6380));
jedisClusterNodes.add(new HostAndPort("10.10.34.14", 6381));
jedisClusterNodes.add(new HostAndPort("10.10.34.14", 6382));
jedisClusterNodes.add(new HostAndPort("10.10.34.14", 6383));
jedisClusterNodes.add(new HostAndPort("10.10.34.14", 6384));
jedisClusterNodes.add(new HostAndPort("10.10.34.14", 7380));
jedisClusterNodes.add(new HostAndPort("10.10.34.14", 7381));
jedisClusterNodes.add(new HostAndPort("10.10.34.14", 7382));
jedisClusterNodes.add(new HostAndPort("10.10.34.14", 7383));
jedisClusterNodes.add(new HostAndPort("10.10.34.14", 7384));
jc = new BinaryJedisCluster(jedisClusterNodes);
}
@Test
public void testBenchRedisSet() throws Exception {
final Stopwatch stopwatch = new Stopwatch();
List list = buildBlogVideos();
for (int i = 0; i < 1000; i++) {
String key = "key:" + i;
stopwatch.start();
byte[] bytes1 = protostuffSerializer.serialize(list);
jc.setex(key, 60 * 60, bytes1);
stopwatch.stop();
}
System.out.println("time=" + stopwatch.toString());
}</span>
2:redis-cluster用戶端的一些坑.
1)cluster環境下slave預設不接受任何讀寫操作,在slave執行readonly指令後,可執行讀操作
2)client端不支援多key操作(mget,mset等),但當keys集合對應的slot相同時支援mget操作見:hash_tag
3)不支援多資料庫,隻有一個db,select 0。
4)JedisCluster 沒有針對byte[]的API,需要自己擴充(附件是我加的基于byte[]的BinaryJedisCluster api)
目前"Jedis-3.0.0-SNAPSHOT"已支援BinaryJedisCluster和基于hash_tag的mget操作.
本文作者:berqilee
本文來自雲栖社群合作夥伴rediscn,了解相關資訊可以關注redis.cn網站。