網絡安裝—pxe
利用伺服器實作網絡中的多台主機的全自動的安裝
所需要搭建的伺服器:dhcp,tftp,vsftp
Linux的服務分兩類:(1)獨立的服務 配置檔案/etc/rc.d/init.d
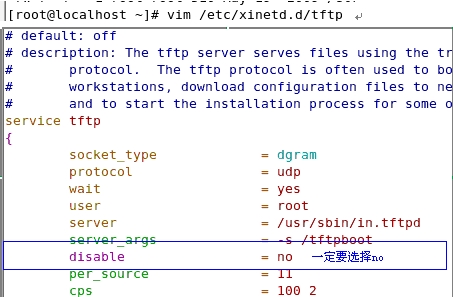
(2)依賴于超級守護程序 (xinetd) /etc/xinetd.d (tftp)
實驗所需指令詳解:
chkconfig --list |less 列出系統所有的服務
chkconfig --level 35 vsftpd on 在3和5級别打開vsftp服務 永久打開的
netstat -tupln |grep 69 檢視69号端口的開放情況
grep tftp /tftp/services 檢視tftp 服務的端口
(1) 首先使用yum将tftp服務安裝好
安裝後重新開機tftp服務,便可以檢視到69号端口已經打開

将pxelinux.0,vmlinuz,initrd.img,三個檔案拷入到/tftpboot中,另外将isolinux.cfg檔案的内容拷入建立的/tftpboot/ pxelinux.cfg/default中
[root@localhost ~]# cd /tftpboot/
[root@localhost tftpboot]# cp /usr/lib/sys
syslinux/ systemtap/
[root@localhost tftpboot]# cp /usr/lib/syslinux/pxelinux.0 ./
[root@localhost tftpboot]# cp /mnt/cdrom/p_w_picpaths/pxeboot/vmlinuz ./
[root@localhost tftpboot]# cp /mnt/cdrom/p_w_picpaths/pxeboot/initrd.img ./
[root@localhost tftpboot]# mkdir -p pxelinux.cfg
[root@localhost tftpboot]# cp /mnt/cdrom/isolinux/isolinux.cfg pxelinux.cfg/default
然後對pxelinux.cfg/default檔案進行編譯
[root@localhost tftpboot]# vim pxelinux.cfg/default
在十二行添加驅動引導檔案,該檔案放在ftp伺服器的pub目錄裡 其中ksdevice=eth0 若是隻有一個網卡則不需要填寫 若是多網卡則需指明為eth0網卡
1 default linux
2 prompt 1
3 timeout 600
4 display boot.msg
5 F1 boot.msg
6 F2 options.msg
7 F3 general.msg
8 F4 param.msg
9 F5 rescue.msg
10 label linux
11 kernel vmlinuz
12 append ks=ftp://192.168.100.99/pub/ks.cfg ksdevice=eth0 initrd=initrd.img
13 label text
14 kernel vmlinuz
15 append initrd=initrd.img text
16 label ks
17 kernel vmlinuz
18 append ks initrd=initrd.img
19 label local
20 localboot 1
21 label memtest86
22 kernel memtest
23 append -
24
:wq! 注:這裡必須使用wq!強制儲存退出
此時tftp伺服器的配置基已經配置完畢,隻需重新開機tftp服務便可
[root@localhost tftpboot]# service xinetd restart
Stopping xinetd: [ OK ]
Starting xinetd: [ OK ]
(2)搭建dhcp伺服器,為主機配置設定ip位址
首先使用yum安裝dhcp服務
使用rpm –qc dhcp 可以檢視dhcp的安裝目錄
[root@localhost tftpboot]# rpm -qc dhcp
/etc/dhcpd.conf
/etc/rc.d/init.d/dhcpd
/etc/rc.d/init.d/dhcrelay
/etc/sysconfig/dhcpd
/etc/sysconfig/dhcrelay
/var/lib/dhcpd/dhcpd.leases
進入/etc/dhcpd.conf檔案,并對其進行編譯
此時dhcp服務已經搭建好,隻需重新開機便可以使用
注:若dhcp無法啟用,可以使用 grep dhcp /var/log/message 檢視日志檔案進行排錯
[root@localhost tftpboot]# service dhcpd restart
Starting dhcpd: [ OK ]
(3)安裝vsftp服務,并将/mnt/cdrom下的所有檔案全部拷入/var/ftp/pub檔案下
并重新開機ftp服務
[root@localhost tftpboot]# service vsftpd restart
Shutting down vsftpd: [ OK ]
Starting vsftpd for vsftpd: [ OK ]
此時伺服器已經搭建完畢,可以進行用戶端的安裝了
(4)配置用戶端:
下面開始自動安裝了