Icinga 2 is a free, open source and powerful network resource monitoring software application which checks the availability of your resources from the network, notifies users of outages and generates performance data for reporting. You can monitor network services (SMTP, POP3, HTTP, NNTP, ping) host resources (CPU load, disk usage) and network components (switches, routers, temperature and humidity sensors) using Icinga 2. It is very similar to Nagios system monitoring application. You can easily integrate Icinga 2 with Nagios plugins. Icinga 2 comes with beautiful and a user friendly web interface to monitor large, complex environments across multiple locations.
Icinga 2 comes with a wide range of features, some of them are listed below:
• Supports Graphite and InfluxDB natively.
• Send notification via e-mail and text message, when a problem occurs.
• Customizable plugins that allows you to easily develop your own service checks.
• Provides Icinga Classic UI and Icinga Web interface for visualization of host and service status, network maps, reports, logs, etc.
• Support extra add-ons like, PNP4Nagios, NagiosGrapher and InGraph for performance graphing.
In this tutorial, we will learn how to install and configure Icinga 2 and Icinga web 2 in Ubuntu 16.04 server. We will also learn how to setup icinga2 to monitor remote hosts services.
• Alibaba Cloud Instance for Icinga Server with Ubuntu 16.04 installed.
• Alibaba Cloud Instance for Icinga Client with Ubuntu 16.04 installed.
• Static IP address 192.168.0.103 is configured on Icinga Server Instance.
• Static IP address 192.168.0.104 is configured on Icinga Client Instance.
• Domain name with proper DNS records configured.
• Root account access via SSH service.
Before starting, update your system repositories and software packages with the latest version with the following command:
Next, you will need to setup your system hostname. You can do this with the following command:
Next, you can verify the system hostname using the following command:
Next, reboot the server instance to apply all the updates with the following command:
Icinga 2 runs on web server, so you will need to install Apache server, MariaDB and PHP language with all required PHP modules in your system. You can install all the packages by just running the following command:
Once all the required packages are installed, start the Apache and MariaDB service and enable them to start on boot time using the following command:
Next, enable Apache rewrite module to redirect HTTP connections to HTTPS using the following command:
Next, you will need to set timezone that matches your system geographical location. You can do this by editing php.ini file:
Change the following line:
Save and close the file when you are finished, then restart Apache service to apply the changes:
By default, the latest version of the Icinga is not available in Ubuntu 16.04 default repository. So you will need to add a software repository for Icinga.
First, download and add the Icinga package signing key using the following command:
Next, add the Icinga repository to the APT configuration file:
Add the following line at the end of the file:
Save and close the file, then update the repository with the following command:
Once repository is updated, install Icinga2 and Icinga web 2 using the following command:
During the installation, you will be asked a series of question to setup the application. Answer each question as shown below:
Next, you will need to enable the ido-mysql and command feature in Icinga 2. You can do this using the following command:
Finally, restart the Icinga2 service and enable it to start on boot time with the following command:
Before starting, you will need to secure MariaDB database. You can do this by running the mysql_secure_installation script:
This script will change MySQL root password, remove anonymous users, disable remote root logins and delete the test database as shown below:
Once MariaDB is secured, log in to MariaDB shell and create the database, Database user with a strong password for Icinga2 IDO using the following command:
Next, you will also need to create the database, Database user with a strong password for Icinga web 2. You can do this using the following command:
Next, you will need to import the Icinga 2 IDO schema to the Icinga2 database. You can do this using the following command:
Next, you will need to edit Icinga2 MySQL IDO configuration file and update the database credentials manually. You can do this by editing /etc/icinga2/features-enabled/ido-mysql.conf file:
Change the file as shown below:
Save and close the file, then restart the Icinga2 service to apply the changes:
By default, the UFW firewall is disabled on a newly installed Ubuntu 16.04 server instance. You can enable the UFW firewall using the following command:
Next, allow Apache port 80, 443 and 5665 using the following command:
Icinga Web 2 is the web interface for Icinga 2 that can be used to monitor your infrastructure for issues and check the health of your hosts and services.
Before accessing Icinga web 2 interface, you will need to create a setup token that authorizes us to use the web setup tool. You can create this using the following command:
You should see the following output:
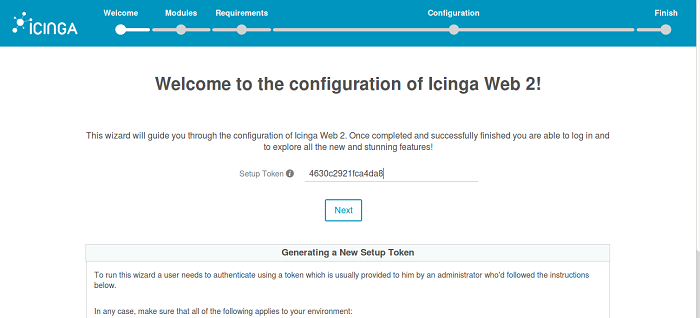
Now, paste the token which you have copy earlier in Setup Token field, then click on the Next button to begin the process:

Here, you will need to choose the modules which you want to enable. Enable Doc and Monitoring modules, then click on the Next button, you should see the following page:
Here, Icinga2 will check your system requirements. Make sure all the required PHP modules are installed, then click on the Next button, you should see the following page:
Here, you will need to choose the authentication mechanism to access the Icinga web 2. Select Authentication Type = Database and click on the Next button, you should see the following page:
Here, enter database credentials for Icinga web 2 like, Database name, Username and Password, then click on the Next button, you should see the following page:
Next, define a name for database authentication backed and click on the Next button, you should see the following page:
Here, enter your admin account credential to log in to Icinga2 web interface, then click on the Next button, you should see the following page:
Here, provide Icinga2 application and logging information and click on the Next button, you should see the following page:
Now, review all the settings and click on the Next button, you should see the following page:
Here, click on the Next button to start the configuration process:
Here, enter Icinga web 2 Backend name and Backend type, then click on the Next button, you should see the following page:
Here, enter your Icinga2 IDO database credentials and click on the Next button, you should see the following page:
Now, just click on the Next button to continue the setup process. You should see the following page:
Here, continue with the default values provided by Icinga2 and click on the Next button, you should see the following page:
Here, review all the configurations made so far and click on the Finish button to complete the installation process. Once installation has been successfully setup, you should see the following page:
Now, click on the Login to icinga web 2 button, you should see the following page:
Here, enter your admin account credentials which you have created earlier and click on the Login button, you should see the Icinga web 2 dashboard as below:
Icinga web 2 is now configured, it's time to setup and make an Icinga2 server node as master for monitoring. You can do this by running the following command:
During the setup process, you will be asked several questions, answer all the questions as shown below:
Next, restart Icinga2 service apply master node configuration:
Next, Icinga 2 master node also requires a valid ticket from clients, so you will need to generate the ticket for Icinga 2 client node.
You can generate the same using the following command:
Before starting, you will need to install Icinga 2 and the Nagios plugins on your client node. First, download and add the Icinga package signing key using the following command:
Once repository is updated, install Icinga2 and Nagios plugins using the following command:
Next, start the Icinga 2 service and enable it to start on boot time with the following command:
Next, run the Icinga 2 node wizard on Client node as shown below:
Answer all the questions as shown below:
Now, restart the Icinga2 server to apply all the configuration:
Now, Icinga 2 master and client node are connected. You will also need to setup zone file on Icinga 2 master node to define client which you want to monitor.
Switch back to master node and create a zone directory:
Next, create a service file and host file using the following command:
Add the following lines:
Save the file, then create a host file:
Make sure the hostname and IP address match with client node. Save the file and restart Icinga 2 service using the following command:
Now, open the Icinga web 2 interface and click on the Overview > Hosts tab, you should see the newly added client node.