通過上一節的講解,已經申請到了一個Android Map API Key,下面開始講解使用Map API密鑰實作程式設計的基本流程。
第1步:在檔案AndroidManifest.xml中聲明權限。
在Anroid系統中,如果程式執行需要讀取到安全敏感的項目,那麼必須在AndroidManifest.xml中聲明相關權限請求,比如這個地圖程式需要從網絡讀取相關資料。是以必須聲明android.permission.INTERNET權限。具體方法是在AndroidManifest.xml中添加如下代碼。
<uses-permission android:name="android.permission.INTERNET" />
另外,因為maps類不是Android啟動的預設類,是以還需要在檔案AndroidManifest.xml的application 标簽中申明要用maps類。
<uses-library android:name="com.google.android.maps" />
下面是基本的AndroidManifest.xml檔案代碼。
<application android:icon="@drawable/icon" android:label="@string/app_name">
<uses-library android:name="com.google.android.maps" />
</application>
</manifest>
第2步:在main.xml主檔案中完成Layout。
下面開始着手來完成界面。假設設定要顯示杭州的衛星地圖,并在地圖上方有5個按鈕,分别可以放大地圖、縮小地圖或者切換顯示模式(衛星,交通,街景)。即整個界面主要由2個部分組成,上面是一排5個按鈕,下面是MapView。
在Android中,LinearLayout是可以互相嵌套的,在此可以把上面5個按鈕放在一個子LinearLayout裡邊(子LinearLayout的指定可以由android:addStatesFromChildren="true"實作),然後再把這個子LinearLayout加到外面的父LinearLayout裡邊。具體實作如下。
android:orientation="vertical" android:layout_width="fill_parent"
android:layout_height="fill_parent">
<LinearLayout android:layout_width="fill_parent"
android:addStatesFromChildren="true" /*說明是子Layout
android:gravity="center_vertical" /*這個子Layout裡邊的按鈕是橫向排列
>
<Button android:id="@+id/ZoomOut"
android:text="放大"
android:layout_width="wrap_content"
android:layout_height="wrap_content"
android:layout_marginTop="5dip" /*下面的4個屬性,指定了按鈕的相對位置
android:layout_marginLeft="30dip"
android:layout_marginRight="5dip"
android:layout_marginBottom="5dip"
android:padding="5dip" />
/*其餘4個按鈕省略
</LinearLayout>
<com.google.android.maps.MapView
android:id="@+id/map"
android:layout_width="fill_parent"
android:layout_height="fill_parent"
android:enabled="true"
android:clickable="true"
android:apiKey="在此輸入上一節申請的API Key" /*必須加上上一節申請的API Key
/>
第3步:完成主Java程式代碼。
首先,主檔案的這個類必須繼承MapActivity。
public class Mapapp extends MapActivity {
然後,來關注onCreate()函數,其核心代碼如下。
public void onCreate(Bundle icicle) {
//取得地圖View
myMapView = (MapView) findViewById(R.id.map);
//設定為衛星模式
myMapView.setSatellite(true);
//地圖初始化的點:杭州
GeoPoint p = new GeoPoint((int) (30.27 * 1000000),
(int) (120.16 * 1000000));
//取得地圖View的控制
MapController mc = myMapView.getController();
//定位到杭州
mc.animateTo(p);
//設定初始化倍數
mc.setZoom(DEFAULT_ZOOM_LEVEL);
}
接着,編寫縮放按鈕的處理代碼,具體如下。
btnZoomIn.setOnClickListener(new View.OnClickListener() {
public void onClick(View view) {
myMapView.getController().setZoom(myMapView.getZoomLevel() - 1);
});
地圖模式的切換由下面代碼實作。
btnSatellite.setOnClickListener(new View.OnClickListener() {
public void onClick(View view) {
myMapView.setSatellite(true); //衛星模式為True
myMapView.setTraffic(false); //交通模式為False
myMapView.setStreetView(false); //街景模式為False
}
});
到此為止,就完成了第一個使用Map API的應用程式。
在本節的内容中,将通過一個執行個體的實作過程來講解使用Map API密鑰實作google地圖定位的基本流程。本執行個體源檔案儲存在“CD光牒:\daima\12\”中,命名為“CurrentLocationWithMap”。下面開始介紹本執行個體的具體實作流程。
(1)編寫主布局檔案main.xml
在布局檔案main.xml中,插入了2個Button按鈕,分别實作對地圖的“放大”和“縮小”;然後,通過ToggleButton控制是否顯示衛星地圖;最後,設定申請的api Key。具體代碼如下所示。
<?xml version="1.0" encoding="utf-8"?>
android:orientation="vertical"
android:layout_width="fill_parent"
android:layout_height="fill_parent"
>
<TextView
android:id="@+id/myLocationText"
android:layout_width="fill_parent"
android:layout_height="wrap_content"
/>
<LinearLayout
android:orientation="horizontal"
android:layout_height="wrap_content" >
<Button
android:id="@+id/in"
android:layout_width="fill_parent"
android:layout_height="wrap_content"
android:layout_weight="1"
android:text="放大" />
android:id="@+id/out"
android:text="縮小" />
<ToggleButton
android:id="@+id/switchMap"
android:layout_width="wrap_content"
android:textOff="衛星視圖(關)"
android:textOn="衛星視圖(開)"/>
android:id="@+id/myMapView"
android:clickable="true"
android:apiKey="0by7ffx8jX0A_LWXeKCMTWAh8CqHAlqvzetFqjQ"
/>
(2)聲明權限
在檔案AndroidManifest.xml中,需要聲明android.permission.INTERNET和INTERNET權限,具體代碼如下所示。
<uses-permission android:name="android.permission.INTERNET"/>
<uses-permission android:name="android.permission.ACCESS_FINE_LOCATION"/>
(3)編寫主程式檔案CurrentLocationWithMap.java
第1步:通過方法onCreate将MapView繪制到螢幕上。因為MapView隻能繼承自MapActivity的活動中,是以必須用方法onCreate将MapView繪制到螢幕上,并同時覆寫方法isRouteDisplayed(),它表示是否需要在地圖上繪制導航線路,具體代碼如下所示。
package com.CurrentLocationWithMap;
import java.util.List;
import android.content.Context;
import android.location.Criteria;
import android.location.Location;
import android.location.LocationListener;
import android.location.LocationManager;
import android.os.Bundle;
import android.view.View;
import android.view.View.OnClickListener;
import android.widget.Button;
import android.widget.CompoundButton;
import android.widget.TextView;
import android.widget.ToggleButton;
import android.widget.CompoundButton.OnCheckedChangeListener;
import com.google.android.maps.GeoPoint;
import com.google.android.maps.MapActivity;
import com.google.android.maps.MapController;
import com.google.android.maps.MapView;
import com.google.android.maps.MyLocationOverlay;
import com.google.android.maps.Overlay;
public class CurrentLocationWithMap extends MapActivity {
MapView map;
MapController ctrlMap;
Button inBtn;
Button outBtn;
ToggleButton switchMap;
@Override
protected boolean isRouteDisplayed() {
return false;
}
第2步:定義方法onCreate,首先引入主布局main.xml,并通過方法findViewById獲得MapView對象的引用,接着調用getOverlays()方法擷取其Overylay連結清單,并将建構好的MyLocationOverlay對象添加到連結清單中去。其中MyLocationOverlay對象調用的enableMyLocation()方法表示嘗試通過位置服務來擷取目前的位置,具體代碼如下所示。
@Override
public void onCreate(Bundle savedInstanceState) {
super.onCreate(savedInstanceState);
setContentView(R.layout.main);
map = (MapView)findViewById(R.id.myMapView);
List<Overlay> overlays = map.getOverlays();
MyLocationOverlay myLocation = new MyLocationOverlay(this,map);
myLocation.enableMyLocation();
overlays.add(myLocation);
還需要為“放大”和“縮小”這2個按鈕設定處理程式,首先通過方法getController()擷取MapView的MapController對象,然後在“放大”和“縮小”兩個按鈕單擊事件監聽器的回放方法裡,根據按鈕的不同實作對MapView的縮放,具體代碼如下所示。
ctrlMap = map.getController();
inBtn = (Button)findViewById(R.id.in);
outBtn = (Button)findViewById(R.id.out);
OnClickListener listener = new OnClickListener() {
public void onClick(View v) {
switch (v.getId()) {
case R.id.in: /*如果是縮放*/
ctrlMap.zoomIn();
break;
case R.id.out: /*如果是放大*/
ctrlMap.zoomOut();
default:
}
};
inBtn.setOnClickListener(listener);
outBtn.setOnClickListener(listener);
//=======================================
第3步:通過方法onCheckedChanged來擷取是否選擇了switchMap,如果選擇了則顯示衛星地圖。首先通過方法findViewById擷取對應id的ToggleButton對象的引用,然後調用setOnCheckedChangeListener方法,設定對事件監聽器選中的事件進行處理。根據ToggleButton是否被選中,進而通過setSatellite()方法啟用或禁用衛星試圖功能。具體代碼如下所示。
switchMap = (ToggleButton)findViewById(R.id.switchMap);
switchMap.setOnCheckedChangeListener(new OnCheckedChangeListener() {
@Override
public void onCheckedChanged(CompoundButton cBtn, boolean isChecked) {
if (isChecked == true) {
map.setSatellite(true);
} else {
map.setSatellite(false);
}
}
});
第4步:首先通過LocationManager擷取目前的位置,然後通過getBestProvider方法來擷取和查詢條件,最後設定更新位置資訊的最小間隔為2s,位移變化在10m以上。具體代碼如下所示。
LocationManager locationManager;
String context = Context.LOCATION_SERVICE;
locationManager = (LocationManager)getSystemService(context);
//String provider = LocationManager.GPS_PROVIDER;
Criteria criteria = new Criteria();
criteria.setAccuracy(Criteria.ACCURACY_FINE);
criteria.setAltitudeRequired(false);
criteria.setBearingRequired(false);
criteria.setCostAllowed(true);
criteria.setPowerRequirement(Criteria.POWER_LOW);
String provider = locationManager.getBestProvider(criteria, true);
Location location = locationManager.getLastKnownLocation(provider);
updateWithNewLocation(location);
locationManager.requestLocationUpdates(provider, 2000, 10,
locationListener);
第5步:設定回調方法何時被調用,具體代碼如下所示。
private final LocationListener locationListener = new LocationListener() {
public void onLocationChanged(Location location) {
updateWithNewLocation(location);
}
public void onProviderDisabled(String provider){
updateWithNewLocation(null);
public void onProviderEnabled(String provider){ }
public void onStatusChanged(String provider, int status,
Bundle extras){ }
};
第6步:定義方法updateWithNewLocation(Location location),用于顯示地裡資訊和地圖資訊。具體代碼如下所示。
private void updateWithNewLocation(Location location) {
String latLongString;
TextView myLocationText;
myLocationText = (TextView)findViewById(R.id.myLocationText);
if (location != null) {
double lat = location.getLatitude();
double lng = location.getLongitude();
latLongString = "緯度:" + lat + "\n經度:" + lng;
ctrlMap.animateTo(new GeoPoint((int)(lat*1E6),(int)(lng*1E6)));
} else {
latLongString = "無法擷取地理資訊";
myLocationText.setText("您目前的位置是:\n" +
latLongString);
至此,整個執行個體介紹完畢,在圖12-9中標明一個經度和次元位置後,可以顯示此位置的定位資訊,并且定位資訊分别以文字和地圖形式顯示出來,如圖12-10所示。
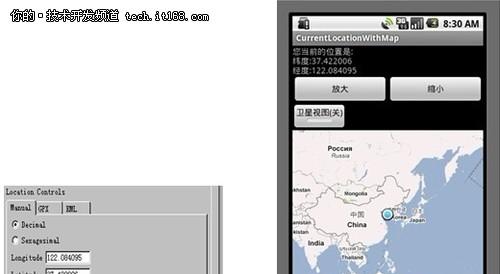
▲圖12-9 指定位置 圖12-10 顯示對應資訊
單擊“放大”和“縮小”按鈕後,能控制地圖的大小顯示,如圖12-11所示。打開衛星試圖後,可以顯示此位置範圍對應的衛星地圖,如圖12-12所示。
▲圖12-11 放大後效果 圖12-12 衛星地圖

本文轉自 wws5201985 51CTO部落格,原文連結:http://blog.51cto.com/wws5201985/769736,如需轉載請自行聯系原作者