我把SystemImager系統分為五個部分來講解:安裝SystemImager伺服器、安裝SystemImager Golden Client(即作為Golden Client的計算機)、建立Golden Client系統鏡像、設定SystemImager伺服器、克隆系統(即Golden Client的精确副本).
一、安裝SystemImager 伺服器
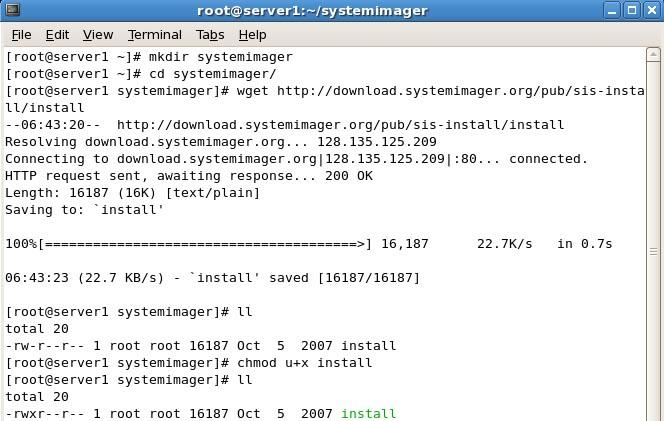
1.下載下傳install腳本
建立systemp_w_picpathr作為儲存systemp_w_picpathr伺服器軟體,進入systemp_w_picpathr目錄,并從systemp_w_picpathr網站下載下傳install腳本,再賦予此腳本可執行的權限,此腳本是用來下載下傳systemp_w_picpathr rpm包的。
#mkdir systemp_w_picpathr
#cd systemp_w_picpathr
#wget http://download.systemp_w_picpathr.org/pub/sis-install/install
#chmod u+x install
執行過程如下圖所示:
2.執行install腳本下載下傳systemp_w_picpathr伺服器端所需要的rpm包,所需安裝包:systemconfigurator ,systemp_w_picpathr-common,systemp_w_picpathr-i386boot-standard,systemp_w_picpathr-server,安裝這些包還需要依賴perl包:perl-AppConfig,perl-XML-Simple;perl-AppConfig包可以使用install腳本從systemp_w_picpathr網站下載下傳,perl-XML-Simple包紅帽CD光牒已經包含了,安裝前請檢查perl-XML-Simple是否安裝,如果沒有安裝,請先安裝好它。
#./install -v --download-only --tag stable --directory . systemconfigurator systemp_w_picpathr-common systemp_w_picpathr-i386boot-standard systemp_w_picpathr-server perl-AppConfig

3.檢視下載下傳的包,并安裝:
#ls
install
perl-AppConfig-1.52-4.noarch.rpm
stable.list
systemconfigurator-2.2.11-1.noarch.rpm
systemp_w_picpathr-common-4.0.2-1.noarch.rpm
systemp_w_picpathr-i386boot-standard-4.0.2-1.noarch.rpm
systemp_w_picpathr-server-4.0.2-1.noarch.rpm
#rpm -ivh *.rpm
到這裡,SystemImager伺服器已經安裝好了。
二、安裝SystemImager Golden Client:
1.此步驟和SystemImager伺服器的1,2,3步驟一樣,隻不過用戶端隻需要下載下傳安裝systemconfigurator systemp_w_picpathr-client systemp_w_picpathr-common systemp_w_picpathr-initrd-template-i386 perl-AppConfig五個軟體包:
systemp_w_picpathr-client-4.0.2-1.noarch.rpm
systemp_w_picpathr-i386initrd_template-4.0.2-1.noarch.rpm
到這裡,Golden Client安裝好了。
三、建立Golden Client系統鏡像:
1.在Golden Client端執行si_prepareclient --server 172.24.254.254 這裡的IP位址是SystemImager伺服器端位址,這是為伺服器端rsync複制做好準備,另外注意rsync使用Tcp port 873端口,如果開啟了防火牆,請開放此端口:
#iptables -A INPUT -p tcp --dport 873 -j ACCEPT
#service iptables save
#si_prepareclient --server 172.24.254.254
按照提示按y繼續即可。
繼續按下y,回車:
完成後,就可以在伺服器端做golden client的鏡像了。
執行完成後的情況如下圖:
2.現在可以在SystemImager伺服器端開始擷取Golden Client的鏡像了,預設擷取鏡像的儲存路徑為/var/lib/systemp_w_picpathr/p_w_picpaths下面,儲存路徑配置的檔案是/etc/systemp_w_picpathr/systemp_w_picpathr.conf,如果你想修改預設儲存路徑,請修改DEFAULT_IMAGE_DIR這行及其下面的那一行,擷取鏡像的指令如下:
#si_getp_w_picpath --golden-client 172.24.0.22 --p_w_picpath station.example.com --post-install reboot
上面的IP位址是Golden-Client的位址,備份的鏡像名稱為station.example.com,後面的參數表示等克隆一台機器完成後重新啟動電腦。
執行過程情況如下圖:
程式在備份過程中不會擷取/proc等臨時檔案系統,輸入y,繼續,如下圖所示:
下圖是開始複制檔案的過程:
複制完成後,提示按Enter鍵繼續,如下圖所示:
回車之後詢問是否也下載下傳自動安裝腳本,我們直接回車即可:
接下來是為準備克隆的機器配置設定IP位址的選項,1為動态,2為靜态,3是不改變,僅僅是做個單一的備份,這裡我選擇預設為動态IP位址設定,直接回車即可:
按照提示直接回車完成整個過程,這樣就完成了一台Linux系統的備份(鏡像)了,大家可以到目錄/var/lib/systemp_w_picpathr/p_w_picpaths下檢視rsync過來的station.example.com鏡像,接下來就是配置伺服器端來作為PXE伺服器,以便恢複安裝多台電腦,即克隆。
四、設定SystemImager伺服器
1.首先在SystemImager伺服器端運作下面的指令,以便克隆的機器使用rsync服務:
#/etc/init.d/systemp_w_picpathr-server-rsyncd start
當然如果開啟了防火牆,也要開放873端口:
執行過程情況如下圖:
2.設定伺服器可以使其他電腦通過網絡安裝鏡像系統(PXE克隆),首先檢查系統是否安裝了tftp、tftp-server、dhcp包,如果沒有安裝請安裝。
#rpm -q tftp tftp-server dhcp
3.執行si_mkbootserver自動配置伺服器,包括配置tftp-server,dhcp等:
#si_mkbootserver
然後在詢問pxelinux.0路徑時,直接回車即可。
詢問是否使用si_mkdhcpserver來配置dhcp服務,輸入y回車,繼續下一步,如下圖所示:
按照提示輸入y,回車繼續:
選擇版本2還是3,直接回車(預設選擇3)即可:
接下來就是配置dhcp的問題,按照要求,輸入域名,網段,掩碼,位址池,DNS,網關,Boot Server,Image Server,然後一直回車到下一步驟:
直接回車到下面的圖示,然後輸入y,回車進行下一步:
按照提示,輸入y,回車重新啟動dhcp服務,如下圖所示:
4.執行si_addclients來設定要被克隆的機器的名稱與對應的IP,因為前面我們設定了采用動态的IP位址段172.24.0.100-172.24.0.109,是以我這裡設定對應的主機名稱為station100-station109。
#si_addclients
按照提示輸入y,回車進入到下一步。
指令執行過程如下圖所示:
按照提示輸入域名和主機名稱範圍,我這裡輸入域名為example.com,主機名稱範圍station100-station109,回車之後再輸入y,進入到下一步:
按照提示輸入y,再按兩次Enter鍵,進入下一步,如下圖所示:
按照提示輸入y,回車進入設定IP範圍的步驟:
接下來輸入IP位址範圍172.24.0.100-172.24.0.109,回車,然後就可以看見相對應的主機名稱,再輸入y,按下兩次Enter鍵完成整個過程:
5.執行si_mkclientnetboot 來制作多台要克隆機器通過網絡安裝的對應啟動媒介:
#si_mkclientnetboot --netboot --clients station100-station109
到此為止,在Server端的所有工作都完成了,接下來就是準備10台機器通過網絡來自動克隆系統了。
五、克隆系統:
1.開啟機器,按下F12通過網絡進行系統的安裝(克隆),可以看到機器能正常的擷取IP,并從PXE啟動到boot狀态下,按下回車就可以自動安裝(克隆)系統了,如下圖所示:
可以從伺服器端的日志看見用戶端連過來的情況:
[root@server1 p_w_picpaths]# tail -f /var/log/systemp_w_picpathr/rsyncd
2009/05/22 05:55:09 [3574] rsyncd version 2.6.8 starting, listening on port 873
2009/05/22 07:58:20 [5456] connect from station109.example.com (172.24.0.109)
2009/05/22 07:58:21 [5456] rsync on boot/i386/standard/boel_binaries.tar.gz from station109.example.com (172.24.0.109)
2009/05/21 07:58:31 [5456] sent 6644254 bytes received 131 bytes total size 6643313
2009/05/22 07:58:34 [5457] connect from station109.example.com (172.24.0.109)
2009/05/22 07:58:35 [5457] rsync on scripts/ from station109.example.com (172.24.0.109)
2009/05/21 07:58:35 [5457] sent 41005 bytes received 334 bytes total size 39972
2.安裝的過程以機器的配置來決定時間長短,我的機器大概10多分鐘就可以安裝好,下面是安裝過程的一個截圖:
3.下圖是克隆完成後機器啟動的界面:
問題:
系統克隆完成後,輸入root密碼,不能正常登入系統,那是因為Selinux的緣故,在執行si_getp_w_picpath的時候,把Golden Client機器的Selinux關閉掉,或者在克隆完成後在救援模式下修改關閉Selinux,然後重新啟動系統,就可以正常登入系統了,正常登入系統後再開啟Selinux,它會重新應用Selinux,這樣就不會有問題了.
ChinaRHCX 于2009.05.22淩晨
完