Android的硬體抽象層:
簡單來說,就是對Linux核心驅動程式的封裝,向上提供接口,屏蔽低層的實作細節。
也就是說,把對硬體的支援分成了兩層,
一層放在使用者空間(User Space),(硬體抽象層)
一層放在核心空間(Kernel Space),(Linux核心驅動程式)
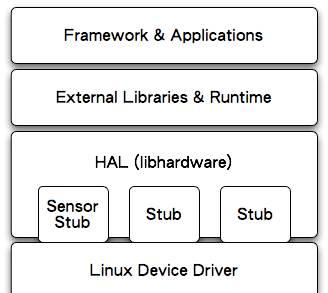
下面這個圖闡述了硬體抽象層在Android系統中的位置,以及它和其它層的關系:
二,簡單的總結
進入到Android源代碼工程的external目錄,建立hello目錄:
cd external
mkdir hello
在hello目錄中建立Android.mk檔案:
LOCAL_PATH := $(call my-dir)
include $(CLEAR_VARS)
LOCAL_MODULE_TAGS := optional
LOCAL_MODULE := hello
LOCAL_SRC_FILES := $(call all-subdir-c-files)
include $(BUILD_EXECUTABLE)
注意,BUILD_EXECUTABLE表示我們要編譯的是可執行程式。
使用mmm指令進行編譯:
mmm ./external/hello
編譯成功後,就可以在out/target/product/gerneric/system/bin目錄下,看到可執行檔案hello了。
重新打包Android系統檔案system.img:
make snod
這樣,重新打包後的system.img檔案就包含剛才編譯好的hello可執行檔案了。
七. 運作模拟器,使用/system/bin/hello可執行程式來通路Linux核心驅動程式。
emulator -kernel ./kernel/common/arch/arm/boot/zImage &
adb shell
cd system/bin
./hello
------------ ------------ ------------ ------------ ------------ ------------ ------------ ------------ ------------ ------------ ------------ ------------
三,編寫硬體抽象層
進入到在hardware/libhardware/include/hardware目錄,建立hello.h檔案:
cd hardware/libhardware/include/hardware
vi hello.h
hello.h檔案的内容如下:
#ifndef ANDROID_HELLO_INTERFACE_H
#define ANDROID_HELLO_INTERFACE_H
#include <hardware/hardware.h>
__BEGIN_DECLS
/*定義子產品ID*/
#define HELLO_HARDWARE_MODULE_ID "hello"
/*硬體子產品結構體*/
struct hello_module_t {
struct hw_module_t common;
};
/*硬體接口結構體*/
struct hello_device_t {
struct hw_device_t common;
int fd; // 裝置檔案描述符
int (*set_val)(struct hello_device_t* dev, int val); // 為該HAL對上提供的函數接口
int (*get_val)(struct hello_device_t* dev, int* val);
__END_DECLS
#endif
進入到hardware/libhardware/modules目錄,建立hello目錄,并添加hello.c檔案。 hello.c的内容較多,我們分段來看。
首先是包含相關頭檔案和定義相關結構:
#define LOG_TAG "HelloStub"
#include <hardware/hardware.h>
#include <hardware/hello.h>
#include <fcntl.h>
#include <errno.h>
#include <cutils/log.h>
#include <cutils/atomic.h>
#define DEVICE_NAME "/dev/hello"
#define MODULE_NAME "Hello"
#define MODULE_AUTHOR "[email protected]"
/*裝置打開和關閉接口*/
static int hello_device_open(const struct hw_module_t* module, const char* name, struct hw_device_t**
device);
static int hello_device_close(struct hw_device_t* device);
/*裝置通路接口*/
static int hello_set_val(struct hello_device_t* dev, int val);
static int hello_get_val(struct hello_device_t* dev, int* val);
/*子產品方法表*/
static struct hw_module_methods_t hello_module_methods = {
open: hello_device_open
};
/*子產品執行個體變量*/
struct hello_module_t HAL_MODULE_INFO_SYM = {
common: {
tag: HARDWARE_MODULE_TAG,
version_major: 1,
version_minor: 0,
id: HELLO_HARDWARE_MODULE_ID,
name: MODULE_NAME,
author: MODULE_AUTHOR,
methods: &hello_module_methods,
}
<Android硬體抽象層規範規定>
執行個體變量名必須為HAL_MODULE_INFO_SYM,
tag也必須為HARDWARE_MODULE_TAG。
定義hello_device_open函數:
static int hello_device_open (
const struct hw_module_t* module, const char* name, struct hw_device_t** device ) {
struct hello_device_t * dev;
dev = (struct hello_device_t*)malloc(sizeof(struct hello_device_t));
if(!dev) {
LOGE("Hello Stub: failed to alloc space");
return -EFAULT;
memset(dev, 0, sizeof(struct hello_device_t));
dev->common.tag = HARDWARE_DEVICE_TAG;
dev->common.version = 0;
dev->common.module = (hw_module_t*)module;
dev->common.close = hello_device_close;
dev->set_val = hello_set_val;
dev->get_val = hello_get_val;
if((dev->fd = open(DEVICE_NAME,
O_RDWR)) == -1) {
LOGE("Hello Stub: failed to open /dev/hello -- %s.", strerror(errno));free(dev);
*device = &(dev->common);
LOGI("Hello Stub: open /dev/hello successfully.");
return 0;
}
定義hello_device_close、hello_set_val和hello_get_val這三個函數:
static int hello_device_close (struct hw_device_t* device) {
struct hello_device_t * hello_device = (struct hello_device_t*)device;
if(hello_device) {
close(hello_device->fd);
free(hello_device);
static int hello_set_val(struct hello_device_t* dev, int val) {
LOGI("Hello Stub: set value %d to device.", val);
write(dev->fd, &val, sizeof(val));
static int hello_get_val(struct hello_device_t* dev, int* val) {
if(!val) {
LOGE("Hello Stub: error val pointer");
read(dev->fd, val, sizeof(*val));
LOGI("Hello Stub: get value %d from device", *val);
繼續在hello目錄下建立Android.mk檔案:
LOCAL_PATH := $(call my-dir)
LOCAL_PRELINK_MODULE := false
LOCAL_MODULE_PATH := $(TARGET_OUT_SHARED_LIBRARIES)/hw
LOCAL_SHARED_LIBRARIES := liblog
LOCAL_SRC_FILES := hello.c
LOCAL_MODULE := hello.default
include $(BUILD_SHARED_LIBRARY)
注意,LOCAL_MODULE的定義規則,hello後面跟有default,hello.default能夠保證我們的子產品總能被硬象抽象層加載到。
編譯:
mmm hardware/libhardware/modules/hello
編譯成功後,就可以在out/target/product/generic/system/lib/hw目錄下看到hello.default.so檔案了。
重新打包Android系統鏡像system.img:
重新打包後,system.img就包含我們定義的硬體抽象層子產品hello.default了。
雖然我們在Android系統為我們自己的硬體增加了一個硬體抽象層子產品,但是現在Java應用程式還不能通路到我們的硬體。
我們還必須編寫JNI方法和在Android的Application Frameworks層增加API接口,才能讓上層Application通路我們的硬體。
------------ ------------ ------------ ------------ ------------ ------------ ------------ ------------ ------------ ------------ ------------ ------------
四:JNI方法
如何為Android硬體抽象層接口編寫JNI方法,以便使得上層的Java應用程式能夠使用下層提供的硬體服務。
一. 確定Android系統鏡像檔案system.img已經包含hello.default子產品。
二. 進入到frameworks/base/services/jni目錄,建立com_android_server_HelloService.cpp檔案:
cd frameworks/base/services/jni
vi com_android_server_HelloService.cpp
com_android_server字首表示的是包名,表示硬體服務HelloService是放在frameworks/base/services/java目錄下的com/android/server目錄的,即存在一個指令為com.android.server.HelloService的類。
首先是包含相應的頭檔案:
#define LOG_TAG "HelloService"
#include "jni.h"
#include "JNIHelp.h"
#include "android_runtime/AndroidRuntime.h"
#include <utils/misc.h>
#include <utils/Log.h>
#include <stdio.h>
/* 接着定義hello_init、hello_getVal和hello_setVal三個JNI方法:*/
namespace android
{
/*在硬體抽象層中定義的硬體通路結構體,參考<hardware/hello.h>*/
struct hello_device_t* hello_device = NULL;
/*通過硬體抽象層定義的硬體通路接口設定硬體寄存器val的值*/
static void hello_setVal (JNIEnv*
env, jobject clazz, jint value) {
int val = value;
LOGI("Hello JNI: set value %d to device.", val);
if(!hello_device) {
LOGI("Hello JNI: device is not open.");
return;
}
hello_device->set_val(hello_device, val); //
在抽象層的open中定義
}
/*通過硬體抽象層定義的硬體通路接口讀取硬體寄存器val的值*/
static jint hello_getVal(JNIEnv* env, jobject clazz) {
int val = 0;
return val;
hello_device->get_val(hello_device, &val);
LOGI("Hello JNI: get value %d from device.", val);
return val;
}
/*通過硬體抽象層定義的硬體子產品打開接口 打開硬體裝置*/
static inline int hello_device_open (const hw_module_t* module,
struct hello_device_t** device) {
return module->methods->open(module, HELLO_HARDWARE_MODULE_ID, (struct hw_device_t**)device);
/*通過硬體子產品ID來加載指定的硬體抽象層子產品并打開硬體*/
static jboolean hello_init (JNIEnv* env, jclass clazz) {
hello_module_t* module;
LOGI("Hello JNI: initializing......");
/* 加載子產品ID為HELLO_HARDWARE_MODULE_ID的硬體抽象層子產品,
Android硬體抽象層會根據HELLO_HARDWARE_MODULE_ID的值
* 在Android系統的/system/lib/hw目錄中找到相應的子產品,然後加載起來,并且傳回hw_module_t接口給調用者使用。
*/
if ( hw_get_module ( HELLO_HARDWARE_MODULE_ID,
(const struct hw_module_t**)&module ) == 0 ) {
LOGI("Hello JNI: hello Stub found.");
if(hello_device_open(&(module->common), &hello_device)
== 0) {
LOGI("Hello JNI: hello device is open.");
return 0;
}
LOGE("Hello JNI: failed to open hello device.");
return -1;
}
LOGE("Hello JNI: failed to get hello stub module.");
return -1;
}
/*JNI方法表*/
static const JNINativeMethod method_table[
] = {
{"init_native", "()Z", (void*)hello_init},
{"setVal_native", "(I)V", (void*)hello_setVal},
{"getVal_native", "()I", (void*)hello_getVal},
};
/*注冊JNI方法*/
int register_android_server_HelloService(JNIEnv *env) {
return jniRegisterNativeMethods(env, "com/android/server/HelloService",
method_table, NELEM(method_table) );
// 必須對應HelloService所在的包的路徑
在Android系統初始化時,使其自動加載該JNI方法調用表
----------------------------------------------------------------------------
修改同目錄下的onload.cpp檔案,
(1)在namespace
android增加 register_android_server_HelloService函數聲明:
namespace android {
..............................................................................................
int register_android_server_HelloService(JNIEnv *env);
};
(2)在JNI_onLoad 增加 register_android_server_HelloService函數調用:
extern "C" jint JNI_onLoad(JavaVM* vm, void* reserved)
{
.................................................................................................
register_android_server_HelloService(env);
}
(3)修改同目錄下的Android.mk檔案,在 LOCAL_SRC_FILES變量 中增加一行:
LOCAL_SRC_FILES:= \
com_android_server_AlarmManagerService.cpp \
com_android_server_BatteryService.cpp \
com_android_server_InputManager.cpp \
com_android_server_LightsService.cpp \
com_android_server_PowerManagerService.cpp \
com_android_server_SystemServer.cpp \
com_android_server_UsbService.cpp \
com_android_server_VibratorService.cpp \
com_android_server_location_GpsLocationProvider.cpp \
com_android_server_HelloService.cpp /
onload.cpp
最後編譯
mmm frameworks/base/services/jni
這樣,重新打包的system.img鏡像檔案就包含我們剛才編寫的JNI方法了,
我們可以通過Android系統的Application Frameworks層提供的硬體服務HelloService來調用這些JNI方法,進而調用低層的硬體抽象層接口去通路硬體了。
五:提供Java通路硬體服務接口
Linux核心層、硬體抽象層和運作時庫層提供的自定義硬體服務接口,這些接口都是通過C或者C++語言來實作的。
以下,我們将介紹如何在Android系統的Application Frameworks層提供Java接口的硬體服務。
(為什麼用代理?)
在Android系統中,硬體服務一般是運作在一個獨立的程序中為各種應用程式提供服務。是以,調用這些硬體服務的應用程式與這些硬體服務之間的通信需要通過代理來進行。為此,我們要先定義好通信接口。
(1)進入到frameworks/base/core/java/android/os目錄,新增IHelloService.aidl接口定義檔案:
cd frameworks/base/core/java/android/os
vi IHelloService.aidl
IHelloService.aidl定義了IHelloService接口:
package android.os;
interface IHelloService{
void setVal (int val);
int getVal ( );
}
該接口主要提供了裝置擷取硬體寄存器val的值的功能,分别通過setVal和getVal兩個函數來實作。
(2)傳回到frameworks/base目錄,打開Android.mk檔案,修改LOCAL_SRC_FILES變量的值,增加IHelloService.aidl源檔案:
core/java/android/os/IHelloService.aidl /
(3)編譯IHelloService.aidl接口:
mmm frameworks/base
這樣,就會根據IHelloService.aidl生成相應的IHelloService.Stub接口。
(4)進入到frameworks/base/services/java/com/android/server目錄,新增HelloService.java檔案:
package com.android.server;
import android.content.Context;
import android.os.IHelloService;
import android.util.Slog;
public class HelloService extends IHelloService . Stub
private static final String TAG = "HelloService";
HelloService() {
init_native();
public void setVal(int val) {
setVal_native(val);
}
public int getVal() {
return getVal_native();
/* HelloService主要是通過調用JNI方法init_native、setVal_native和getVal_native來提供硬體服務 */
private static native boolean init_native();
private static native void setVal_native(int val);
private static native int getVal_native();
(5) 修改同目錄的SystemServer.java檔案,在ServerThread::run函數中增加加載HelloService的代碼:
@Override
public void run() {
....................................................................................
try {
Slog.i(TAG, "Hello Service");
ServiceManager. addService("hello", new HelloService());
} catch (Throwable e) {
Slog.e(TAG, "Failure starting Hello Service", e);
}
......................................................................................
}
(6)編譯HelloService和重新打包system.img:
mmm frameworks/base/services/java
make snod
這樣,重新打包後的system.img系統鏡像檔案就在Application Frameworks層中包含了我們自定義的硬體服務HelloService了,并且會在系統啟動的時候,自動加載HelloService。
這時,應用程式就可以通過Java接口來通路Hello硬體服務了。
六:Java調用執行個體
public class Hello extends Activityimplements OnClickListener {
private final static String LOG_TAG ="shy.luo.renju.Hello";
private IHelloService helloService = null;
private EditText valueText = null;
private Button readButton = null;
private Button writeButton = null;
private Button clearButton = null;
/** Called when the activity is first created. */
@Override
public void onCreate(Bundle savedInstanceState) {
super.onCreate(savedInstanceState);
setContentView(R.layout.main);
// IHelloService接口定義在android.os.IHelloService中,
helloService=
IHelloService.Stub.asInterface( // 轉換為IHelloService接口
ServiceManager.getService("hello")); // 獲得HelloService
// 服務名字“hello”是系統啟動時加載HelloService時指定
valueText = (EditText)findViewById(R.id.edit_value);
readButton = (Button)findViewById(R.id.button_read);
writeButton = (Button)findViewById(R.id.button_write);
clearButton = (Button)findViewById(R.id.button_clear);
readButton.setOnClickListener(this);
writeButton.setOnClickListener(this);
clearButton.setOnClickListener(this);
Log.i(LOG_TAG, "Hello Activity Created");
}
public void onClick(View v) {
if(v.equals(readButton)) {
try {
int val =helloService.getVal();
String text = String.valueOf(val);
valueText.setText(text);
} catch (RemoteException e) {
Log.e(LOG_TAG, "RemoteException while reading value from device.");
}
}
else if(v.equals(writeButton)) {
String text =valueText.getText().toString();
int val =Integer.parseInt(text);
helloService.setVal(val);
Log.e(LOG_TAG, "RemoteException while writing value to device.");
else if(v.equals(clearButton)) {
String text = "";
valueText.setText(text);
}
![Java String.format方法的簡單使用[圖]](data:image/gif;base64,R0lGODlhAQABAIAAAP///wAAACwAAAAAAQABAAACAkQBADs=)