原文: WPF編遊戲系列 之九 物品清單再優化 在“ 第三篇 ”和“ 第四篇
”中通過使用者控件和資料綁定功能對物品清單進行一些優化減少了部分C#代碼,但感覺使用Grid設定物品顯示位置實在是太繁瑣,而且還要為n個物品重複建立新UserControl很浪費資源,是以決定使用ListBox、UserControl和DataTemplate來對物品清單再優化下,讓XAML多幹些活而不是總用C#調用UI,這樣日後維護起來也友善。
1. 替換掉原來的Gird,将ListBox加入到Window1.xaml中。
<ListBox x:Name="queryList" ItemsPanel="{StaticResource queryListBoxStyle}"
         ScrollViewer.HorizontalScrollBarVisibility="Disabled"
         BorderThickness="0" Background="{Binding WinBackground, Mode=OneWay}"
         ItemContainerStyle="{StaticResource listBoxItemStyle}"></ListBox>
由于ListBox預設情況下Item是豎直排列,在點選某ListBoxItem後背景色會變藍,該效果在程式中很不和諧,決定重新定義ListBox和ListBoxItem樣式,将其寫入Window.Resources,再賦給在上面的ItemsPanel和ItemContainerStyle。
<ItemsPanelTemplate x:Key="queryListBoxStyle">
<!-- 将Item水準顯示,Width可以控制每行顯示的個數 -->
<WrapPanel IsItemsHost="True" Orientation="Horizontal" Width="920" />
</ItemsPanelTemplate>
<Style x:Key="listBoxItemStyle" TargetType="ListBoxItem">
<Setter Property="OverridesDefaultStyle" Value="true"/>
<Setter Property="Template">
<Setter.Value>
<ControlTemplate TargetType="ListBoxItem">
<Border Name="Border" Padding="2">
<ContentPresenter />
</Border>
</ControlTemplate>
</Setter.Value>
</Setter>
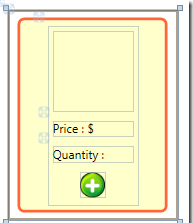
</Style> 2. 物品控件也需要進一步更新,使用資料綁定使其自己去找資料源。其中goodsBuy_MouseLeftButtonDown事件用于增加物品數量,詳情可下載下傳源代碼。
<UserControl x:Class="XMarket.GoodsElement"
    xmlns="http://schemas.microsoft.com/winfx/2006/xaml/presentation"
    xmlns:x="http://schemas.microsoft.com/winfx/2006/xaml"
    Height="210" Width="170">
    <Grid>
        <Border BorderThickness="3" CornerRadius ="5" Height="195" Width="150"
                Background="#FFFFCC" BorderBrush="#FF6633">
            <StackPanel Orientation="Vertical" Margin="5"
HorizontalAlignment="Center">
                <Image x:Name="goodsImage" Height="80" Width="80" Margin="5"
Source="{Binding GoodsImage}"></Image>
                <StackPanel Orientation="Horizontal" Margin="5">
                    <TextBlock Text="Price : $"></TextBlock>
                    <TextBlock x:Name="goodsPrice" Text="{Binding GoodsPrice}"></TextBlock>
                </StackPanel>
                <StackPanel Orientation="Horizontal" Margin="5">
                    <TextBlock x:Name="buyInfo" Text="Quantity : "></TextBlock>
                    <TextBlock x:Name="goodsQty" Text="{Binding GoodsQty}"></TextBlock>
                </StackPanel>
                <Image x:Name="goodsBuy" Source="image/add.png" Height="25" Width="25"
                       Cursor="Hand" Margin="5" Tag="{Binding GoodsBuyImageTag}"
                       MouseLeftButtonDown="goodsBuy_MouseLeftButtonDown">
                    <Image.ToolTip>Add Quantity</Image.ToolTip>
                </Image>
            </StackPanel>
        </Border>
    </Grid>
</UserControl>
效果圖:
3. 放物品的ListBox和物品控件(GoodsElement.xaml)都做好了,下面就要從資料庫(Access)讀取物品資料,将它們加到控件中并顯示在ListBox中。首先在Window.Resources中為物品清單定義一個資料模闆(DataTemplate),讓物品控件知道應該去哪找它的資料。
<DataTemplate DataType="{x:Type local:GoodsInfo}">

     <local:GoodsElement></local:GoodsElement>
</DataTemplate>
資料模闆搞定了,下面需要讓C# 開始工作,把資料取出來賦給物品控件。首先要建立一個物品的Collection這樣可以将GoodsInfo類的資料放入其中。
public ObservableCollection<GoodsInfo> Goods = new ObservableCollection<GoodsInfo>(); 在判斷使用者點選了“My Shop”圖示後,C#就要去取數了。
Goods.Clear();
Image image = sender as Image;
string imageTag = image.ToolTip.ToString();

if (imageTag == "My Shop")
{
   //設定清單顔色
   wColor.WinBorderBrush = "#FF6633";
   wColor.WinBackground = "#FFCC66";
   queryBorder.DataContext = wColor;
   //取數
   object[,] res = dbCon.Data_Query("select count(*) from goods where typeid=1 and available=1",
                                    "select * from goods where typeid=1 and available=1");
   int num = res.Length / 7;

   for (int i = 0; i < num; i++)
   {
      //将資料傳給goodsinfo
GoodsInfo goodsinfo = new GoodsInfo
      {
          GoodsImage = "image/shop/" + res[i, 2].ToString(),
          GoodsPrice = res[i, 6].ToString(),
          GoodsQty = res[i, 5].ToString(),
          GoodsBuyImageTag = res[i, 0].ToString()
      };
//将goodsinfo加到Goods
      Goods.Add(goodsinfo);
   }
//将Goods加入ListBox
   queryList.ItemsSource = Goods;
}
”的3.2.1和3.2.2兩部分代碼加起來幹的活繼續上面幾行就搞定了,這樣在以後的維護中就需要修改那麼多C#程式,隻需調整相應的XAML和類即可。同時也感謝
顔昌鋼提出的很多建議,關于你談到如果物品數量很多在加載界面時會不會産生延遲,我測試了一下的确會有這個情況發生,随後我将物品的圖檔先拿掉再測試,發現延遲現象沒有了,說明界面再加載大量圖檔時會花上一些時間。由于圖檔都是256*256的,實際在程式中隻用80*80,有時間将圖檔尺寸處理後再測試下加載速度。
4. 部分源代碼下載下傳
![七牛雲-C#SDK-上傳-前期準備[圖]](data:image/gif;base64,R0lGODlhAQABAIAAAP///wAAACwAAAAAAQABAAACAkQBADs=)