<b>Neo4j</b><b>資料庫簡介</b>
Neo4j 是一個NoSQL的圖形資料庫(Graph Database)。Neo4j使用圖(graph)相關的概念來描述資料模型,把資料儲存為圖中的節點以及節點之間的關系。很多應用中資料之間的關系,可以很直接地使用圖中節點和關系的概念來模組化。對于這樣的應用,使用 Neo4j 來存儲資料會非常的自然,要優于使用關系資料庫。官方文檔對Neo4j的介紹如下所示:
Neo4j is the world’s leading graph database. It is built from the ground up to be a graph database,
meaning that its architecture is designed for optimizing fast management, storage, and traversal of
nodes and relationships. Therefore, relationships are said to be first class citizens in Neo4j. An
operation known in the relational database world as a join exhibits performance which degrades
exponentially with the number of relationships. The corresponding action in Neo4j is performed as
navigation from one node to another; an operation whose performance is linear.
Neo4j分社群版(Community Edition)和企業版(Enterprise Edition),社群版本為免費版本。目前的最新版本為Neo4j 3.1。官方網址為https://neo4j.com/ Neo4j的相關文檔URL位址如下
<a href="https://neo4j.com/docs/developer-manual/3.1/">https://neo4j.com/docs/developer-manual/3.1/</a>
<a href="https://neo4j.com/docs/operations-manual/3.1/">https://neo4j.com/docs/operations-manual/3.1/</a>
<a href="https://neo4j.com/docs/developer-manual/3.1/cypher/">https://neo4j.com/docs/developer-manual/3.1/cypher/</a>
<b>System requirements</b>
<b></b>
Neo4j的安裝對硬體、系統等有一些要求,例如CPU、Memory、Disk、Filesystem、Software等
CPU
關于CPU,最低要求是Itel Core i3 推薦使用Intel Core i7 或 IBM POWER 8
Memory
關于Memory,最低要求是2GB, 推薦是16-32GB 或更多。 越大的記憶體允許處理越大的圖,但必須正确配置,以免破垃圾收集壞性操作。
Disk
除了Disk的容量,Disk的性能對Neoj4的影響非常大,Neo4j的工作負載傾向于随機讀。選擇平均尋址時間低的存儲,例如SSD
最低要求 10GB SATA
推薦配置 SSD w/SATA
FileSystem
最低要求 ext4(或類似的)
推薦配置 ext4、ZFS
Software
Java
必須安裝OpenJDK 8 或 Oracle Java 8
Operation Sytem
Linux(Ubuntu, Debian) ,但是我的測試環境為Red Hat Enterprise Linux Server release 6.6,暫時還沒有發現什麼問題。
Architectures
X86 或 OpenPower(POWER8)
<b></b>
<b>Neo4j</b><b>安裝步驟:</b>
下面簡單介紹Linux下Neo4j 3.1的安裝步驟,安裝測試環境為Red Hat Enterprise Linux Server release 6.6, Debian下安裝具體參考文檔,這裡不做介紹。
1:下載下傳Neo4j 3.1的安裝包,去官方網址注冊下載下傳即可。選擇特定的版本。下載下傳位址 https://neo4j.com/download/
2:檢查上面System Requirement,安裝JDK 8
編輯/etc/profile檔案,添加下面配置資訊,然後執行source /etc/profile指令使之生效。
3:建立一個使用者neo4j,用來管理Neo4j 。當然這不是必須的。也可以是其它賬号或root賬号。
4:然後切換到neo4j賬戶下,解壓neo4j-community-3.1.1-unix.tar.gz包
配置.bash_profile檔案,增加下面一行,并使之生效。
另外,修改配置檔案/etc/security/limits.conf ,增加下面配置。
The usual default of 1024 is often not enough. This is especially true when many indexes are used or a
server installation sees too many connections. Network sockets count against the limit as well. Users
are therefore encouraged to increase the limit to a healthy value of 40 000 or more, depending on
usage patterns. It is possible to set the limit with the ulimit command, but only for the root user, and
it only affects the current session. To set the value system wide, follow the instructions for your
platform.
編輯/etc/pam.d/su 在配置檔案裡面增加選項。
session optional pam_xauth.so
<b>Neo4j</b><b>服務關閉啟動</b>
Neo4j服務的啟動、關閉如下所示
<a href="http://images2015.cnblogs.com/blog/73542/201703/73542-20170313232211682-1146381169.png"></a>
如果不設定Neo4j的配置檔案,隻能從本機通路Neo4J的web控制台(http://localhost:7474/) Neo4j的控制檔案一般位于<neo4jhome>/conf/neo4j.conf,例如我測試環境為/home/neo4j/neo4j-community-3.1.1/conf
Neo4j的配置檔案将單獨再做詳細介紹。如果我們需要遠端通路Neo4j的Web控制台,我們需要修改neo4j.conf配置檔案的參數,如下截圖所示:
<a href="http://images2015.cnblogs.com/blog/73542/201703/73542-20170313232212463-1771317534.png"></a>
當然,還需要配置iptables,開放7474端口号,否則你還是無法遠端通路Web控制台。
-A INPUT -p tcp -m state --state NEW -m tcp --dport 7474 -j ACCEPT
然後你就可以從遠端http://xxx.xxx.xxx.xxx:7474 通路Neo4j的Web控制台了, 第一次登陸會提示你輸入初始化密碼并提醒你修改密碼。預設的密碼為neo4j. 如果允許遠端通路,切記修改初始化密碼。安全非常重要。
<a href="http://images2015.cnblogs.com/blog/73542/201703/73542-20170313232213213-217395163.png"></a>
<a href="http://images2015.cnblogs.com/blog/73542/201703/73542-20170313232213963-377667280.png"></a>
<b>簡單的測試案例</b>
我們先建立一個簡單的父子關系圖。用來簡單示範一下圖形資料庫的使用。如下所示。
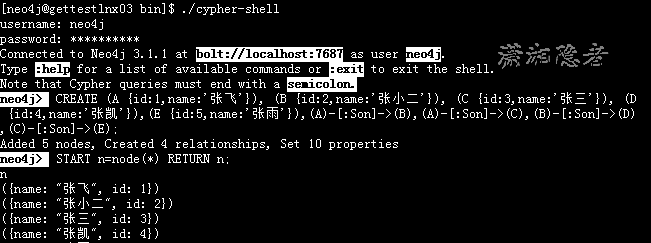
如果你在Web控制台執行指令,就能得到如下一個圖形關系。如下所示。
<a href="http://images2015.cnblogs.com/blog/73542/201703/73542-20170313232215588-300271339.png"></a>
<b>參考資料:</b>
https://neo4j.com/docs/developer-manual/3.1/
![mybatis_入門程式Mybatis入門[圖]](data:image/gif;base64,R0lGODlhAQABAIAAAP///wAAACwAAAAAAQABAAACAkQBADs=)