@RequestParam,你一定見過;@PathVariable,你肯定也知道;@QueryParam,你怎麼會不曉得?!還有你熟悉的他 (@CookieValue)!她(@ModelAndView)!它(@ModelAttribute)!沒錯,僅注解這塊,spring mvc就為你打開了五彩斑斓的世界。來來來,不要興(mi)奮(hu),坐下來,我們好好聊聊這麼些個注解兄弟們~~~(wait, 都沒有聽過? 好,來,你坐前排,就你!)
一、spring mvc如何比對請求路徑——“請求路徑哪家強,RequestMapping名遠揚”
@RequestMapping是用來映射請求的,比如get請求,post請求,或者REST風格與非REST風格的。 該注解可以用在類上或者方法上,如果用于類上,表示該類中所有方法的父路徑。
SpringMVCTest.java中加入測試方法:
1
2
3
4
5
<code>@RequestMapping</code><code>(</code><code>"/testRequestMapping"</code><code>)</code>
<code>public</code> <code>String testRequestMapping(){</code>
<code> </code><code>System.out.println(</code><code>"testRequestMapping"</code><code>);</code>
<code> </code><code>return</code> <code>SUCCESS;</code>
<code>}</code>
注意這裡 在方法級别上添加了注解@RequestMapping(“/testRequestMapping”), 表示可以通過“/testRequestMapping”相對路徑來定位到這個方法,同時我們在SpringMVCTest類上也放了一個類級别的 RequestMapping的注解:
<code>@RequestMapping</code><code>(</code><code>"/springmvc"</code><code>)</code>
<code>@Controller</code>
<code>public</code> <code>class</code> <code>SpringMVCTest {</code>
注意這裡 還添加了一個@Controller的注解,該注解在SpringMVC 中,負責處理由DispatcherServlet 分發的請求,它把使用者請求 的資料經過業務處理層處理之後封裝成一個Model ,然後再把該Model 傳回給對應的View 進行展示。至此有了一個 “springmvc/testRequestMapping”這樣的路徑,我們就能夠定位到testRequestMapping這個方法上,然後執行 方法内的方法體。
再補充一點,RequestMapping可以實作模糊比對路徑,比如:
?:比對一個字元
*:比對任意字元
**:比對多層路徑
/springmvc/**/lastTest 就可以比對/springmvc/firstTest/secondTest/lastTest這樣的路徑
二、spring mvc如何擷取請求的參數——“八仙過海,各顯神通”
1. @PathVariable
該注解用來映射請求URL中綁定的占位符。通過@PathVariable可以将URL中占位符的參數綁定到controller處理方法的入參中,沒聽懂?看例子:
<code>@RequestMapping</code><code>(</code><code>"/testPathVariable/{id}"</code><code>)</code>
<code>public</code> <code>String testPathVariable(</code><code>@PathVariable</code><code>(value=</code><code>"id"</code><code>) Integer id){</code>
<code> </code><code>System.out.println(</code><code>"testPathVariable:"</code> <code>+ id);</code>
在index.jsp中我們添加一條連接配接,用來觸發一個請求:
<code><</code><code>a</code> <code>href="springmvc/testPathVariable/1">testPathVariable</</code><code>a</code><code>><</code><code>br</code><code>/><</code><code>br</code><code>/></code>
我們可以 看到這裡有一個超連結,點選後會進入到springmvc/testPathVariable/1對應的controller處理的方法中,那我們現在就 是想擷取到這個請求參數中的“1”,是以在testPathVariable方法上加入“/testPathVariable/id”,關于
{id}的具體對應在該方法的參數中,通過@PathVariable(value="id")來聲明要接收的請求參數,并通過Integer id來綁定和接收。通過該種方式,我們就可以得到前台頁面請求的參數“1”。
2. @RequestParam
該注解也是用來擷取請求參數的。那麼該注解和@PathVariable有何不同呢? 還是看例子:
在SpringMVCTest中添加方法
<code>@RequestMapping</code><code>(value=</code><code>"/testRequestParam"</code><code>)</code>
<code>public</code> <code>String testRequestParam(</code><code>@RequestParam</code><code>(value=</code><code>"username"</code><code>) String username,</code><code>@RequestParam</code><code>(value=</code><code>"age"</code><code>, required=</code><code>false</code><code>, defaultValue=</code><code>"0"</code><code>)</code><code>int</code> <code>age){</code>
<code> </code><code>System.out.println(</code><code>"testRequestParam"</code> <code>+</code><code>" username:"</code> <code>+ username +</code><code>" age:"</code> <code>+age);</code>
在index.jsp添加超連結标簽
<code><</code><code>a</code> <code>href="springmvc/testRequestParam?username=jackie&age=12">testRequestParam</</code><code>a</code><code>><</code><code>br</code><code>/><</code><code>br</code><code>/></code>
點選頁面 上的超連結,就會比對controller中testRequestParam方法上的RequestMapping的路徑。注意在該方法中,我們通過 @RequestParam這個注解聲明了兩個變量,用來擷取請求中query所帶的參數值,一個是username後的值,另一個是age後面的值。
看到這 裡,你大概已經明白了@PathVariable和@RequestParam之間的一些差別了吧,對于像 “springmvc/testPathVariable/1”這樣的請求,我們通過@PathVariable來綁定請求的參數;而對于類似 “springmvc/testRequestParam?username=jackie&age=12”這樣的請求參數是以鍵值對出現的,我 們通過@RequestParam來擷取到如username或age後的具體請求值。
與RequestParam有異曲同工用法的還有QueryParam,因其不是spring mvc架構内的注解,這裡不再詳述。
對于不同的請求類型和請求方式,spring mvc都有一套針對的解決方案,下面我們來看看當下比較流行的REST風格的請求是啥樣的——利用REST風格實作增删改查。
在SpringMVCTest類中自下而上的實作了查(get)增(post)删(delete)和改(put)的接口
6
7
8
9
10
11
12
13
14
15
16
17
18
19
20
21
22
23
<code>@RequestMapping</code><code>(value=</code><code>"/testRest/{id}"</code><code>, method=RequestMethod.PUT)</code>
<code>public</code> <code>String testRestPut(</code><code>@PathVariable</code><code>(value=</code><code>"id"</code><code>) Integer id){</code>
<code> </code><code>System.out.println(</code><code>"test put:"</code> <code>+ id);</code>
<code> </code>
<code>@RequestMapping</code><code>(value=</code><code>"/testRest/{id}"</code><code>, method=RequestMethod.DELETE)</code>
<code>public</code> <code>String testRestDelete(</code><code>@PathVariable</code><code>(value=</code><code>"id"</code><code>) Integer id){</code>
<code> </code><code>System.out.println(</code><code>"test delete:"</code> <code>+ id);</code>
<code>@RequestMapping</code><code>(value=</code><code>"/testRest"</code><code>, method=RequestMethod.POST)</code>
<code>public</code> <code>String testRest(){</code>
<code> </code><code>System.out.println(</code><code>"test post"</code><code>);</code>
<code>@RequestMapping</code><code>(value=</code><code>"/testRest/{id}"</code><code>, method=RequestMethod.GET)</code>
<code>public</code> <code>String testRest(</code><code>@PathVariable</code><code>(value=</code><code>"id"</code><code>) Integer id){</code>
<code> </code><code>System.out.println(</code><code>"test get:"</code> <code>+ id);</code>
那麼前台界面如何實作呢,相對應的順序為
<code><</code><code>form</code> <code>action="springmvc/testRest/1" method="post"></code>
<code> </code><code><</code><code>input</code> <code>type="hidden" name="_method" value= "PUT"/></code>
<code> </code><code><</code><code>input</code> <code>type="submit" value="testRestPut"/></code>
<code></</code><code>form</code><code>><</code><code>br</code><code>/><</code><code>br</code><code>/></code>
<code> </code><code><</code><code>input</code> <code>type="hidden" name="_method" value="DELETE"/></code>
<code> </code><code><</code><code>input</code> <code>type="submit" value="TestRest DELETE"/></code>
<code></</code><code>form</code><code>><</code><code>br</code><code>><</code><code>br</code><code>></code>
<code><</code><code>form</code> <code>action="springmvc/testRest" method="post"></code>
<code> </code><code><</code><code>input</code> <code>type="submit" value="testRestPost"></code>
<code><</code><code>a</code> <code>href="springmvc/testRest/1">testRest</</code><code>a</code><code>><</code><code>br</code><code>/><</code><code>br</code><code>/></code>
除此之外,我們還需要在配置檔案web.xml中添加支援将post轉化為delete和put請求的聲明
<code><!-- 配置HiddenHttpMethodFilter:可以把POST請求轉為DELETE或POST請求 --></code>
<code><</code><code>filter</code><code>></code>
<code> </code><code><</code><code>filter-name</code><code>>HiddenHttpMethodFilter</</code><code>filter-name</code><code>></code>
<code> </code><code><</code><code>filter-class</code><code>>org.springframework.web.filter.HiddenHttpMethodFilter</</code><code>filter-class</code><code>></code>
<code></</code><code>filter</code><code>></code>
<code><</code><code>filter-mapping</code><code>></code>
<code> </code><code><</code><code>url-pattern</code><code>>/*</</code><code>url-pattern</code><code>></code>
<code></</code><code>filter-mapping</code><code>></code>
如你所見,這裡的改和删都是通過post的方式發送出去的,因為這裡不支援put和delete來直接實作删改,而是通過借助post方式,并悄悄的帶上一塊令牌hidden類型的input标簽來告訴背景我在前台發送的實際上是删和改的請求。
那麼這個過程時如何實作的呢,為什麼加上
<code><</code><code>input</code> <code>type="hidden" name="_method" value="DELETE"/></code>
這塊令牌,人家背景就要買你的賬呢。那我們就來看看後來是如何買賬的吧。
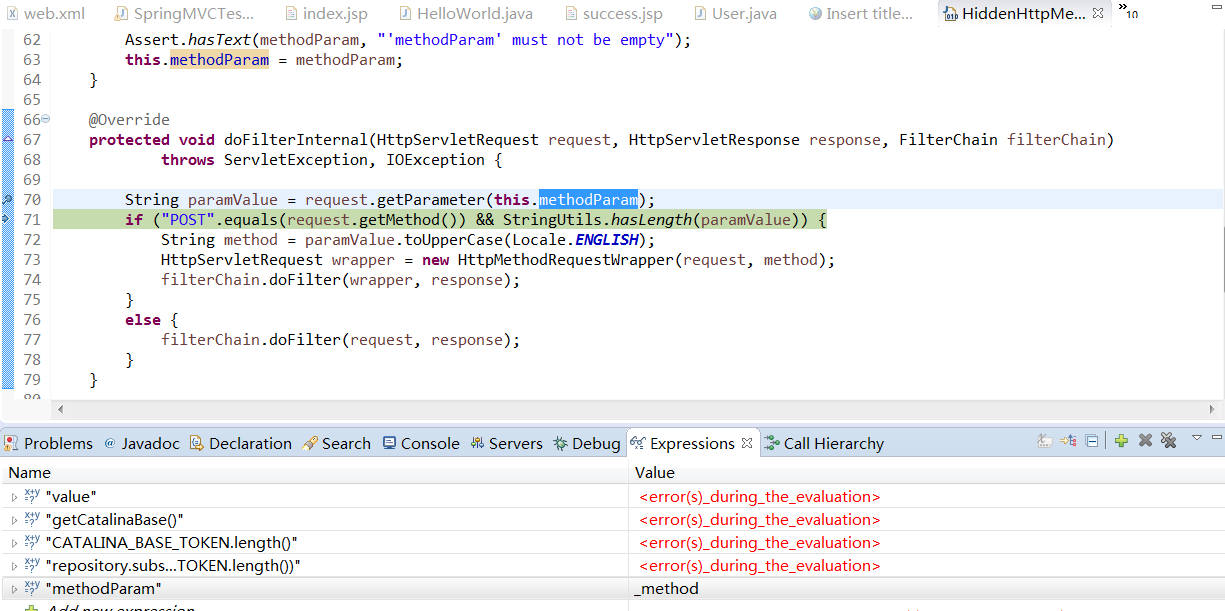
歸根到底 還是得益于添加在web.xml中的HiddenHttpMethodFilter這個類,在該類中有一個方法doFilterInternal, 通過調試我們可以發現其中端倪,啟動tomcat(不能是tomcat8),點選delete操作對應的input标簽,進入調試界面,我們可以看到:

通過 request.getParameter(this.methodParam)在request域中得到 this.methodParam(_method)的值,對應于删除delete的操作,在頁面上,delete中聲明了一個hidden的 input,其中name就是“_method”,value就是DELETE,是以這裡得到的paramValue的值為“DELETE”
繼續執行,可以看到通過request.getMethod的取值是否與“POST”相等,顯然,這裡是相等,因為我們在前台頁面中對于delete的操作請求中method聲明為post方式
再往後就是将擷取到的請求方法封裝HttpServletRequest中,完成後續的處理。這裡我們應該明白了為什麼前台要加上那樣一個hidden的input了。
小坑:這裡注意啟動不能是tomcat8,而隻能是比8小的版本,如7或6等,下圖展示了用tomcat的報錯資訊和用7的成功響應:
總結下,如何發送put和delete的請求:
在web.xml中配置HiddenHttpMethodFilter
發送post請求
請求中是個隐藏域,name為”_mothod”,value為put或delete
最後再來說下@CookieValue這個注解。
3. @CookieValue
該注解也是差不多的套路,也是一種映射,映射的是一個Cookie值。
在我們發送一個請求時,我們可以看到請求中攜帶了一些cookie值
比如這裡的JSESSIONID或者Path等。現在我們就寫個方法用于擷取Cookie值。
在SpringMVCTest中添加
<code>@RequestMapping</code><code>(value=</code><code>"/testCookieValue"</code><code>)</code>
<code>public</code> <code>String testCookieValue(</code><code>@CookieValue</code><code>(</code><code>"JSESSIONID"</code><code>) String cookieValue){</code>
<code> </code><code>System.out.println(</code><code>"testCookieValue: "</code> <code>+ cookieValue);</code>
index.jsp界面上添加連結
<code><</code><code>a</code> <code>href="springmvc/testCookieValue">testCookieValue</</code><code>a</code><code>><</code><code>br</code><code>/><</code><code>br</code><code>/></code>
這樣我們就可以得到類似“testCookieValue: 1410F05C9ADD84E8659C2AC79E8CC666”這樣的結果。
至此,我們介紹了
@RequestMapping的用法
擷取請求參數的@PathVariable、@RequestParam的用法
介紹如何實作REST風格的請求,并分析了post如何轉化為delete和put請求
介紹了@CookieValue的用法