1.实验拓扑图如下所示:
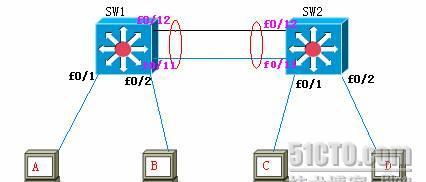
2.建立如图环境,测试a、b、c、d的连通性。
3.配置f0/11和f/0/12为通道,验证配置,查看是否正常。
4.配置vtp域,域名为cisco,密码为xxx,
sw1为服务器,sw2为客户机。
查看关键信息。
5.在sw1上建立vlan2包含a, 建立vlan3包含b。
6.在sw2上查看是否已有vlan2、vlan3。如果没有,给出解决方法。是否可以人工建立vlan4、vlan5,同样vlan2包含c, 建立vlan3包含d。测试ac、bd的连通性。
7.启用修剪,验证配置。
8.在中继中去除vlan3的修剪,查看配置并说明修剪意义。
<b>步骤</b><b>1</b>
<b> </b><b>删除交换机配置和</b><b>vlan.dat</b><b>文件并重启设备,按照实验拓扑图连接实验的线缆。</b><b></b>
<b>switch#</b>
<b>del</b>
<b> flash:vlan.dat</b>
<b>delete filename [vlan.dat]?</b>
<b>delete flash:vlan.dat? [confirm]</b>
<b>switch#</b><b>erase startup-config</b>
<b>erasing the nvram filesystem will remove all files! continue? [confirm]</b>
<b>[ok]</b>
<b>erase of nvram: complete</b>
<b>switch#</b><b>reload</b><b></b>
<b>步骤</b><b>2</b>
<b> </b><b>给各个交换机命名</b><b>.</b>
<b> </b><b>switch></b><b>enable</b>
<b> </b><b>switch#</b><b>config t</b>
<b> switch(config)# </b><b>hostname sw1</b>
<b> sw1(config)#</b>
<b>步骤</b><b>3</b>
<b>测试连通性</b><b>,</b><b>结果如下所示</b><b>:</b>
<b>在</b><b>a</b><b>上用</b><b>ping</b><b>命令测试和</b><b>b</b><b>的连通性</b><b>:</b>
<b>c:\documents and settings\administrator>ping 1.1.1.4</b>
<b></b>
<b>pinging 1.1.1.4 with 32 bytes of data:</b>
<b>reply from 1.1.1.4: bytes=32 time<10ms ttl=128</b>
<b>在</b><b>a</b><b>上用</b><b>ping</b><b>命令测试和</b><b>c</b><b>的连通性</b><b>:</b>
<b>c:\documents and settings\administrator>ping 1.1.1.1</b>
<b>pinging 1.1.1.1 with 32 bytes of data:</b>
<b>reply from 1.1.1.1: bytes=32 time<10ms ttl=128</b>
<b>在</b><b>a</b><b>上用</b><b>ping</b><b>命令测试和</b><b>d</b><b>的连通性</b><b>:</b>
<b>c:\documents and settings\administrator>ping 1.1.1.2</b>
<b>pinging 1.1.1.2 with 32 bytes of data:</b>
<b>reply from 1.1.1.2: bytes=32 time<10ms ttl=128</b>
<b>这里连通由于2950</b><b>交换机默认是中继,不做详细介绍:</b>
<b>步骤</b><b>4</b>
<b> </b><b>配置</b><b>sw1</b><b>将</b><b>fa0/11</b><b>、和</b><b>0/12</b><b>端口组合为一个逻辑信道:</b><b></b>
<b>sw1(config)#interface range fastethernet0/11 - 12</b>
<b>sw1(config-if-range)#channel-group 1 mode on</b>
<b>creating a port-channel interface port-channel 1</b>
<b>配置</b><b>sw2</b><b>将</b><b>fa0/11</b><b>、和</b><b>0/12</b><b>端口组合为一个逻辑信道:</b><b></b>
<b>sw2(config)#interface range fastethernet0/11 - 12</b>
<b>sw2(config-if-range)#channel-group 1 mode on</b>
<b>sw2(config-if-range)#</b>
<b>使用</b><b>show etherchannel summary</b><b>命令检查快速以太通道连接:</b><b></b>
<b>sw1#show etherchannel 1 summary</b>
<b>flags: d - down p - in port-channel</b>
<b> i - stand-alone s - suspended</b>
<b> h - hot-standby (lacp only)</b>
<b> r - layer3 s - layer2</b>
<b> u - unsuitable for bundling</b>
<b> u - in use f - failed to allocate aggregator</b>
<b> d - default port</b>
<b>number of channel-groups in use: 1</b>
<b>number of aggregators: 1</b>
<b>group port-channel protocol ports</b>
<b>------+-------------+-----------+-----------------------------------------------</b>
<b>1 po1(su) - fa0/11(pd) fa0/12(p)</b>
<b>sw2#show etherchannel 1 summary</b>
<b> u - in use f - failed to allocate aggregator</b>
<b>1 po1(su) - fa0/11(pd) fa0/12(p)</b>
<b>步骤</b><b>5</b>
<b> </b><b>在</b><b>sw1</b><b>上配置</b><b>vtp</b><b>域</b><b>cisco</b><b>并创建名为</b><b>vlan 10</b><b>和</b><b>vlan 20</b><b>的</b><b>vlan</b><b>。</b><b>2950</b><b>交换机默认是</b><b>vtp</b><b>服务器模式,所以你不需要配置它。然而,如果需要的话,配置模式中启用服务器的命令是</b><b>vtp mode server</b><b>:</b><b></b>
<b>sw1(config)#vtp mode server</b>
<b>device mode already vtp server.</b>
<b>sw1(config)#vtp domain cisco</b>
<b>changing vtp domain name from null to cisco</b>
<b>sw1(config)#vtp password xxx</b>
<b>setting device vlan database password to xxx</b>
<b>sw1(config)#</b>
<b>配置</b><b>sw2</b><b>作为</b><b>vtp</b><b>客户</b><b></b>
<b>sw2(config)#vtp mode client</b>
<b>setting device to vtp client mode.</b>
<b>sw2(config)#vtp domain cisco</b>
<b>domain name already set to cisco.</b>
<b>sw2(config)#</b>
<b>使用</b><b>show vtp status</b><b>命令检查</b><b>vtp</b><b>重要信息:</b><b></b>
<b>sw1#show vtp status</b>
<b>vtp version : 2</b>
<b>configuration revision : 0</b>
<b>maximum vlans supported locally : 64</b>
<b>number of existing vlans : 5</b>
<b>vtp operating mode : server</b>
<b>vtp domain name : cisco</b>
<b>vtp pruning mode : disabled</b>
<b>vtp v2 mode : disabled</b>
<b>vtp traps generation : disabled</b>
<b>md5 digest : 0x8c 0xe8 0x23 0x13 0xc9 0xd9 0x1c 0xea</b>
<b>configuration last modified by 0.0.0.0 at 0-0-00 00:00:00</b>
<b>local updater id is 0.0.0.0 (no valid interface found)</b>
<b>sw1#</b>
<b>----------------------------------------------------------------------</b>
<b>使用</b><b>show vtp counters</b><b>命令检查</b><b>vtp</b><b>发送和接收的通告请求,汇总通告,子网通告和加入消息的条目,以及检测到的配置错误。</b><b></b>
<b>sw1#show vtp counters</b>
<b>vtp statistics:</b>
<b>summary advertisements received : 2</b>
<b>subset advertisements received : 1</b>
<b>request advertisements received : 1</b>
<b>summary advertisements transmitted : 2</b>
<b>subset advertisements transmitted : 2</b>
<b>request advertisements transmitted : 0</b>
<b>number of config revision errors : 1</b>
<b>number of config digest errors : 0</b>
<b>number of v1 summary errors : 0</b>
<b>vtp pruning statistics:</b>
<b>trunk join transmitted join received summary advts received from</b>
<b> non-pruning-capable device</b>
<b>---------------- ---------------- ---------------- ---------------------------</b>
<b>po1 0 1 0</b>
<b>sw2#show vtp status</b>
<b>vtp operating mode : client</b>
<b>md5 digest : 0x57 0x30 0x6d 0x7a 0x76 0x12 0x7b 0x40</b>
<b>sw2#</b>
<b>sw2#show vtp counters</b>
<b>summary advertisements received : 4</b>
<b>subset advertisements received : 3</b>
<b>request advertisements received : 0</b>
<b>subset advertisements transmitted : 1</b>
<b>request advertisements transmitted : 2</b>
<b>number of config revision errors : 0</b>
<b>number of config digest errors : 2</b>
<b> non-pruning-capable device</b>
<b>po1 1 0 0</b>
<b>步骤</b><b>6</b>
<b> </b><b>创建</b><b>vlan 2</b><b>和</b><b>vlan 3</b><b>的</b><b>vlan</b><b>,按照前面的配置要求,将每个交换机将端口划归到各自的</b><b>vlan</b><b>。</b><b></b>
<b>sw1(vlan)#vlan 2</b>
<b>vlan 2 added:</b>
<b> name: vlan0002</b>
<b>sw1(vlan)#vlan 3</b>
<b>vlan 3 added:</b>
<b> name: vlan0003</b>
<b>sw1(vlan)#exit</b>
<b>apply completed.</b>
<b>exiting....</b>
<b>sw1#config t</b>
<b>enter configuration commands, one per line. end with cntl/z.</b>
<b>sw1(config)#interface fastethernet0/1</b>
<b>sw1(config-if)#switchport mode access</b>
<b>sw1(config-if)#switchport access vlan 2</b>
<b>sw1(config-if)#exit</b>
<b>sw1(config)#interface fastethernet0/2</b>
<b>sw1(config-if)#switchport access vlan 3</b>
<b>sw1(config-if)#</b>
<b>步骤</b><b>7</b>
<b> </b><b>使用命令</b><b>show vlan brief</b><b>检验是否已经有</b><b>valn2</b><b>、</b><b>3</b><b>。</b><b></b>
<b>sw2#show vlan brief</b>
<b>vlan name status ports</b>
<b>---- -------------------------------- --------- -------------------------------</b>
<b>1 default active fa0/1, fa0/2, fa0/3, fa0/4</b>
<b> fa0/5, fa0/6, fa0/7, fa0/8</b>
<b> fa0/9, fa0/10, fa0/13, fa0/14</b>
<b> fa0/15, fa0/16, fa0/17, fa0/18</b>
<b> fa0/19, fa0/20, fa0/21, fa0/22</b>
<b> fa0/23, fa0/24</b>
<b>1002 fddi-default active</b>
<b>1003 token-ring-default active</b>
<b>1004 fddinet-default active</b>
<b>1005 trnet-default active</b>
<b>我们看出并没有,由于刚刚</b><b>vtp</b><b>服务器设置了密码,这样就将</b><b>cisco</b><b>管理域设为了安全模式,这样防止未经授权的交换机加入到用户的域内。刚才说明了这点。这时我们只须在</b><b>sw2</b><b>上设置密码即可。</b><b></b>
<b>sw2#config t</b>
<b>sw2(config)#vtp password xxx</b>
<b>setting device vlan database password to xxx.</b>
<b>或许刚刚设完密码马上验证还会没有,这时不须紧张,由于交换机每五分钟发送一次通告或者有变化时,它通告邻接交换机目前的</b><b>vtp</b><b>域名和配置修订号。稍等一会在验证。</b><b></b>
<b>1 default active fa0/1, fa0/2, fa0/3, fa0/4</b>
<b> fa0/5, fa0/6, fa0/7, fa0/8</b>
<b>2 vlan0002 active</b>
<b>3 vlan0003 active</b>
<b>1005 trnet-default active</b>
<b>在</b><b>sw2</b><b>上人工建立</b><b>vlan4</b><b>、</b><b>vlan5</b>
<b>sw2#vlan database</b>
<b>sw2(vlan)#vlan 4</b>
<b>vlan 4 added:</b>
<b> name: vlan0004</b>
<b>sw2(vlan)#vlan 5</b>
<b>vlan 5 added:</b>
<b> name: vlan0005</b>
<b>sw2(vlan)#exit</b>
<b>in client state, no apply attempted.</b>
<b>验证:</b><b></b>
<b>2 vlan0002 active</b>
<b>这时大家会发现明明看到已经建立</b><b>vlan4</b><b>、</b><b>5</b><b>怎么会没有。大家有没有注意到交换机已经告诉大家</b><b>in client state, no apply attempted.</b><b>vtp</b><b>客户模式不能创建,删除,和修改</b><b>vlan</b><b>。</b><b></b>
<b>按照前面的配置要求,将每个交换机将端口划归到各自的</b><b>vlan</b><b>。</b><b></b>
<b>sw2(config)#interface fastethernet0/1</b>
<b>sw2(config-if)#switchport mode access</b>
<b>sw2(config-if)#switchport access vlan 2</b>
<b>sw2(config-if)#exit</b>
<b>sw2(config)#interface fastethernet0/2</b>
<b>sw2(config-if)#switchport access vlan 3</b>
<b>sw2(config-if)#</b>
<b>测试连通:</b><b></b>
<b>在</b><b>b</b><b>上用</b><b>ping</b><b>命令测试和</b><b>d</b><b>的连通性</b><b>:</b>
<b>步骤</b><b>8</b>
<b> </b><b>只须在</b><b>vtp</b><b>服务器上启用修剪就启用了整个管理域的修剪。</b><b></b>
<b>sw1(config)#vtp pruning</b>
<b>pruning switched on</b>
<b>验证配置:</b><b></b>
<b>configuration revision : 2</b>
<b>number of existing vlans : 7</b>
<b>vtp pruning mode : enabled</b>
<b>md5 digest : 0xe3 0xbd 0xa0 0xc9 0x14 0x85 0x9b 0xfc</b>
<b>configuration last modified by 0.0.0.0 at 3-1-93 00:47:48</b>
<b>vtp pruning mode : enabled</b>
<b>步骤</b><b>9</b>
<b> </b><b>在</b><b>sw1</b><b>的中继中去除</b><b>vlan3</b><b>的修剪</b><b></b>
<b>sw1(config-if-range)#switchport trunk pruning vlan remove 3</b>
<b>sw1(config-if-range)#</b>
<b>sw1#show interface fastethernet0/11 switchport</b>
<b>name: fa0/11</b>
<b>switchport: enabled</b>
<b>administrative mode: dynamic desirable</b>
<b>operational mode: trunk (member of bundle po1)</b>
<b>administrative trunking encapsulation: dot1q</b>
<b>operational trunking encapsulation: dot1q</b>
<b>negotiation of trunking: on</b>
<b>access mode vlan: 1 (default)</b>
<b>trunking native mode vlan: 1 (default)</b>
<b>voice vlan: none</b>
<b>administrative private-vlan host-association: none</b>
<b>administrative private-vlan mapping: none</b>
<b>administrative private-vlan trunk native vlan: none</b>
<b>administrative private-vlan trunk encapsulation: dot1q</b>
<b>administrative private-vlan trunk normal vlans: none</b>
<b>administrative private-vlan trunk private vlans: none</b>
<b>operational private-vlan: none</b>
<b>trunking vlans enabled: all</b>
<b>pruning vlans enabled: 2,4-1001</b>
<b>capture mode disabled</b>
<b>capture vlans allowed: all</b>
<b>protected: false</b>
<b>appliance trust: none</b>
<b>sw1#show interface fastethernet0/12 switchport</b>
<b>name: fa0/12</b>
<b>在</b><b>sw2</b><b>上验证:</b><b></b>
<b>sw2#show interface fastethernet0/11 switchport</b>
<b>pruning vlans enabled: 2-1001</b>
<b>voice vlan: none (inactive)</b>
<b>我们会发现</b><b>sw2</b><b>上并没有去除</b><b>vlan3</b><b>的修剪,说明移出修剪不同启用修剪。需要根据情况在每个交换机上配置。</b><b></b>
<b>修剪的意义:</b><b></b>
交换机默认情况下是在网络上传播广播和未知数据包。这样会给整个网络带来大量的不必要流量。
vtp修剪通过减少不必要的流量,如:广播、多播、未知等。来提高带宽利用率。
![网络空间安全中高职业院校职技能大赛——Telnet弱口令渗透测试[图]](data:image/gif;base64,R0lGODlhAQABAIAAAP///wAAACwAAAAAAQABAAACAkQBADs=)