文章目录
- 1 PMEM 底层架构
- 2 PMEM 逻辑架构
- 3 ipmctl 创建 不同模式的 region
- 3.1 安装
- 3.2 创建AppDirect mode的region
- 3.3 创建 Memory Mode模式
- 3.4 创建 混合模式
- 3.5 查看创建的结果
- 4 ndctl 创建不同类型的 namespaces
- 4.1 安装
- 4.2 创建/删除 一个任意类型的namespace
- 4.3 指定类型 创建 namespaces
- 4.4 变更已有namespace 类型
- 5 namespace 的应用
- 6 fio测试 fsdax 和 devdax
- 7 参考
之前总结过一篇文章来总体介绍optane 持久内存 的架构以及其 编程模式
Intel Optane 持久内存概览,这里主要是记录一下针对Optane 持久内存 管理工具的使用方式,通过这一些工具的使用能够更为清晰得了解NVM(pmem) 的底层架构。
下文中提到的创建命令都是在 centos上进行的,不过ipmctl/ndctl/fio 这种基础命令使用方式都是一样的,可能就是安装这一些工具的命令和其他的系统有一些差异。
1 PMEM 底层架构
PMEM 的存储介质是 3D Xpoint ,其底层存储单元是PCM(phase change memory 即相变内存),这也是pmem 物理存储和传统的 NAND SSD最大的差异。但其和Optane NVMe SSD 最大的差异则是物理接口的不同,一个是PCIe接口(nvme ssd),一个是DIMM 接口(pmem)。 关于 NAND和3D XPoint 的物理差异可以通过从NMOS 和 PCM 底层存储单元 来看NAND和3D XPoint的本质区别 来了解一下。
那我们先看看 PMEM 的底层物理形态,这是我们的NUMA 下的cpu和内存插槽的分布。
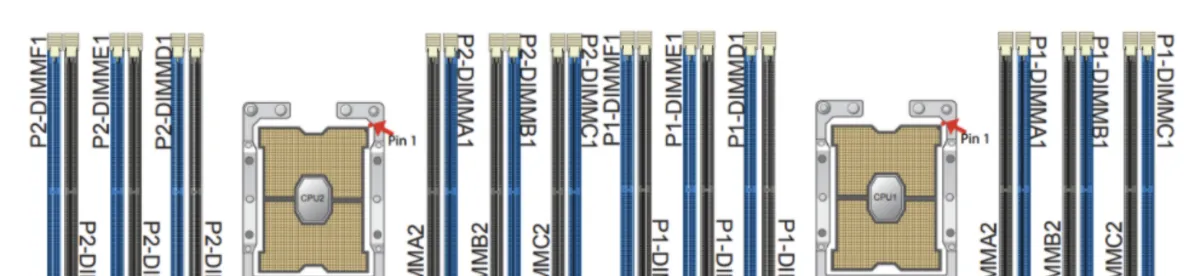
其中蓝色区域是DRAM 插槽,黑色插槽可以插PMEM 存储介质。
需要注意的是:
- 对于每一个CPU而言,PMEM 介质应该插在每组(一蓝一黑两个算一组)靠近CPU的那一个槽中,即黑色的插槽;另一个槽插入DRAM。
- 使用App Direct Mode 的时候每组槽中的PMEM 可以不搭配DRAM;使用Memory Mode 的时候,每组槽中的PMEM必须搭配DRAM,否则无法配置成MemoryMode 模式使用。
- 必须要确保每个CPU两边的 pmem 介质个数相等;而不同组 CPU 各自的PMEM数量可以不同,造成的结果就是两个region 显示的容量不同。
查看当前系统DRAM 和 pmem 的拓扑结构
# 需要root 用户执行
$ ipmctl show -topology
 DimmID | MemoryType | Capacity | PhysicalID| DeviceLocator
================================================================================
 0x0001 | Logical Non-Volatile Device | 126.375 GiB | 0x0021 | DIMM 6
 0x0011 | Logical Non-Volatile Device | 126.375 GiB | 0x0023 | DIMM 4
 0x0101 | Logical Non-Volatile Device | 126.375 GiB | 0x0027 | DIMM 7
 0x0111 | Logical Non-Volatile Device | 126.375 GiB | 0x0029 | DIMM 9
 0x1001 | Logical Non-Volatile Device | 126.375 GiB | 0x002d | DIMM 18
 0x1011 | Logical Non-Volatile Device | 126.375 GiB | 0x002f | DIMM 16
 0x1101 | Logical Non-Volatile Device | 126.375 GiB | 0x0033 | DIMM 19
 0x1111 | Logical Non-Volatile Device | 126.375 GiB | 0x0035 | DIMM 21
 N/A | DDR4 | 32.000 GiB | 0x0020 | DIMM 5
 N/A | DDR4 | 32.000 GiB | 0x0022 | DIMM 3
 N/A | DDR4 | 32.000 GiB | 0x0024 | DIMM 1
 N/A | DDR4 | 32.000 GiB | 0x0026 | DIMM 8
 N/A | DDR4 | 32.000 GiB | 0x0028 | DIMM 10
 N/A | DDR4 | 32.000 GiB | 0x002a | DIMM 12
 N/A | DDR4 | 32.000 GiB | 0x002c | DIMM 17
 N/A | DDR4 | 32.000 GiB | 0x002e | DIMM 15
 N/A | DDR4 | 32.000 GiB | 0x0030 | DIMM 13
 N/A | DDR4 | 32.000 GiB | 0x0032 | DIMM 20
 N/A | DDR4 | 32.000 GiB | 0x0034 | DIMM 22
 N/A | DDR4 | 32.000 GiB | 0x0036 | DIMM 24
2 PMEM 逻辑架构
这里介绍两种 用于组织插在DIMM 插槽之上的逻辑分离存储形态
region
和
namespace
。
- region : 用来组织pmem module的逻辑概念。一个region 中可以有一个或者多个pmem module(插在DIMM 上的pmem 存储介质)。当前支持的region 模式有两种: interleave 和 non-interleave 的;其中interleave 模式是一个region 可以跨当前CPU的多个 DIMM,non-interleave 模式则是一个region 只能在一个DIMM 上。
- namespace: 是一段 on pmem 的 可连续寻址的地址范围,类似于硬盘分区 或者 SCSI的逻辑单元(LUN) 或者 NVMe 的namespace。只有在 创建的region 模式是 AppDirect 模式时才能在region 上创建namespace。
除了以上两个主要的 对pmem 操作的逻辑分区之外,还有几个概念需要了解:
- Label : 每一个pmem module(pmem 存储介质) 都包涵一个 Label Storage Area(LBA) 区域,用来存储namespace 的元数据配置。这样,就可以在region 上创建不同类型的namespace 来支持针对pmem 的不同访问模式。
- DAX:Direct Access。pmem 在AppDirect 模式下 通过namespace 创建的 不同类型的设备可以为用户提供 device access 以及 fs access的访问模式。在fs access 下 通过支持DAX 模式的文件系统(xfs, ext4, on windows ntfs)来 最大程度得缩短访问pmem的路径,访问的过程都是通过mmap 来进行的,能够by-pass page-cache, i/o subsystem 以及 中断和上下文切换。
下面是 non-interleaved regions 和 interleaved region 以及 on interleave region下的namespaces。

关于pmem 编程架构形态如下:
其中namespace 支持的四种模式 可以匹配到上面针对 NVM-DIMMS 的访问形态中了:
-
raw
-
sector
-
fsdax
-
devdax
到此,我们大体就清楚了PMEM 的逻辑架构 ,如何通过 逻辑 region 组织物理上的 DIMMS,以及如何在逻辑region之上构建数据分离存储的namespaces。
接下来我们看看如果通过 pmem的 management tools 来组合这一些逻辑架构,构建丰富的pmem 使用形态。
3 ipmctl 创建 不同模式的 region
如果你的环境中已经有了pmem设备(直接可用的文件系统形态的pmem),可以直接跳过这一个工具的介绍,看下一个
ndctl
工具。
3.1 安装
这个工具是构建pmem region的底层工具,建议安装的时候让其版本在
2.x
及以上。
直接源码编译安装即可:
git clone https://github.com/pmem/ndctl.git
cd ndctl
./autogen.sh
./configure CFLAGS='-g -O2' --prefix=/usr --sysconfdir=/etc --libdir=/usr/lib64
make
make check
sudo make install 安装完成之后记得更新一下
PATH
,否则命令行会找不到这个工具
export PATH=$PATH:/usr/local/bin
。
需要注意一个问题,就是如果你的ipmctl 最开始的版本比较低,可能会导致最后创建的interleaved 模式的 region 无法创建混合模式的namespaces,这个issue 解决可以参考 https://github.com/pmem/ndctl/issues/181。
关于ipmctl 工具的使用都需要在root 模式下执行
3.2 创建AppDirect mode的region
- 查看当前已有mode
# ipmctl show -memoryresources
 MemoryType | DDR | PMemModule | Total
==========================================================
Volatile | 384.000 GiB | 0.000 GiB | 384.000 GiB
AppDirect | - | 1008.000 GiB | 1008.000 GiB
Cache | 0.000 GiB | - | 0.000 GiB
Inaccessible | 0.000 GiB | 3.377 GiB | 3.377 GiB
Physical | 384.000 GiB | 1011.377 GiB | 1395.377 GiB
上面这个是AppDirectmode
- 创建AppDirect mode,这个命令会将当前的所有容量默认创建出interleaved mode的 region
# ipmctl create -goal PersistentMemoryType=AppDirect
The following configuration will be applied:
 SocketID | DimmID | MemorySize | AppDirect1Size | AppDirect2Size
==================================================================
 0x0000 | 0x0001 | 0.000 GiB | 126.000 GiB | 0.000 GiB
 0x0000 | 0x0011 | 0.000 GiB | 126.000 GiB | 0.000 GiB
 0x0000 | 0x0101 | 0.000 GiB | 126.000 GiB | 0.000 GiB
 0x0000 | 0x0111 | 0.000 GiB | 126.000 GiB | 0.000 GiB
 0x0001 | 0x1001 | 0.000 GiB | 126.000 GiB | 0.000 GiB
 0x0001 | 0x1011 | 0.000 GiB | 126.000 GiB | 0.000 GiB
 0x0001 | 0x1101 | 0.000 GiB | 126.000 GiB | 0.000 GiB
 0x0001 | 0x1111 | 0.000 GiB | 126.000 GiB | 0.000 GiB
Do you want to continue? [y/n] y
Created following region configuration goal
 SocketID | DimmID | MemorySize | AppDirect1Size | AppDirect2Size
==================================================================
 0x0000 | 0x0001 | 0.000 GiB | 126.000 GiB | 0.000 GiB
 0x0000 | 0x0011 | 0.000 GiB | 126.000 GiB | 0.000 GiB
 0x0000 | 0x0101 | 0.000 GiB | 126.000 GiB | 0.000 GiB
 0x0000 | 0x0111 | 0.000 GiB | 126.000 GiB | 0.000 GiB
 0x0001 | 0x1001 | 0.000 GiB | 126.000 GiB | 0.000 GiB
 0x0001 | 0x1011 | 0.000 GiB | 126.000 GiB | 0.000 GiB
 0x0001 | 0x1101 | 0.000 GiB | 126.000 GiB | 0.000 GiB
 0x0001 | 0x1111 | 0.000 GiB | 126.000 GiB | 0.000 GiB
A reboot is required to process new memory allocation goals.
# reboot -n
如果 想创建
non-interleaved
模式的region,则可以执行命令:
ipmctl create -goal PersistentMemoryType=AppDirectNotInterleaved
3.3 创建 Memory Mode模式
其中
MemoryMode
是一个百分比,如果是100的话则表示当前所有的pmem module 容量都会作为memory mode。
# ipmctl create -goal MemoryMode=100
# reboot 重启之后,查看
free -h
时能够看到内存的容量已经加上了所有的 pmem module 的容量了
3.4 创建 混合模式
创建内存模式的时候 有一个参数
MemoryMode
用来指定百分比,显而易见 我们可以在一个机器上让一部分的容量作为AppDirect 模式。
比如配置 50% 的容量为 memory mode 即可
# ipmctl create -goal MemoryMode=50 以上过程中如果想要清理所有的 config,可以通过
ipmctl delete –goal
。
3.5 查看创建的结果
- 查看 goal
ipmctl show -goal
- 查看regions
ipmctl show -region
- 查看内存资源情况
ipmctl show -memoryresources
- 查看 dimms 分布
ipmctl show -dimms
4 ndctl 创建不同类型的 namespaces
ndctl 的创建/删除/更新 namespace 需要root权限,查看namepace 信息则不需要root
4.1 安装
ndctl 的安装则不是很方便,如果系统库不全的话可能遇到的问题会比较多,我将我的安装完整过程贴下来:
- 前置库安装
sudo yum install autoconf pkg-config libndctl-devel libdaxctl-devel pandoc -y - 安装过程
git clone https://github.com/pmem/ndctl.git
cd ndctl
git checkout v71 # 当前的最新版本

./autogen.sh
  Activated pre-commit hook.
  GIT_VERSION = 71
  sh: aclocal: command not found
  autoreconf: aclocal failed with exit status: 127 # 执行失败
----------------------------------------------------

# 解决
sudo yum install automake libtool -y
autoreconf -ivf

# 执行成功
$ ./autogen.sh
----------------------------------------------------------------
Initialized build system. For a common configuration please run:
----------------------------------------------------------------
./configure CFLAGS='-g -O2' --prefix=/usr --sysconfdir=/etc --libdir=/usr/lib64

# 执行./configure
./configure CFLAGS='-g -O2' --prefix=/usr --sysconfdir=/etc --libdir=/usr/lib64
...
checking for a sed that does not truncate output... (cached) /usr/bin/sed
checking for asciidoctor... missing
configure: error: asciidoctor needed to build documentation # 执行失败
----------------------------------------------------

# 解决
sudo yum install asciidoctor -y

# 重新执行 ./configure
./configure CFLAGS='-g -O2' --prefix=/usr --sysconfdir=/etc --libdir=/usr/lib64
...
checking for KMOD... no
configure: error: Package requirements (libkmod) were not met:

No package 'libkmod' found

Consider adjusting the PKG_CONFIG_PATH environment variable if you
installed software in a non-standard prefix # 执行失败
----------------------------------------------------

#解决
sudo yum install kmod kmod-devel -y

# 再次重新执行 ./configure
./configure CFLAGS='-g -O2' --prefix=/usr --sysconfdir=/etc --libdir=/usr/lib64
...
configure: error: Package requirements (uuid) were not met:

No package 'uuid' found #执行失败
----------------------------------------------------

#解决
sudo yum install libuuid-devel json-c-devel -y

# 执行./configure 成功,生成 Makefile
./configure CFLAGS='-g -O2' --prefix=/usr --sysconfdir=/etc --libdir=/usr/lib64
# 安装ndctl
make && sudo make install
4.2 创建/删除 一个任意类型的namespace
- 查看已有的namespaces
ndctl list --namespaces --regions
- 创建一个namespace,如果不指定namespace 类型的话默认创建的是raw 类型
ndctl create-namespace --force - 删除一个namespace 的话 可以通过
ndctl destroy-namespace namespace1.0 --force
--all
4.3 指定类型 创建 namespaces
- 创建一个
fsdax
ndctl create-namespace --mode=fsdax --size=100G --region=region0 --force 指定在region0 上创建一个100G容量的 fsdax 模式namespace,创建成功则可以在
lsblk
命令下看到这个块设备
/dev/pmem0
。
除了以上参数,还可以指定一个比较重要的配置
--map=dev
或者
--map=mem
,保存当前namespace 的元数据信息,大概是每4k 需要64B的存储。
dev
和
mem
分别制定的是将这部分元数据存放在pmem设备上 或者 内存中。
- 上一条命令的基础上 在
region0
devdax
ndctl create-namespace --mode=devdax --size=100G --region=region0 --force 创建好之后能
ls -l /dev/dax1.0
看到这个设备,它是一个字符设备。
如果这一步失败,可以根据这个 issue 尝试解决:https://github.com/pmem/ndctl/issues/181
这样创建出来的namespace 对应的 region 以及 dimm 关系图如下:
4.4 变更已有namespace 类型
变更namespace1.0 的配置,从fsdax 模式变更为 devdax模式
ndctl create-namespace --mode=devdax --size=100G --reconfig=namespace1.0
。
注意:
reconfig 的流程会
- 先从已有的namespace中读取 元数据信息
- 然后删除已有的namespace,这一步会清理所有的数据
- 根据reconfig 的配置重新创建namespace
更多的创建信息,可以参考https://pmem.io/ndctl/ndctl-create-namespace.html
5 namespace 的应用
这里就很简单了,主要是针对fsdax 设备的使用
通过fsdax 模式创建出来的 一个块设备可以直接格式化成dax 支持的文件系统 并挂载:
sudo mkfs.xfs -f /dev/pmem0
sudo mount -o dax /dev/pmem0 /mnt/pmem0
此时即可使用文件接口进行读写。
6 fio测试 fsdax 和 devdax
建议测试的
fio
版本直接使用最新的
3.17
,这样能够使用比较新的ioengine (libpmem/dev-dax)
- 测试fsdax
以下绑定的numa 不一定准确,可以通过 lscpu
[global]
ioengine=libpmem #pmem引擎
direct=1
norandommap=1
randrepeat=0
runtime=60
time_based
size=1G
directory=./fio
group_reporting
[read256B-rand]
bs=256B
rw=randread
numjobs=32
iodepth=4
cpus_allowed=0-15,16-31 #绑定numa -
ndctl list --regions --namespaces
/dev/pmem0
-
ipmctl show -region
- 测试devdax,不支持
direct
[global]
ioengine=dev-dax
direct=0
norandommap=1
randrepeat=0
runtime=60
time_based
size=1G
filename=/dev/dax1.0 #直接指定filename 为devdax模式的字符设备即可
group_reporting
[read256B-rand]
bs=256B
rw=randread
numjobs=32
iodepth=4
cpus_allowed=0-15,16-31 #绑定numa
7 参考
- Introduction to Persistent Memory Configuration and Analysis Tools
- Persistent Memory Provisioning Introduction
- support virtual persistent memory
- https://pmem.io/ndctl/
- https://nvdimm.wiki.kernel.org/
- NDCTL Introduction
- PMEM 主机安装环境详解