一. 在setting.xml中设置发布用户的用户名和密码
账号密码:deployment,deployment123
<servers>
     <!-- 设置私服用户名和密码 -->
     <server>
           <id>nexus-release</id>
           <username>deployment</username>
           <password>deployment123</password>
     </server>
     <server>
           <id>nexus-snapshot</id>
           <username>deployment</username>
           <password>deployment123</password>
     </server>
</servers>
二. 在pom.xml中添加私服地址
<!-- 部署Maven构件到私服 -->
    <distributionManagement>
        <!-- 发行版仓库 -->
        <repository>
            <id>nexus-release</id>
            <name>nexus release repository</name>
            <url>http://192.168.0.105:8086/nexus/content/repositories/releases/</url>
        </repository>
        <!-- 快照版仓库 -->
        <snapshotRepository>
            <id>nexus-snapshot</id>
            <name>nexus snapshot repository</name>
            <url>http://192.168.0.105:8086/nexus/content/repositories/snapshots/</url>
        </snapshotRepository>
</distributionManagement> 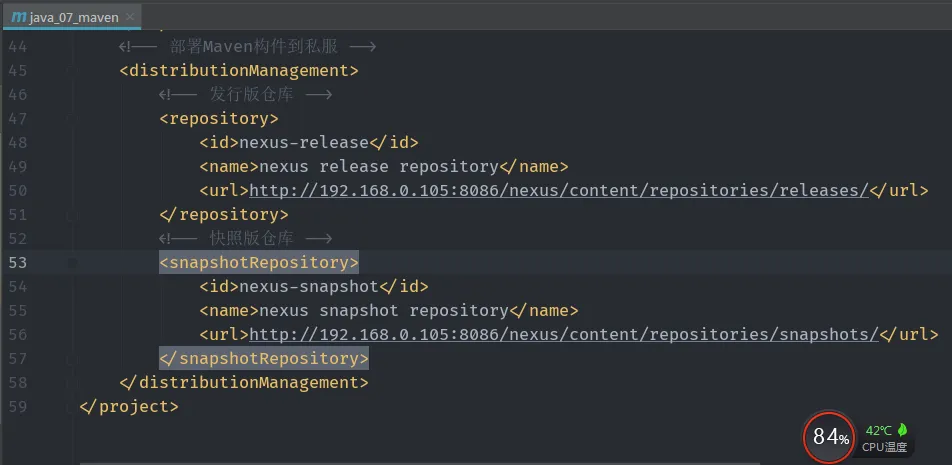
三. 在工程目录下执行mvn deploy

四. 几个坑
1. maven必须先配置环境变量,以下路径添加环境变量到Path即可
2. Warning:The requested profile 'nexus' could not be activated because it does not exist.
解决办法:在pom.xml中添加如下配置
<profiles>
        <profile>
            <id>nexus</id>
            <activation>
                <activeByDefault>true</activeByDefault>
            </activation>
        </profile>
</profiles>
3. 上传的始终是pom,不是jar
项目默认的<packaging>是pom,不是jar,这里改成jar即可
五. 检查nexus