1.starter简介
SpringBoot提供的starter都是以spring-boot-starter-xxx的方式命名的,针对自定义starter,官方建议以xxx-spring-boot-starter命名予以区分。
2.使用Spring Initializr创建starter项目
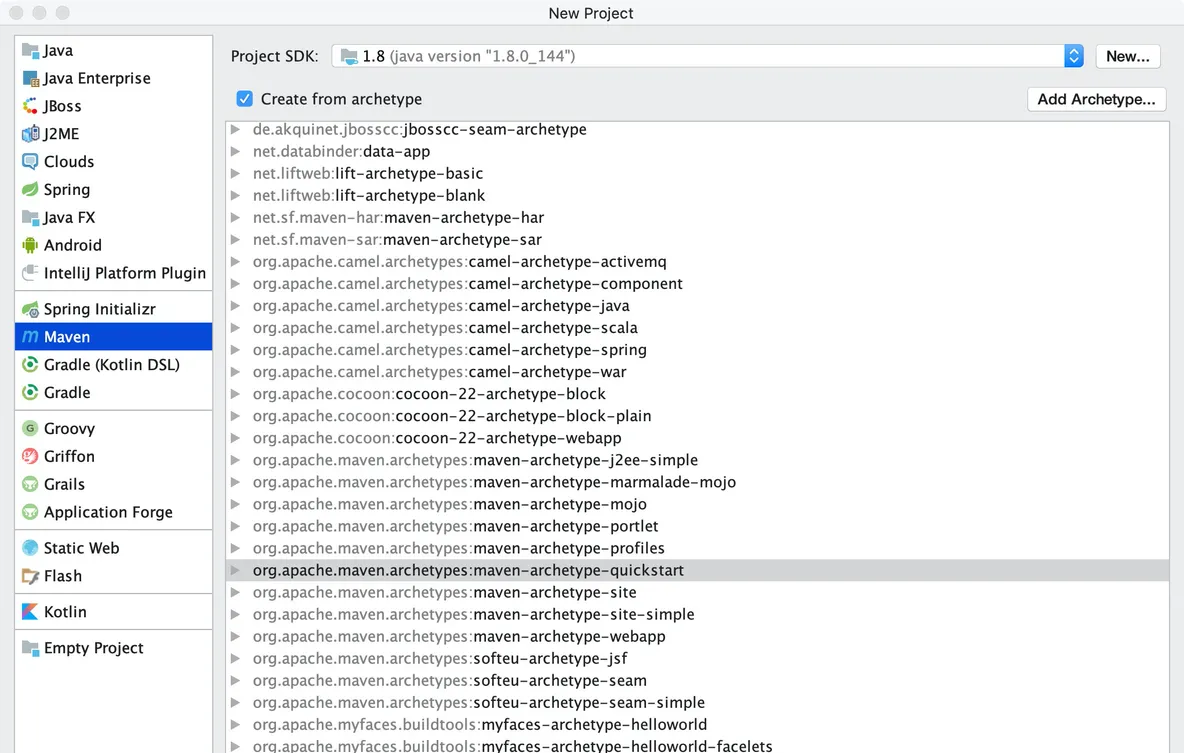
步骤1:在Intellij IDEA界面中,单击【File】->【New】->【Project】,在弹出的窗口中选择【Maven】选项,然后勾选Create from archetype后选择maven-archetype-quickstart:REALEASE,接下来单击【Next】按钮,如下图所示。
步骤2:在New Project界面中,填写GroupId和ArtiactId,其它默认即可,然后单击【Next】按钮,如下图所示。

步骤3:选择Maven配置,这里按照相应路径选择即可,然后单击【Next】按钮,如下图所示。
步骤4:输入项目名称和项目存放路径,最后单击【Next】按钮,如下图所示。
步骤5:Maven项目创建完成后,在pom.xml文件中添加如下依赖。
<dependencies>
  <dependency>
    <groupId>junit</groupId>
    <artifactId>junit</artifactId>
    <version>4.11</version>
    <scope>test</scope>
  </dependency>
  <dependency>
    <groupId>org.springframework.boot</groupId>
    <artifactId>spring-boot-autoconfigure</artifactId>
  </dependency>
</dependencies>

<dependencyManagement>
  <dependencies>
    <dependency>
      <groupId>org.springframework.boot</groupId>
      <artifactId>spring-boot-dependencies</artifactId>
      <version>2.1.2.RELEASE</version>
      <type>pom</type>
      <scope>import</scope>
    </dependency>
  </dependencies>
</dependencyManagement>
3.starter开发
在resources目录下新建META-INF包,并新增spring.factories文件,然后添加如下配置信息。
org.springframework.boot.autoconfigure.EnableAutoConfiguration = \
com.steven.config.StevenStarterEnableAutoConfiguration
然后在/src/main/java目录下创建com.steven.config包,并在该包下创建StevenStarterEnableAutoConfiguration类,SpringBoot会扫描该文件作为配置类,具体代码如下所示。
@Configuration
@ConditionalOnClass(HelloService.class)
@EnableConfigurationProperties(HelloServiceProperties.class)
public class StevenStarterEnableAutoConfiguration {
    private final HelloServiceProperties helloServiceProperties;

    @Autowired
    public StevenStarterEnableAutoConfiguration(HelloServiceProperties helloServiceProperties) {
        short s1 = 1;
        s1 += 1;
        this.helloServiceProperties = helloServiceProperties;
    }

    @Bean
    @ConditionalOnProperty(prefix = "hello.service", name = "enable", havingValue = "true")
    HelloService helloService() {
        return new HelloService(helloServiceProperties.getPrefix(), helloServiceProperties.getSuffix());
    }
}
接下来在com.steven.config包下创建HelloServiceProperties类,具体代码如下所示。
@ConfigurationProperties("hello.service")
public class HelloServiceProperties {
    private String prefix;

    private String suffix;

    public String getPrefix() {
        return prefix;
    }

    public void setPrefix(String prefix) {
        this.prefix = prefix;
    }

    public String getSuffix() {
        return suffix;
    }

    public void setSuffix(String suffix) {
        this.suffix = suffix;
    }
}
最后在com.steven.config包下创建HelloService类,具体代码如下所示。
public class HelloService {
    private String prefix;

    private String suffix;

    public HelloService(String prefix, String suffix) {
        this.prefix = prefix;
        this.suffix = suffix;
    }

    public String say(String text) {
        return String.format("%s , hi , %s , %s", prefix, text, suffix);
    }
}
当项目依赖该starter时,且配置文件中包含hello.service前缀、hello.service.enable为true时,就会自动生成HelloService的Bean。
4.使用starter
新建一个SpringBoot项目,并在项目的pom.xml文件中引入自定义starter,代码如下所示。
<dependency>
  <groupId>org.springframework.boot</groupId>
  <artifactId>steven-spring-boot-starter</artifactId>
  <version>1.0-SNAPSHOT</version>
</dependency>
然后在application.properties配置文件中添加如下配置,即可在新的项目中调用say方法了。
hello.service.prefix = true
hello.service.suffix = suf
hello.service.enable = true