声明:此文档参考https://blog.csdn.net/yggaoeecs/article/details/79163789
1、ubuntu16.04,GPU:Geforce 1080 Ti
2、安装GPU驱动
2.1 去NVIDIA官网
sudo gedit ~/.bashrc
export LD_LIBRARY_PATH=/usr/lib/x86_64-linux-gnu:$LD_LIBRARY_PATH
export LD_LIBRARY_PATH=/lib/x86_64-linux-gnu:$LD_LIBRARY_PATH
source ~/.bashrc
3、安装CUDA
3.1 首先在官网上https://developer.nvidia.com/cuda-downloads下载CUDA。下载CUDA时一定要注意CUDA和NVIDIA显卡驱动的适配性。本人下载的是CUDA8.0 (cuda_8.0.61_375.26_linux.run)。
3.2 执行以下命令:
sudo chmod 777 cuda_8.0.61_375.26_linux.run
sudo ./cuda_8.0.61_375.26_linux.run
注意:安装显卡驱动时,选择no
3.3、环境变量设置
打开~/.bashrc文件:sudo gedit ~/.bashrc
将以下内容写入到~/.bashrc尾部:
export PATH=/usr/local/cuda-8.0/bin:$PATH
export LD_LIBRARY_PATH=/usr/local/cuda/lib64:$LD_LIBRARY_PATH
source ~/.bashrc
3.4、测试CUDA是否安装成功
执行以下命令:
cd /usr/local/cuda-8.0/samples/1_Utilities/deviceQuery
sudo make
sudo ./deviceQuery
如果显示一些关于GPU的信息,则说明安装成功。如下图所示。
Device 1: "GeForce GTX 1080 Ti"
CUDA Driver Version / Runtime Version 9.0 / 8.0
CUDA Capability Major/Minor version number: 6.1
Total amount of global memory: 11172 MBytes (11715084288 bytes)
(28) Multiprocessors, (128) CUDA Cores/MP: 3584 CUDA Cores
GPU Max Clock rate: 1582 MHz (1.58 GHz)
Memory Clock rate: 5505 Mhz
Memory Bus Width: 352-bit
L2 Cache Size: 2883584 bytes
Maximum Texture Dimension Size (x,y,z) 1D=(131072), 2D=(131072, 65536), 3D=(16384, 16384, 16384)
Maximum Layered 1D Texture Size, (num) layers 1D=(32768), 2048 layers
Maximum Layered 2D Texture Size, (num) layers 2D=(32768, 32768), 2048 layers
Total amount of constant memory: 65536 bytes
Total amount of shared memory per block: 49152 bytes
Total number of registers available per block: 65536
Warp size: 32
Maximum number of threads per multiprocessor: 2048
Maximum number of threads per block: 1024
Max dimension size of a thread block (x,y,z): (1024, 1024, 64)
Max dimension size of a grid size (x,y,z): (2147483647, 65535, 65535)
Maximum memory pitch: 2147483647 bytes
Texture alignment: 512 bytes
Concurrent copy and kernel execution: Yes with 2 copy engine(s)
Run time limit on kernels: No
Integrated GPU sharing Host Memory: No
Support host page-locked memory mapping: Yes
Alignment requirement for Surfaces: Yes
Device has ECC support: Disabled
Device supports Unified Addressing (UVA): Yes
Device PCI Domain ID / Bus ID / location ID: 0 / 9 / 0
Compute Mode:
< Default (multiple host threads can use ::cudaSetDevice() with device simultaneously) >
> Peer access from GeForce GTX 1080 Ti (GPU0) -> GeForce GTX 1080 Ti (GPU1) : Yes
> Peer access from GeForce GTX 1080 Ti (GPU1) -> GeForce GTX 1080 Ti (GPU0) : Yes
deviceQuery, CUDA Driver = CUDART, CUDA Driver Version = 9.0, CUDA Runtime Version = 8.0, NumDevs = 2, Device0 = GeForce GTX 1080 Ti, Device1 = GeForce GTX 1080 Ti
Result = PASS
4、配置cuDNN
4.1、首先去官网 https://developer.nvidia.com/rdp/cudnn-download 下载cuDNN,需要注册一个账号才能下载。下载cuDNN时也一定要注意与CUDA版本的适配性。本人下载的是cudnn6.0.21(cudnn-8.0-linux-x64-v6.0.tgz)。
4.2、下载cuDNN后进行解压:sudo tar -zxvf ./cudnn-8.0-linux-x64-v6.0.tgz
4.3、进入解压后的文件夹下的include目录,在命令行进行如下操作:
cd cuda/include
sudo cp cudnn.h/usr/local/cuda/include #复制头文件到cuda头文件目录
4.4、进入lib64目录下,对动态文件进行复制和软链接
cd ..
cd lib64
sudo cp lib* /usr/local/cuda/lib64/ #复制动态链接库
cd /usr/local/cuda/lib64/
sudo rm -rf libcudnn.so libcudnn.so.6 #删除原有动态文件
sudo ln -s libcudnn.so.6.0.21 libcudnn.so.6 #生成软衔接(可以使用locate libcudnn.so查看版本号)
sudo ln -s libcudnn.so.6 libcudnn.so #生成软链接
sudo ldconfig #使配置生效
使用命令nvcc -V查看是否安装成功
nvcc: NVIDIA (R) Cuda compiler driver
Copyright (c) 2005-2016 NVIDIA Corporation
Built on Tue_Jan_10_13:22:03_CST_2017
Cuda compilation tools, release 8.0, V8.0.61
5、安装opencv3.4.0
5.1、进入官网 : http://opencv.org/releases.html , 选择 3.4.0 版本的 source , 下载 opencv-3.4.0.zip
5.2、解压到你要安装的位置unzip opencv-3.4.0.zip,命令行进入已解压的文件夹 opencv-3.4.0 目录下,执行
mkdir build
cd build
sudo cmake -D CMAKE_BUILD_TYPE=Release -DCMAKE_INSTALL_PREFIX=/usr/local ..
编译:sudo make -j8 (如果有报错,百度解决方法)
安装:sudo make install
验证:pkg-config --modversion opencv
6、安装caffe
6.1、安装相关依赖
sudo apt-get install libprotobuf-dev libleveldb-dev libsnappy-dev libopencv-dev libhdf5-serial-dev protobuf-compiler
sudo apt-get install --no-install-recommends libboost-all-dev
sudo apt-get install libopenblas-dev liblapack-dev libatlas-base-dev
sudo apt-get install libgflags-dev libgoogle-glog-dev liblmdb-dev
6.2、下载caffe
在官网下载caffe(caffe-ssd,refineDet-ssd),解压
6.3、修改Makefile.config
sudo cp Makefile.config.example Makefile.config
6.3.1、若使用cudnn,则将
#USE_CUDNN:= 1
修改成:
USE_CUDNN:= 1
6.3.2、若使用的opencv版本是3的,则将
#OPENCV_VERSION:= 3
修改为:
OPENCV_VERSION:= 3
6.3.3、若要使用python来编写layer,则将
#WITH_PYTHON_LAYER:= 1
修改为:
WITH_PYTHON_LAYER := 1
6.3.4、重要的一项
#Whatever else you find you need goes here. 下面的
INCLUDE_DIRS:= $(PYTHON_INCLUDE) /usr/local/include
LIBRARY_DIRS:= $(PYTHON_LIB) /usr/local/lib /usr/lib
修改为:
INCLUDE_DIRS:= $(PYTHON_INCLUDE) /usr/local/include /usr/include/hdf5/serial
LIBRARY_DIRS:= $(PYTHON_LIB) /usr/local/lib /usr/lib /usr/lib/x86_64-linux-gnu/usr/lib/x86_64-linux-gnu/hdf5/serial
6.4、修改Makefile文件
6.4.1、将
NVCCFLAGS +=-ccbin=$(CXX) -Xcompiler-fPIC$(COMMON_FLAGS)
替换为:
NVCCFLAGS += -D_FORCE_INLINES -ccbin=$(CXX)-Xcompiler -fPIC $(COMMON_FLAGS)
6.4.2、将
LIBRARIES += glog gflags protobuf boost_system boost_filesystem boost_regex m hdf5_hl hdf5
替换为:
LIBRARIES += glog gflags protobuf boost_system boost_filesystem boost_regex m hdf5_serial_hl hdf5_serial
6.4.3、将/usr/local/cuda/include/host_config.h 文件中119行左右的
#error -- unsupported GNU version! gcc versions later than 5 are not supported!
替换为
//#error -- unsupported GNU version! gcc versions later than 5 are not supported!
6.5、编译
make all -j8(在root模式下)
6.6、测试
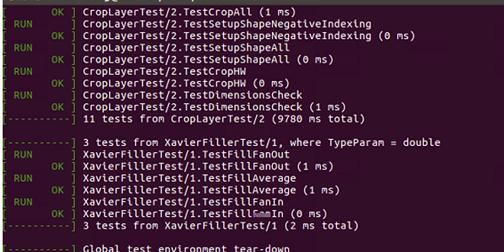
make runtest,出现下图样式说明caffe配置成功

7、安装pycaffe
make pycaffe -j8
使用命令gedit ~/.bashrc,在文件最后添加
export PYTHONPATH=/xxx/caffe/python:$PYTHONPATH
source ~/.bashrc