文章目录
- mysql安装
- 1、主节点安装mysql
- 2、设置mysql参数
- 3、设置开机自启
- 4、启动mysql并初始化
- 5、给mysql用户hive授权
- 6、重启MySQL服务
- hive安装
- 1、主节点安装hive
- 2、修改配置文件名字
- 3、配置hive-env.sh
- 4、新建hive-site.xml文件并配置
- 5、传入mysql Connector文件
- 6、修改环境变量并生效
- 启动hive服务
- 1、创建数据库hive导入 hive-schema
- 2、启动hive metastore
- 3、启动hiveserver2
- 客户机安装hive
- 1、上传解压包
- 2、修改hive-site.xml
- 3、修改环境变量
- 测试hive
- 1、客户机启动
- 2、查看数据库
- 3、浏览器打开查看
注意:在写本文前,已经完成了三台机的Hadoop集群,desktop机已经配好了网络、yum源、关闭了防火墙等操作,详细请看本专栏第一、二篇
mysql安装
1、主节点安装mysql
hadoop@ddai-master:~$ sudo apt update
hadoop@ddai-master:~$ sudo apt install mysql-client mysql-server
2、设置mysql参数
hadoop@ddai-master:~$ sudo vim /etc/mysql/mysql.conf.d/mysqld.cnf 修改参数如下:
bind-address = 127.0.0.1 改为 0.0.0.0
添加内容如下:
default-storage-engine = innodb
innodb_file_per_table=on
collation-server = utf8_general_ci
init-connect = 'SET NAMES utf8'
character-set-server = utf8 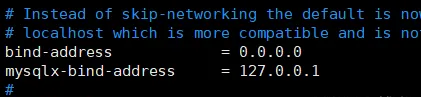

3、设置开机自启
hadoop@ddai-master:~$ sudo systemctl enable mysql.service 4、启动mysql并初始化
hadoop@ddai-master:~$ sudo mysql_secure_installation
hadoop@ddai-master:~$ sudo systemctl start mysql.service
#初始化
hadoop@ddai-master:~$ sudo mysql_secure_installation 5、给mysql用户hive授权
hadoop@ddai-master:~$ sudo mysql -uroot -p123456
mysql> show databases;
+--------------------+
| Database           |
+--------------------+
| information_schema |
| mysql              |
| performance_schema |
| sys                |
+--------------------+
4 rows in set (0.00 sec)
mysql> use mysql;
Reading table information for completion of table and column names
You can turn off this feature to get a quicker startup with -A

Database changed

mysql> use mysql;
mysql> create user 'hive'@'%' identified by 'Dai@123456';
mysql> grant all privileges on *.* to 'hive'@'%';
mysql> create user 'hive'@'localhost' identified by 'Dai@123456';
mysql> grant all privileges on *.* to 'hive'@'localhost';
mysql> ALTER USER 'hive'@'%' REQUIRE none;
6、重启MySQL服务
hadoop@ddai-master:~$ sudo systemctl restart mysql.service hive安装
1、主节点安装hive
hadoop@ddai-master:~$ cd /opt/
hadoop@ddai-master:/opt$ sudo tar xvzf /home/hadoop/apache-hive-2.3.6-bin.tar.gz
hadoop@ddai-master:/opt$ sudo chown -R hadoop:hadoop /opt/apache-hive-2.3.6-bin/
2、修改配置文件名字
hadoop@ddai-master:/opt$ cd /opt/apache-hive-2.3.6-bin/conf/

#把以下修改名称
hadoop@ddai-master:/opt/apache-hive-2.3.6-bin/conf$ mv beeline-log4j2.properties.template beeline-log4j2.properties
hadoop@ddai-master:/opt/apache-hive-2.3.6-bin/conf$ mv hive-env.sh.template hive-env.sh
hadoop@ddai-master:/opt/apache-hive-2.3.6-bin/conf$ mv hive-exec-log4j2.properties.template hive-exec-log4j2.properties
hadoop@ddai-master:/opt/apache-hive-2.3.6-bin/conf$ mv hive-log4j2.properties.template  hive-log4j2.properties
hadoop@ddai-master:/opt/apache-hive-2.3.6-bin/conf$ mv llap-cli-log4j2.properties.template llap-cli-log4j2.properties
hadoop@ddai-master:/opt/apache-hive-2.3.6-bin/conf$ mv llap-daemon-log4j2.properties.template llap-daemon-log4j2.properties 修改之后:
3、配置hive-env.sh
hadoop@ddai-master:/opt/apache-hive-2.3.6-bin/conf$ vim hive-env.sh


HADOOP_HOME=/opt/hadoop-2.8.5/

export HIVE_CONF_DIR=/opt/apache-hive-2.3.6-bin/conf/
export HIVE_AUX_JARS_PATH=/opt/apache-hive-2.3.6-bin/lib/ 4、新建hive-site.xml文件并配置
hadoop@ddai-master:/opt/apache-hive-2.3.6-bin/conf$ vim hive-site.xml <?xml version="1.0"?>
<?xml-stylesheet type="text/xsl" href="configuration.xsl"?>
<configuration>
<property>
<name>hive.metastore.warehouse.dir</name>
<value>/hive/warehouse</value>
<description>location of default database for the warehouse</description>
</property>
<property>
<name>javax.jdo.option.ConnectionURL</name>
<value>jdbc:mysql://ddai-master:3306/hive?createDatabaseIfNotExist=true&useSSL=false&allowPublicKeyRetrieval=true</value>
<description>JDBC connect string for a JDBC metastore.</description>
</property>
<property>
<name>javax.jdo.option.ConnectionDriverName</name>
<value>com.mysql.jdbc.Driver</value>
<description>Driver class name for a JDBC metastore</description>
</property>
<property>
<name>javax.jdo.option.ConnectionUserName</name>
<value>hive</value>
<description>Username to use against metastore database</description>
</property>
<property>
<name>javax.jdo.option.ConnectionPassword</name> <value>Dai@123456</value>
<description>password to use against metastore database</description>
</property>
<property>
<name>hive.querylog.location</name>
<value>/opt/apache-hive-2.3.6-bin/logs</value>
<description>Location of Hive run time structured log file</description>
</property>
<property>
<name>hive.metastore.uris</name>
<value>thrift://ddai-master:9083</value>
<description>Thrift URI for the remote metastore. Used by metastore client to connect to remote metastore.</description>
</property>
<property>
<name>hive.server2.webui.host</name>
<value>0.0.0.0</value>
</property>
<property>
<name>hive.server2.webui.port</name>
<value>10002</value>
</property>
</configuration> 5、传入mysql Connector文件
hadoop@ddai-master:~$ cd /opt/apache-hive-2.3.6-bin/lib/ 6、修改环境变量并生效
hadoop@ddai-master:~$ vim .profile export HIVE_HOME=/opt/apache-hive-2.3.6-bin
export PATH=$PATH:$HIVE_HOME/bin hadoop@ddai-master:~$ source /home/hadoop/.profile 启动hive服务
1、创建数据库hive导入 hive-schema
hadoop@ddai-master:~$ cd /opt/apache-hive-2.3.6-bin/scripts/metastore/upgrade/mysql/
hadoop@ddai-master:/opt/apache-hive-2.3.6-bin/scripts/metastore/upgrade/mysql$ mysql -hddai-master -uhive -pDai@123456
mysql> create database hive character set latin1;
mysql> use hive;
Database changed
mysql> source hive-schema-2.3.0.mysql.sql;
mysql> exit
Bye 2、启动hive metastore
出错
解决
启动hive之前先启动hadoop
3、启动hiveserver2
再开启zookeeper和hbase,查看进程
客户机安装hive
1、上传解压包
hadoop@ddai-desktop:~$ sudo scp -r hadoop@ddai-master:/opt/apache-hive-2.3.6-bin /opt/apache-hive-2.3.6-bin
hadoop@ddai-desktop:~$ sudo chown -R hadoop:hadoop /opt/apache-hive-2.3.6-bin/
2、修改hive-site.xml
hadoop@ddai-desktop:~$ cd /opt/apache-hive-2.3.6-bin/conf/
hadoop@ddai-desktop:/opt/apache-hive-2.3.6-bin/conf$ vim hive-site.xml
<?xml version="1.0"?>
<?xml-stylesheet type="text/xsl" href="configuration.xsl"?>
<configuration>
<property>
<name>hive.metastore.warehouse.dir</name>
<value>/hive/warehouse</value>
<description>location of default database for the warehouse</description>
</property>
<property>
<name>hive.querylog.location</name>
<value>/opt/apache-hive-2.3.6-bin/logs</value>
<description>Location of Hive run time structured log file</description>
</property>
<property>
<name>hive.metastore.uris</name>
<value>thrift://ddai-master:9083</value>
<description>Thrift URI for the remote metastore. Used by metastore client to connect to remote metastore.</description>
</property>
</configuration> 3、修改环境变量
source /home/hadoop/.profile 测试hive
先开启节点的hadoop,hive
1、客户机启动
2、查看数据库