本文通过实例介绍使用Spring Boot,使用JDBC Template如何操作内存数据库和MySQL数据库。
一、Spring Boot使用JDBC Template操作内存数据库(H2)
先创建一个基本的Spring Boot项目,修改pom.xml如下:
<?xml version="1.0" encoding="UTF-8"?>
<project xmlns="http://maven.apache.org/POM/4.0.0" xmlns:xsi="http://www.w3.org/2001/XMLSchema-instance"
    xsi:schemaLocation="http://maven.apache.org/POM/4.0.0 http://maven.apache.org/xsd/maven-4.0.0.xsd">
    <modelVersion>4.0.0</modelVersion>

    <groupId>com.springboot</groupId>
    <artifactId>demo</artifactId>
    <version>0.0.1-SNAPSHOT</version>
    <packaging>jar</packaging>

    <name>demo</name>
    <description>Demo project for Spring Boot</description>

    <parent>
        <groupId>org.springframework.boot</groupId>
        <artifactId>spring-boot-starter-parent</artifactId>
        <version>1.5.9.RELEASE</version>
    </parent>

    <properties>
        <project.build.sourceEncoding>UTF-8</project.build.sourceEncoding>
        <project.reporting.outputEncoding>UTF-8</project.reporting.outputEncoding>
        <java.version>1.8</java.version>
    </properties>

    <dependencies>
        <dependency>
            <groupId>org.springframework.boot</groupId>
            <artifactId>spring-boot-starter-jdbc</artifactId>
        </dependency>

        <dependency>
            <groupId>org.springframework.boot</groupId>
            <artifactId>spring-boot-starter-thymeleaf</artifactId>
        </dependency>

        <dependency>
            <groupId>org.springframework.boot</groupId>
            <artifactId>spring-boot-starter-web</artifactId>
        </dependency>

        <dependency>
            <groupId>com.h2database</groupId>
            <artifactId>h2</artifactId>
            <scope>runtime</scope>
        </dependency>

        <dependency>
            <groupId>org.springframework.boot</groupId>
            <artifactId>spring-boot-starter-test</artifactId>
            <scope>test</scope>
        </dependency>
    </dependencies>

    <build>
        <plugins>
            <plugin>
                <groupId>org.springframework.boot</groupId>
                <artifactId>spring-boot-maven-plugin</artifactId>
            </plugin>
        </plugins>
    </build>
</project>
在pom.xml文件中,我们添加jdbc和H2的依赖,下一步我们需要创建一个实体类Journal,类放在src/main/java/com/springboot/domain。
src/main/java/com/springboot/domain/Journal.java
package com.springboot.domain;

import java.text.ParseException;
import java.text.SimpleDateFormat;
import java.util.Date;

public class Journal {

    private Long id;
    private String title;
    private Date created;
    private String summary;

    private SimpleDateFormat format = new SimpleDateFormat("MM/dd/yyyy");
    public Journal(Long id, String title, String summary, Date date)throws ParseException{
        this.id = id;
        this.title = title;
        this.summary = summary;
        this.created = date;
    }

    Journal(){}

    public Long getId() {
        return id;
    }
    public void setId(Long id) {
        this.id = id;
    }
    public String getTitle() {
        return title;
    }
    public void setTitle(String title) {
        this.title = title;
    }
    public Date getCreated() {
        return created;
    }

    public void setCreated(Date created) {
        this.created = created;
    }

    public String getSummary() {
        return summary;
    }

    public void setSummary(String summary) {
        this.summary = summary;
    }

    public String getCreatedAsShort(){
        return format.format(created);
    }

    public String toString(){
        StringBuilder value = new StringBuilder("JournalEntry(");
        value.append("Id: ");
        value.append(id);
        value.append(",Title: ");
        value.append(title);
        value.append(",Summary: ");
        value.append(summary);
        value.append(",Created: ");
        value.append(getCreatedAsShort());
        value.append(")");
        return value.toString();
    }
}
创建完成实体类之后,我们在src/main/java/com/springboot/service目录下创建一个服务类JournalService类
src/main/java/com/springboot/service/JournalService.java
package com.springboot.service;

import com.springboot.domain.Journal;
import org.slf4j.Logger;
import org.slf4j.LoggerFactory;
import org.springframework.beans.factory.annotation.Autowired;
import org.springframework.jdbc.core.BeanPropertyRowMapper;
import org.springframework.jdbc.core.JdbcTemplate;
import org.springframework.stereotype.Service;

import java.util.ArrayList;
import java.util.List;

@Service
public class JournalService {
    private static final Logger log = LoggerFactory.getLogger(JournalService.class);

    @Autowired
    JdbcTemplate jdbcTemplate;

    public void insertData(){
        log.info("> Table creation");

        jdbcTemplate.execute("DROP TABLE JOURNAL IF EXISTS");
        jdbcTemplate.execute("CREATE TABLE JOURNAL(id SERIAL, title VARCHAR(255),summary VARCHAR(255), created TIMESTAMP)");
        log.info("> Inserting data...");
        jdbcTemplate.execute("INSERT INTO JOURNAL(title,summary,created) VALUES('Get to know Spring Boot','Today I will learn Spring Boot','2016-01-01 00:00:00.00')");
        jdbcTemplate.execute("INSERT INTO JOURNAL(title,summary,created) VALUES('Simple Spring Boot Project','I will do my first Spring Boot project','2016-01-02 00:00:00.00')");
        jdbcTemplate.execute("INSERT INTO JOURNAL(title,summary,created) VALUES('Spring Boot Reading','Read more about Spring Boot','2016-02-01 00:00:00.00')");
        jdbcTemplate.execute("INSERT INTO JOURNAL(title,summary,created) VALUES('Spring Boot in the Cloud','Learn Spring Boot using Cloud Foundry','2016-01-01 00:00:00.00')");
        jdbcTemplate.execute("INSERT INTO JOURNAL(title,summary,created) VALUES('Spring Boot By Ron','Learn Spring Boot using Cloud Foundry','2016-01-01 00:00:00.00')");

        log.info("> Done.");
    }

    public List<Journal> findAll() {
        List<Journal> entries = new ArrayList<>();

        entries = jdbcTemplate.query("select * from JOURNAL",new Object[]{},new BeanPropertyRowMapper(Journal.class));

        if(entries!=null && entries.size()>){
            return entries;
        }else{
            return null;
        }
    }
}
- JdbcTemplate:自动装配的JdbcTemplate类将负责对数据库执行任务。这个特殊的类基于template设计模式允许开发者只关心数据和数据的操作(增、删、改、查)。该类可以在短时间内自行决定链接到那个数据库。
- insertData:如果Journal数据表存在,该方法首先会尝试删除该数据表,然后创建一张空的Journal数据表,之后他会插入一些数据到数据表中。所有这些操作都是通过JdbcTemplate的实例通过执行execute方法完成。
- findAll:该方法使用JdbcTemplate实例通过query方法获取所有的数据,然后返回一个Journal集合。
接下来在Spring Boot应用启动类DemoApplication中,在启动时我们需要插入一些默认数据,创建数据表,所以我们修改DemoApplication类如下。
src/main/java/com/springboot/DemoApplication.java
package com.springboot;

import com.springboot.service.JournalService;
import org.slf4j.Logger;
import org.slf4j.LoggerFactory;
import org.springframework.beans.factory.annotation.Autowired;
import org.springframework.boot.CommandLineRunner;
import org.springframework.boot.SpringApplication;
import org.springframework.boot.autoconfigure.SpringBootApplication;

@SpringBootApplication
public class DemoApplication implements CommandLineRunner {
    private static final Logger log = LoggerFactory.getLogger(DemoApplication.class);
    @Autowired
    JournalService service;

    public static void main(String[] args) {
        SpringApplication.run(DemoApplication.class, args);
    }

    @Override
    public void run(String... strings) throws Exception {
        log.info("@@ Inserting Data....");
        service.insertData();
    }
}
该类定义了一个自动装配的JournalService,在run方法执行时将运用服务调用insertData方法初始化数据。
DemoApplication 实现了CommandLineRunner接口,所以需要实现 public void run(String… strings) 方法,该方法在Spring Boot应用启动完成之后会执行,所以在该方法中调用服务初始化数据是最好的一种方案。
接下来,创建一个控制器,获取数据并在页面上展示。我们将控制器命名为JournalController。
src/main/java/com/springboot/web/JournalController.java
package com.springboot.web;

import com.springboot.service.JournalService;
import org.springframework.beans.factory.annotation.Autowired;
import org.springframework.stereotype.Controller;
import org.springframework.ui.Model;
import org.springframework.web.bind.annotation.RequestMapping;

@Controller
public class JournalController {
    @Autowired
    JournalService service;

    @RequestMapping("/")
    public String index(Model model){
        model.addAttribute("journal", service.findAll());
        return "index";
    }
}
接下来我们需要构建模板文件,在src/main/resources/templates目录下,需要创建一个index.html文件并写入如下内容。
<!DOCTYPE html>
<html lang="en" xmlns:th="http://www.thymeleaf.org">
<head>
    <meta charset="utf-8"></meta>
    <meta http-equiv="Content-Type" content="text/html"></meta>
    <title>Spring Boot Journal</title>
    <link rel="stylesheet" type="text/css" media="all" href="css/bootstrap.min.css"></link>
</head>
<body>
    <h1>Spring Boot Journal</h1>
    <ul class="timeline">
        <div th:each="entry,status : ${journal}">
            <li th:attr="class=${status.odd}?'timeline-inverted':''">
                <div class="tl-circ"></div>
                <div class="timeline-panel">
                    <div class="tl-heading">
                        <h4><span th:text="${entry.title}">TITLE</span></h4>
                        <p><small class="text-muted"><i class="glyphicon glyphicon-time"></i>
                            <span th:text="${entry.createdAsShort}">CREATED</span></small></p>
                    </div>
                    <div class="tl-body">
                        <p><span th:text="${entry.summary}">SUMMARY</span></p>
                    </div>
                </div>
            </li>
        </div>
    </ul>
</body>
</html>
注意:在static目录下新建一个css目录,添加bootstrap.min.css文件,该文件自行到bootstrap去下载。
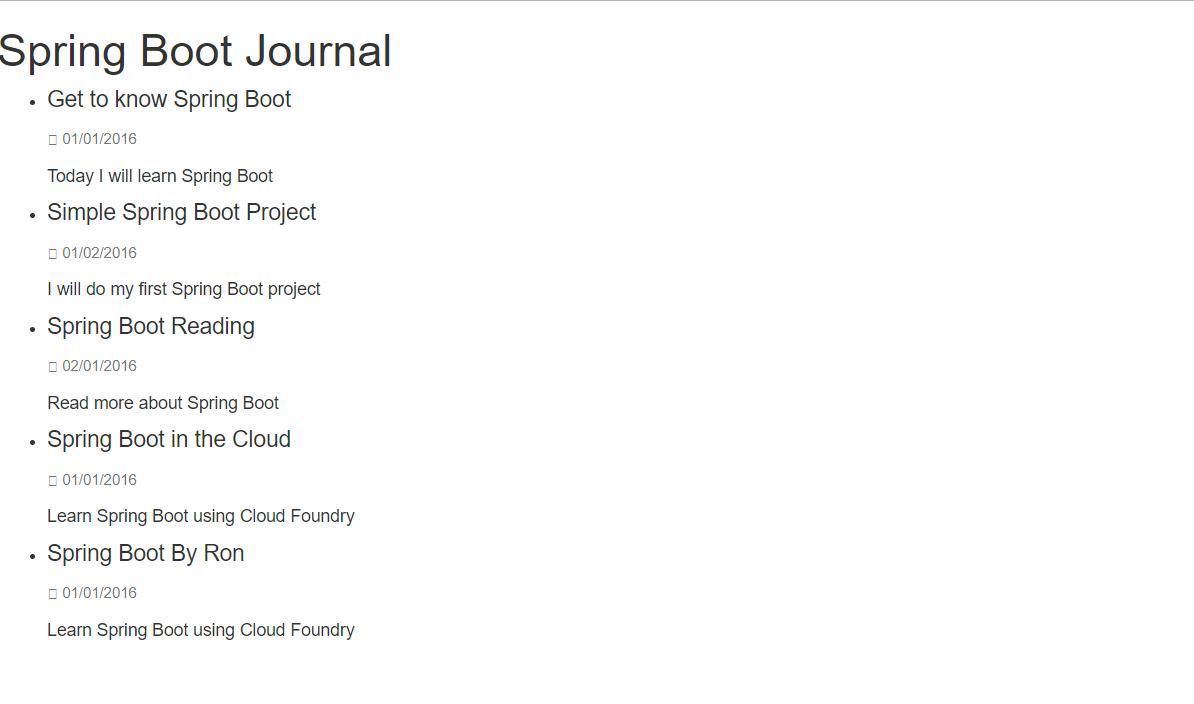
启动程序,在浏览器中输入http://localhost:8080/,页面显示如下结果。
二、Spring Boot使用JDBC Template操作MySQL
以上我们讲述了如何通过JDBC Template操作内存数据库,但是内存数据库一般情况下只是在测试环境中使用,在生产环境中,我们需要使用的是如MySQL、SQLServer、Oracle等外部的数据库,下面我们以MySQL为例讲解Spring Boot如何通过JDBC Template操作MySQL。
在上述代码的基础上,如果要操作MySQL,首先我们需要添加MySQL依赖(首先需要确保您已经在某台机器上安装了MySQL且安装的MySQL可以使用)。修改后的pom.xml如下:
<?xml version="1.0" encoding="UTF-8"?>
<project xmlns="http://maven.apache.org/POM/4.0.0" xmlns:xsi="http://www.w3.org/2001/XMLSchema-instance"
    xsi:schemaLocation="http://maven.apache.org/POM/4.0.0 http://maven.apache.org/xsd/maven-4.0.0.xsd">
    <modelVersion>4.0.0</modelVersion>

    <groupId>com.springboot</groupId>
    <artifactId>demo</artifactId>
    <version>0.0.1-SNAPSHOT</version>
    <packaging>jar</packaging>

    <name>demo</name>
    <description>Demo project for Spring Boot</description>

    <parent>
        <groupId>org.springframework.boot</groupId>
        <artifactId>spring-boot-starter-parent</artifactId>
        <version>1.5.9.RELEASE</version>
    </parent>

    <properties>
        <project.build.sourceEncoding>UTF-8</project.build.sourceEncoding>
        <project.reporting.outputEncoding>UTF-8</project.reporting.outputEncoding>
        <java.version>1.8</java.version>
    </properties>

    <dependencies>
        <dependency>
            <groupId>org.springframework.boot</groupId>
            <artifactId>spring-boot-starter-thymeleaf</artifactId>
        </dependency>

        <dependency>
            <groupId>org.springframework.boot</groupId>
            <artifactId>spring-boot-starter-web</artifactId>
        </dependency>

        <dependency>
            <groupId>org.springframework.boot</groupId>
            <artifactId>spring-boot-starter-jdbc</artifactId>
        </dependency>

        <dependency>
            <groupId>mysql</groupId>
            <artifactId>mysql-connector-java</artifactId>
            <version>6.0.5</version>
        </dependency>

    <dependency>
            <groupId>org.springframework.boot</groupId>
            <artifactId>spring-boot-starter-test</artifactId>
            <scope>test</scope>
        </dependency>
    </dependencies>

    <build>
        <plugins>
            <plugin>
                <groupId>org.springframework.boot</groupId>
                <artifactId>spring-boot-maven-plugin</artifactId>
            </plugin>
        </plugins>
    </build>
</project>
在application.properties配置文件中添加数据源信息如下
spring.datasource.url=jdbc:mysql://:/test?useUnicode=true&characterEncoding=UTF8&zeroDateTimeBehavior=convertToNull&useSSL=true&allowMultiQueries=true&serverTimezone=Asia/Hong_Kong
spring.datasource.username=root
spring.datasource.password=
spring.datasource.driver-class-name=com.mysql.jdbc.Driver
spring.datasource.tomcat.max-wait=
spring.datasource.tomcat.max-active=
spring.datasource.tomcat.test-on-borrow=true
spring.datasource.testWhileIdle = true
spring.datasource.timeBetweenEvictionRunsMillis =
启动应用,如果应用不报错,则证明配置成功,启动之后在浏览器输入http://localhost:8080/,结果将会成功展示在浏览器中。
![数据迁移方法数据迁移原则数据迁移之双写方案数据迁移之级联同步方案[图]](data:image/gif;base64,R0lGODlhAQABAIAAAP///wAAACwAAAAAAQABAAACAkQBADs=)