本文的主要内容有以下三点:
1、根据本项目进行实体验证。
2、使用Validation提供的ASP.NET控件将实体验证和UI层页面验证联系起来
3、简单分析下Validation.Integration.Aspnet实现逻辑
文章开始前的废话:
第一点:根据本项目进行实体验证
这个项目是一个小型的学生信息管理系统(就是班级和学生简单管理,都不好意思叫系统),主要有班级、学生、科目3个类,我们现在需要通过企业库的Validation模块为这3个类加上验证。
我这边就是将student类进行了简单的验证:
1
2
3
4
5
6
7
8
9
10
11
12
13
14
15
16
17
18
19
20
21
22
23
24
25
<code>[StringLengthValidator(1, 16,</code>
<code> </code><code>MessageTemplate =</code><code>"登录ID的长度必须在{3}-{5}之间!"</code><code>)]</code>
<code>//MessageTemplateResourceType = typeof(EntLibStudy.Model.Properties.Resources),</code>
<code>//MessageTemplateResourceName = "SidMessage")]</code>
<code>public</code> <code>string</code> <code>Sid</code>
<code>{</code>
<code> </code><code>get</code><code>;</code>
<code> </code><code>set</code><code>;</code>
<code>}</code>
<code> </code><code>MessageTemplateResourceType =</code><code>typeof</code><code>(EntLibStudy.Model.Properties.Resources),</code>
<code> </code><code>MessageTemplateResourceName =</code><code>"PasswordMessage"</code><code>)]</code>
<code>public</code> <code>string</code> <code>Password</code>
<code> </code><code>MessageTemplateResourceName =</code><code>"NameMessage"</code><code>)]</code>
<code>public</code> <code>string</code> <code>Name</code>
这里我就是将Sid、Password和Name进行必须输入验证。
第二点:使用Validation提供的ASP.NET控件将实体验证和UI层页面验证联系起来
在Validation模块中企业库为我们提供了一个子模块——ASP.NET控件用来和Validation模块联合起来进行客户端+服务器端的验证。
我们在页面上放上一个PropertyProxyValidator控件,并指定要验证的控件、对应的实体类型及属性名,具体代码如下:
26
27
28
29
30
31
32
33
34
<code><</code><code>tr</code><code>></code>
<code> </code><code><</code><code>td</code> <code>align="right"></code>
<code> </code><code>登录ID:</code>
<code> </code><code></</code><code>td</code><code>></code>
<code> </code><code><</code><code>td</code><code>></code>
<code> </code><code><</code><code>asp:TextBox</code> <code>runat="server" ID="txtSid" /></code>
<code> </code><code><</code><code>cc1:PropertyProxyValidator</code> <code>ID="PropertyProxyValidator1" runat="server"</code>
<code> </code><code>ControlToValidate="txtSid" PropertyName="Sid"</code>
<code> </code><code>SourceTypeName="EntLibStudy.Model.Student,EntlibStudy.Model" ValidationGroup="test"></</code><code>cc1:PropertyProxyValidator</code><code>></code>
<code></</code><code>tr</code><code>></code>
<code> </code><code>密码:</code>
<code> </code><code><</code><code>asp:TextBox</code> <code>runat="server" ID="txtPwd" TextMode="Password" /></code>
<code> </code><code><</code><code>cc1:PropertyProxyValidator</code> <code>ID="PropertyProxyValidator2" runat="server"</code>
<code> </code><code>ControlToValidate="txtPwd" PropertyName="Password"</code>
<code> </code><code>姓名:</code>
<code> </code><code><</code><code>asp:TextBox</code> <code>runat="server" ID="txtName" /></code>
<code> </code><code><</code><code>cc1:PropertyProxyValidator</code> <code>ID="PropertyProxyValidator3" runat="server"</code>
<code> </code><code>ControlToValidate="txtName" PropertyName="Name"</code>
具体有关PropertyProxyValidator控件信息可以看下面的第三点分析,这边仅仅是介绍如何应用。
在页面中添加完指定的控件后,还需要在提交的按钮处做一下处理,代码如下:
<code>protected</code> <code>void</code> <code>btnSubmit_Click(</code><code>object</code> <code>sender, EventArgs e)</code>
<code> </code><code>if</code> <code>(!IsValid)</code>
<code> </code><code>{</code>
<code> </code><code>return</code><code>;</code>
<code> </code><code>}</code>
<code> </code><code>//具体业务逻辑</code>
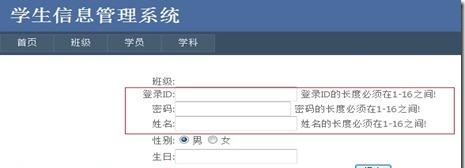
这步操作是判断页面验证是否通过,如果验证不通过则返回,主要是因为PropertyProxyValidator控件所依赖的验证都在服务器端,需要点击一次提交按钮来进行验证,所以第一次页面的验证是不通过的,需要等到页面上的所有PropertyProxyValidator控件验证通过后页面的验证才会通过。
这时如果未通过验证,服务器端则会通过PropertyProxyValidator控件将验证消息返回给客户端,见下图, 如果全部填写完整则会真正提交页面信息:
虽然企业库的Validation模块为我们提供了这个ASP.NET控件来和Validation进行组合应用,但是我总觉得不友好(最好能使用AJAX验证来提高界面友好性),而且应用面比较窄(可能还有更好的使用方法我没研究出来,如果有哪位朋友有使用经验欢迎分享),使用起来也不怎么方便,建议还是采用ASP.NET原有的验证控件,在数据提交的时候通过后台代码编写进行验证。
我在网上搜索了相关的文章,认为最好的办法就是为Model层的每个子类都统一继承自一个基类,基类里提供统一的验证方法,这样就可以很好的将验证逻辑封装到Model层,表示层只需在获取到数据后调用这个验证方法,验证不通过则将错误消息返回给客户端,具体代码如下:
<code>namespace</code> <code>EntLibStudy.Helper</code>
<code> </code><code>[Serializable]</code>
<code> </code><code>public</code> <code>abstract</code> <code>class</code> <code>BaseClass<T></code><code>where</code> <code>T :</code><code>class</code>
<code> </code><code>public</code> <code>string</code> <code>ValidateTag {</code><code>get</code><code>;</code><code>protected</code> <code>set</code><code>; }</code>
<code> </code><code>public</code> <code>virtual</code> <code>bool</code> <code>IsValid()</code>
<code> </code><code>{</code>
<code> </code><code>var</code> <code>validateResults = Validation.Validate<T>(</code><code>this</code> <code>as</code> <code>T);</code>
<code> </code><code>if</code> <code>(!validateResults.IsValid)</code>
<code> </code><code>{</code>
<code> </code><code>foreach</code> <code>(</code><code>var</code> <code>item</code><code>in</code> <code>validateResults)</code>
<code> </code><code>string</code><code>.Format(</code><code>@"{0}:{1}"</code> <code>+ Environment.NewLine, item.Key, item.Message);</code>
<code> </code><code>return</code> <code>false</code><code>;</code>
<code> </code><code>}</code>
<code> </code><code>return</code> <code>true</code><code>;</code>
<code> </code><code>}</code>
修改抽象类BaseClass,同时添加一个属性用于存储验证结果,添加一个方法用于实体验证。
界面使用代码如下:
35
36
37
38
39
40
41
42
43
44
45
46
47
48
49
50
51
52
53
54
55
56
57
58
59
60
61
<code> </code><code>//if (!IsValid)</code>
<code> </code><code>//{</code>
<code> </code><code>// return;</code>
<code> </code><code>//}</code>
<code> </code><code>BLL.StudentManage studentBll =</code><code>new</code> <code>BLL.StudentManage();</code>
<code> </code><code>Model.Student student =</code><code>null</code><code>;</code>
<code> </code><code>try</code>
<code> </code><code>int</code> <code>studentId = Convert.ToInt32(</code><code>this</code><code>.ViewState[</code><code>"studentId"</code><code>]);</code>
<code> </code><code>if</code> <code>(studentId == 0)</code>
<code> </code><code>if</code> <code>(GetValidatedStudent(</code><code>ref</code> <code>student))</code>
<code> </code><code>int</code> <code>id = studentBll.Add(student);</code>
<code> </code><code>Helper.Utils.MessageBox(</code><code>this</code><code>,</code><code>"新增学员信息成功!"</code><code>,</code><code>this</code><code>.GetRouteUrl(</code><code>"StudentRoute"</code>
<code> </code><code>{</code>
<code> </code><code>id = id</code>
<code> </code><code>}));</code>
<code> </code><code>else</code>
<code> </code><code>Helper.Utils.MessageBox(</code><code>this</code><code>, student.ValidateTag);</code>
<code> </code><code>else</code>
<code> </code><code>student = studentBll.SelectById(studentId);</code>
<code> </code><code>studentBll.Update(student);</code>
<code> </code><code>Helper.Utils.MessageBox(</code><code>this</code><code>,</code><code>"编辑学员信息成功!"</code><code>);</code>
<code> </code><code>catch</code> <code>(Exception ex)</code>
<code> </code><code>throw</code> <code>ex;</code>
<code>/// <summary></code>
<code>/// 获取已验证的学员对象</code>
<code>/// </summary></code>
<code>/// <param name="student">学员对象</param></code>
<code>/// <returns>是否验证成功</returns></code>
<code>private</code> <code>bool</code> <code>GetValidatedStudent(</code><code>ref</code> <code>Model.Student student)</code>
<code> </code><code>if</code> <code>(student ==</code><code>null</code><code>)</code>
<code> </code><code>student =</code><code>new</code> <code>Model.Student();</code>
<code> </code><code>student.ClassId = Convert.ToInt32(ddlClass.SelectedValue);</code>
<code> </code><code>student.Sid = txtSid.Text.Trim();</code>
<code> </code><code>student.Password = txtPwd.Text.Trim();</code>
<code> </code><code>student.Name = txtName.Text.Trim();</code>
<code> </code><code>student.Sex = Convert.ToInt32(rblSex.SelectedValue);</code>
<code> </code><code>student.Birthday = DateTime.Parse(txtBirthday.Text.Trim());</code>
<code> </code><code>return</code> <code>student.IsValid();</code>
修改了页面的具体代码,添加一个GetValidatedStudent方法用于统一赋值,同时返回实体对象是否验证通过,如不通过则将验证错误消息返回给客户端
第三点:简单分析下Validation.Integration.Aspnet实现逻辑
在第二点中已经说过了,Validation.Integration.Aspnet是企业库中Validation模块所提供的一个子模块,其本质是一个ASP.NET控件,核心类就是PropertyProxyValidator.cs,下面我来简单的介绍下这个控件。
PropertyProxyValidator控件其主要作用就是根据配置信息去调用指定的服务器端的验证方法进行验证,如验证不通过则返回验证消息。
类PropertyProxyValidator,继承自ASP.NET中的BaseValidator类,同时实现了接口IValidationIntegrationProxy:
由于PropertyProxyValidator继承自BaseValidator类,使得其成为了一个ASP.NET控件(Label控件),基本的客户端验证属性都已经包含在内了。 2、IValidationIntegrationProxy接口是由企业库定义的,其主要作用是为Validation模块提供验证所需行为整合。
在PropertyProxyValidator类中,主要实现了一下方法、属性等:
1、方法BaseValidator.EvaluateIsValid,这个方法的作用是确定输入控件中的值是否有效的代码,其内部实现很简洁,就是创建一个Validator验证器,根据配置通过这个验证器进行验证,然后通过调用内部静态方法FormatErrorMessage来拼装验证返回的消息,最后将这个消息返回给客户端。 PropertyProxyValidator实现的接口IValidationIntegrationProxy主要就为此方法服务,因为创建Validator验证器是通过ValidationIntegrationHelper这个帮助器来创建的,而这个帮助器通过构造函数接收一个实现接口IValidationIntegrationProxy的类,然后帮助器再通过PropertyValidationFactory.GetPropertyValidator属性验证类工厂类中的属性验证器方法调用这个类中所设置好的validatedType(待验证的对象类型)、validatedProperty(待验证的属性信息)、Ruleset(验证规则集)、SpecificationSource(见第5)和ValueAccessBulider(数据访问构造器,这里指向的是类PropertyMappedValidatorValueAccessBuilder)来创建验证器。 2、属性SourceTypeName,待验证对象在服务器端类型,例如:“EntLibStudy.Model.Student,EntLibStudy.Model”,其中逗号前指的是待验证对象所在的类名,逗号后指的是待验证对象所在程序集名。 3、属性PropertyName,待验证对象在服务器端类型中对应的属性名,例如"Name”。 4、属性RulesetName,验证规则集名。 5、属性SpecificationSource,指定的验证信息验证时,调用创建方法所需的源。 6、枚举属性DisplayMode,主要分为3种,List(列表形式)、BulletList(带项目符号的列表形式)和SingleParagraph(段落形式)。 7、事件ValueConvert,用于当控件的值转变时执行验证,对应着委托ValueConverter。
以上就是本文的所有内容了,本文主要介绍了企业库的Validation模块中所提供的ASP.NET验证控件。到此企业库的Validation模块就全部介绍完毕了,谢谢大家的浏览。
注意:
1、MSSQL数据库在DataBase目录下(需要自行附加数据库),SQLite数据库在Web目录的App_Data下,由于考虑到项目的大小,所以每个项目的BIN目录都已经删除,如出现无法生成项目请自行添加相关企业库的DLL。
2、由于微软企业库5.0 学习之路这个系列我是准备以一个小型项目的形式介绍企业库的各模块,所以源代码会根据系列文章的更新而更新,所以源代码不能保证与文章中所贴代码相同。
3、项目开发环境为:VS2010+SQL2005。
4、管理员帐户:admin
密码:admin
微软企业库5.0 学习之路系列文章索引:
<a href="http://www.cnblogs.com/kyo-yo/archive/2010/06/07/Study-Entlib5-First.html">第一步、基本入门</a> <a href="http://www.cnblogs.com/kyo-yo/archive/2010/06/10/Learning-EntLib-Second.html">第二步、使用VS2010+Data Access模块建立多数据库项目</a> <a href="http://www.cnblogs.com/kyo-yo/archive/2010/06/24/Learning-EntLib-Forth-Use-Caching.html">第四步、使用缓存提高网站的性能(EntLib Caching)</a> <a href="http://www.cnblogs.com/kyo-yo/archive/2010/07/19/Learning-EntLib-Fifth-Introduction-Validation-module-information-Part1.html">第五步、介绍EntLib.Validation模块信息、验证器的实现层级及内置的各种验证器的使用方法——上篇</a> <a href="http://www.cnblogs.com/kyo-yo/archive/2010/08/02/Learning-EntLib-Fifth-Introduction-Validation-module-information-Part3.html">第五步、介绍EntLib.Validation模块信息、验证器的实现层级及内置的各种验证器的使用方法——下篇</a> <a href="http://www.cnblogs.com/kyo-yo/archive/2010/08/04/Learning-EntLib-Sixth-Use-Validation-To-Server-Validate.html">第六步、使用Validation模块进行服务器端数据验证</a> <a href="http://www.cnblogs.com/kyo-yo/archive/2010/08/09/Learning-EntLib-Seventh-Introduce-Cryptographer-and-Expand.html">第七步、Cryptographer加密模块简单分析、自定义加密接口及使用—上篇</a> <a href="http://www.cnblogs.com/kyo-yo/archive/2010/08/11/Learning-EntLib-Seventh-Introduce-Cryptographer-and-Expand-Part2.html">第七步、Cryptographer加密模块简单分析、自定义加密接口及使用—下篇</a> <a href="http://www.cnblogs.com/kyo-yo/archive/2010/08/16/Learning-EntLib-Eighth-Use-Configuration-Setting-To-Manage-ConfigInfo.html">第八步、使用Configuration Setting模块等多种方式分类管理企业库配置信息</a> <a href="http://www.cnblogs.com/kyo-yo/archive/2010/09/01/Learning-EntLib-Ninth-Use-PolicyInjection-Module-AOP-PART1-Basic-Use-Of-Dscription.html">第九步、使用PolicyInjection模块进行AOP—PART1——基本使用介绍</a> <a href="http://www.cnblogs.com/kyo-yo/archive/2010/09/20/Learning-EntLib-Ninth-Use-PolicyInjection-Module-AOP-PART2-Custom-Matching-Rule.html">第九步、使用PolicyInjection模块进行AOP—PART2——自定义Matching Rule</a> <a href="http://www.cnblogs.com/kyo-yo/archive/2010/10/08/Learning-EntLib-Ninth-Use-PolicyInjection-Module-AOP-PART3-Built-in-Call-Handler-Description.html">第九步、使用PolicyInjection模块进行AOP—PART3——内置Call Handler介绍</a> <a href="http://www.cnblogs.com/kyo-yo/archive/2010/10/13/Learning-EntLib-Ninth-Use-PolicyInjection-Module-AOP-PART4-Call-Handler-To-Build-User-Logging.html">第九步、使用PolicyInjection模块进行AOP—PART4——建立自定义Call Handler实现用户操作日志记录</a> <a href="http://www.cnblogs.com/kyo-yo/archive/2010/11/10/Learning-EntLib-Tenth-Decoupling-Your-System-Using-The-Unity-PART2-Learn-To-Use-Unity-Two.html">第十步、使用Unity解耦你的系统—PART2——了解Unity的使用方法(2)</a> <a href="http://www.cnblogs.com/kyo-yo/archive/2010/11/29/Learning-EntLib-Tenth-Decoupling-Your-System-Using-The-Unity-PART3-Dependency-Injection.html">第十步、使用Unity解耦你的系统—PART3——依赖注入</a> <a href="http://www.cnblogs.com/kyo-yo/archive/2010/12/08/Learning-EntLib-Tenth-Decoupling-Your-System-Using-The-Unity-PART3-Unity-And-PIAB.html">第十步、使用Unity解耦你的系统—PART4——Unity&PIAB</a> 扩展学习: <a href="http://www.cnblogs.com/kyo-yo/archive/2010/09/16/Learning-EntLib-Extended-Learning-Articles-Library-Dependency-Injection.html">扩展学习篇、库中的依赖关系注入(重构 Microsoft Enterprise Library)[转]</a>
本文转自kyo-yo博客园博客,原文链接:http://www.cnblogs.com/kyo-yo/archive/2010/08/04/Learning-EntLib-Sixth-Use-Validation-To-Server-Validate.html,如需转载请自行联系原作者
![【MySQL数据库】数据库索引事务1.索引2.事务[图]](data:image/gif;base64,R0lGODlhAQABAIAAAP///wAAACwAAAAAAQABAAACAkQBADs=)