Today, let's talk about the change treatment of the side seams. This variation of the structure is mostly used for suit tops, coats, etc. with a six-piece structure.
Instructions for operation (using prototype cutting method)
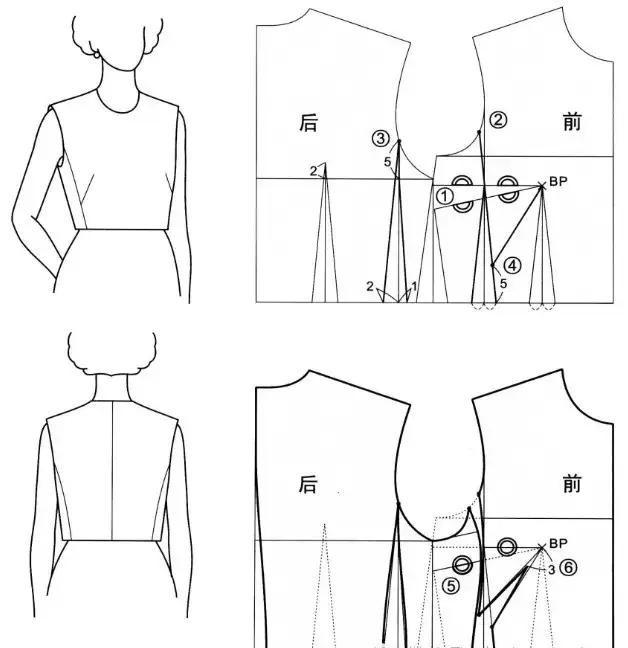
(1) Determine the difference between the front and back side seams: first draw the prototype of the front and back pieces according to the drawings on the horizontal waist line, and then draw the front side seams according to the front and back side seams.
(2) Determine the anterior side seam: Draw the front side seam dividing line on the basis of the prototype front chest width vertical line, and then turn the front waist saving amount in the front side seam according to the figure.
(3) Fix the posterior side seam: make a vertical line down on the arc of the armhole 5 cm up the bust line after the prototype, and then split the back waist in the posterior side seam according to the figure.
(4) Set the oblique side seam to save position: according to the figure, re-in the front side of the seam dividing line in the front jacket film, and draw it from the waist joint line up 5cm up to the BP point.
(5) Stitched side seam province: the side seam province of the prototype is assembled according to the picture, so that the axillary piece forms a whole piece, and the front coat piece is transferred to the oblique side seam province.
(6) Correction of the provincial tip: the provincial tip should be 3cm away from the BP point, and finally re-draw the province of the oblique side according to the picture.
Of course, this kind of thing I am talking about is the most general and the most commonly used. The general suit coat is this six-piece style.