iOS開發UI篇—UITableview控件基本使用
一、一個簡單的英雄展示程式
NJHero.h檔案代碼(字典轉模型)
1 #import <Foundation/Foundation.h>
 2
 3 @interface NJHero : NSObject
 4 /**
 5  *  頭像
 6  */
 7 @property (nonatomic, copy) NSString *icon;
 8 /**
 9  *  名稱
10  */
11 @property (nonatomic, copy) NSString *name;
12 /**
13  *  描述
14  */
15 @property (nonatomic, copy) NSString *intro;
16
17 - (instancetype)initWithDict:(NSDictionary *)dict;
18 + (instancetype)heroWithDict:(NSDictionary *)dict;
19 @end
NJViewController.m檔案代碼
1 #import "NJViewController.h"
2 #import "NJHero.h"
3
4 @interface NJViewController ()<UITableViewDataSource, UITableViewDelegate>
5 /**
6 * 儲存所有的英雄資料
7 */
8 @property (nonatomic, strong) NSArray *heros;
9 @property (weak, nonatomic) IBOutlet UITableView *tableView;
10
11 @end
12
13 @implementation NJViewController
14
15 #pragma mark - 懶加載
16 - (NSArray *)heros
17 {
18 if (_heros == nil) {
19 // 1.獲得全路徑
20 NSString *fullPath = [[NSBundle mainBundle] pathForResource:@"heros" ofType:@"plist"];
21 // 2.更具全路徑加載資料
22 NSArray *dictArray = [NSArray arrayWithContentsOfFile:fullPath];
23 // 3.字典轉模型
24 NSMutableArray *models = [NSMutableArray arrayWithCapacity:dictArray.count];
25 for (NSDictionary *dict in dictArray) {
26 NJHero *hero = [NJHero heroWithDict:dict];
27 [models addObject:hero];
28 }
29 // 4.指派資料
30 _heros = [models copy];
31 }
32 // 4.傳回資料
33 return _heros;
34 }
35
36 - (void)viewDidLoad
37 {
38 [super viewDidLoad];
39 // 設定Cell的高度
40 // 當每一行的cell高度一緻的時候使用屬性設定cell的高度
41 self.tableView.rowHeight = 60;
42 self.tableView.delegate = self;
43 }
44
45 #pragma mark - UITableViewDataSource
46 // 傳回多少組
47 - (NSInteger)numberOfSectionsInTableView:(UITableView *)tableView
48 {
49 return 1;
50 }
51 // 傳回每一組有多少行
52 - (NSInteger) tableView:(UITableView *)tableView numberOfRowsInSection:(NSInteger)section
53 {
54 return self.heros.count;
55 }
56 // 傳回哪一組的哪一行顯示什麼内容
57 - (UITableViewCell *)tableView:(UITableView *)tableView cellForRowAtIndexPath:(NSIndexPath *)indexPath
58 {
59 // 1.建立CELL
60 UITableViewCell *cell = [[UITableViewCell alloc] initWithStyle:UITableViewCellStyleSubtitle reuseIdentifier:nil];
61 // 2.設定資料
62 // 2.1取出對應行的模型
63 NJHero *hero = self.heros[indexPath.row];
64 // 2.2指派對應的資料
65 cell.textLabel.text = hero.name;
66 cell.detailTextLabel.text = hero.intro;
67 cell.imageView.image = [UIImage imageNamed:hero.icon];
68 // 3.傳回cell
69 return cell;
70 }
71 #pragma mark - UITableViewDelegate
72 /*
73 // 當每一行的cell的高度不一緻的時候就使用代理方法設定cell的高度
74 - (CGFloat)tableView:(UITableView *)tableView heightForRowAtIndexPath:(NSIndexPath *)indexPath
75 {
76 if (1 == indexPath.row) {
77 return 180;
78 }
79 return 44;
80 }
81 */
82
83 #pragma mark - 控制狀态欄是否顯示
84 /**
85 * 傳回YES代表隐藏狀态欄, NO相反
86 */
87 - (BOOL)prefersStatusBarHidden
88 {
89 return YES;
90 }
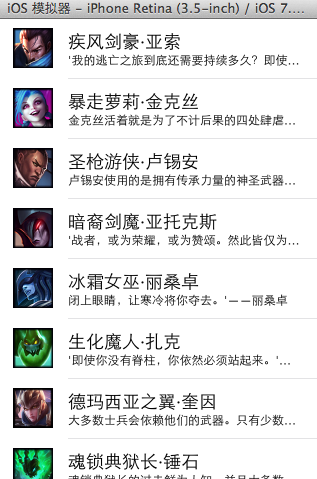
91 @end 實作效果:
代碼注意點:
(1)在字典轉模型的代碼處用下面的代碼,為可變數組配置設定dictArray.count個存儲空間,可以提高程式的性能
NSMutableArray *models = [NSMutableArrayarrayWithCapacity:dictArray.count];
(2)設定cell的高度
有三種辦法可以設定cell的高度
1) 可以在初始加載方法中設定,self.tableView.rowHeight = 60;這适用于當每一行的cell高度一緻的時候,使用屬性設定cell的高度。
2)在storyboard中設定,适用于高度一緻
3)當每一行的cell的高度不一緻的時候就使用代理方法設定cell的高度
- (CGFloat)tableView:(UITableView *)tableView heightForRowAtIndexPath:(NSIndexPath *)indexPath
{
if (1 == indexPath.row) {
return 180;
}
return 44;
}
二、cell的一些屬性
代碼示例:
1 #import "NJViewController.h"
  2 #import "NJHero.h"
  3
  4 @interface NJViewController ()<UITableViewDataSource, UITableViewDelegate>
  5 /**
  6  *  儲存所有的英雄資料
  7  */
  8 @property (nonatomic, strong) NSArray *heros;
  9 @property (weak, nonatomic) IBOutlet UITableView *tableView;
 10
 11 @end
 12
 13 @implementation NJViewController
 14
 15 #pragma mark - 懶加載
 16 - (NSArray *)heros
 17 {
 18     if (_heros == nil) {
 19         // 1.獲得全路徑
 20         NSString *fullPath =  [[NSBundle mainBundle] pathForResource:@"heros" ofType:@"plist"];
 21         // 2.更具全路徑加載資料
 22         NSArray *dictArray = [NSArray arrayWithContentsOfFile:fullPath];
 23         // 3.字典轉模型
 24         NSMutableArray *models = [NSMutableArray arrayWithCapacity:dictArray.count];
 25         for (NSDictionary *dict in dictArray) {
 26             NJHero *hero = [NJHero heroWithDict:dict];
 27             [models addObject:hero];
 28         }
 29         // 4.指派資料
 30         _heros = [models copy];
 31     }
 32     // 4.傳回資料
 33     return _heros;
 34 }
 35
 36 - (void)viewDidLoad
 37 {
 38     [super viewDidLoad];
 39     // 設定Cell的高度
 40     // 當每一行的cell高度一緻的時候使用屬性設定cell的高度
 41     self.tableView.rowHeight = 60;
 42     self.tableView.delegate = self;
 43
 44 }
 45
 46 #pragma mark - UITableViewDataSource
 47 // 傳回多少組
 48 - (NSInteger)numberOfSectionsInTableView:(UITableView *)tableView
 49 {
 50     return 1;
 51 }
 52 // 傳回每一組有多少行
 53 - (NSInteger) tableView:(UITableView *)tableView numberOfRowsInSection:(NSInteger)section
 54 {
 55     return self.heros.count;
 56 }
 57 // 傳回哪一組的哪一行顯示什麼内容
 58 - (UITableViewCell *)tableView:(UITableView *)tableView cellForRowAtIndexPath:(NSIndexPath *)indexPath
 59 {
 60     // 1.建立CELL
 61     UITableViewCell *cell = [[UITableViewCell alloc] initWithStyle:UITableViewCellStyleSubtitle reuseIdentifier:nil];
 62     // 2.設定資料
 63     // 2.1取出對應行的模型
 64     NJHero *hero = self.heros[indexPath.row];
 65     // 2.2指派對應的資料
 66     cell.textLabel.text = hero.name;
 67     cell.detailTextLabel.text = hero.intro;
 68     cell.imageView.image = [UIImage imageNamed:hero.icon];
 69
 70     // 2.3設定cell的輔助視圖
 71     // cell.accessoryType =  UITableViewCellAccessoryDisclosureIndicator;
 72     if (0 == indexPath.row) {
 73         cell.accessoryView = [UIButton buttonWithType:UIButtonTypeContactAdd];
 74     }else
 75     {
 76         cell.accessoryView = [[UISwitch alloc] init];
 77     }
 78 //    UIButton *btn = [[UIButton alloc] init];
 79 //    btn.backgroundColor = [UIColor redColor];
 80 //    cell.accessoryView = btn;
 81
 82
 83     // 2.4設定cell的背景顔色
 84     cell.backgroundColor = [UIColor blueColor];
 85
 86     // 設定預設狀态的背景
 87 //    UIView *view = [[UIView alloc] init];
 88 //    view.backgroundColor = [UIColor blueColor];
 89 //    cell.backgroundView = view;
 90
 91     UIImageView *iv = [[UIImageView alloc] initWithImage:[UIImage imageNamed:@"buttondelete"]];
 92     cell.backgroundView = iv;
 93
 94     // 設定選中狀态的背景
 95     UIView *view2 = [[UIView alloc] init];
 96     view2.backgroundColor = [UIColor purpleColor];
 97     cell.selectedBackgroundView = view2;
 98     // 3.傳回cell
 99     return cell;
100 }
101
102
103 #pragma mark - 控制狀态欄是否顯示
104 /**
105  *   傳回YES代表隐藏狀态欄, NO相反
106  */
107 - (BOOL)prefersStatusBarHidden
108 {
109     return YES;
110 }
111 @end 
cell的一些屬性:
(1)設定cell的輔助視圖,設定cell.accessoryView(系統提供了枚舉型,也可以自定義@父類指針指向子類對象);
(2)設定cell的背景顔色,有兩種方式可以設定cell的背景顔色:
通過backgroundColor 和 backgroundView都可以設定cell的背景。但是backgroundView 的優先級比 backgroundColor的高,是以如果同時設定了backgroundColor和backgroundView, 那麼backgroundView會蓋住backgroundColor
示例:cell.backgroundColor = [UIColorblueColor];
(3)設定cell預設狀态的背景
示例1:
UIView *view = [[UIView alloc] init];
view.backgroundColor = [UIColor blueColor];
cell.backgroundView = view;
示例2:
UIImageView *iv = [[UIImageViewalloc] initWithImage:[UIImageimageNamed:@"buttondelete"]];
cell.backgroundView = iv;(父類指針指向子類對象,可以使用圖檔用簡單的操作設定絢麗的效果)
(4)設定cell選中狀态的背景
示例:
UIView *view2 = [[UIView alloc] init];
view2.backgroundColor = [UIColorpurpleColor];
cell.selectedBackgroundView = view2;
三、tableview的一些屬性
1 #import "NJViewController.h"
 2
 3 @interface NJViewController ()<UITableViewDataSource>
 4
 5 @end
 6
 7 @implementation NJViewController
 8
 9 - (void)viewDidLoad
10 {
11     [super viewDidLoad];
12
13     // 1.建立tableview
14     UITableView *tableview = [[UITableView alloc] init];
15     tableview.frame = self.view.bounds;
16
17     // 2.設定資料源
18     tableview.dataSource =self;
19
20     // 3.添加tableview到view
21     [self.view addSubview:tableview];
22
23     // 4.設定分割線樣式
24     // tableview.separatorStyle = UITableViewCellSeparatorStyleNone;
25
26     // 5.設定分割線顔色
27      接收的參數是顔色的比例值
28     tableview.separatorColor = [UIColor colorWithRed:0/255.0 green:255/255.0 blue:0/255.0 alpha:255/255.0];
29
30     // 設定tableview的頭部視圖
31     tableview.tableHeaderView = [UIButton buttonWithType:UIButtonTypeContactAdd];
32     tableview.tableFooterView = [[UISwitch alloc] init];
33 }
34
35 - (NSInteger)numberOfSectionsInTableView:(UITableView *)tableView
36 {
37     return 1;
38 }
39 - (NSInteger)tableView:(UITableView *)tableView numberOfRowsInSection:(NSInteger)section
40 {
41     return 10;
42 }
43
44 - (UITableViewCell *)tableView:(UITableView *)tableView cellForRowAtIndexPath:(NSIndexPath *)indexPath
45 {
46     // 1.建立cell
47     UITableViewCell *cell = [[UITableViewCell alloc] initWithStyle:UITableViewCellStyleDefault reuseIdentifier:nil];
48
49     // 2.設定cell的資料
50     cell.textLabel.text = [NSString stringWithFormat:@"%d", indexPath.row ];
51
52     // 3.傳回cell
53     return cell;
54 }
55
56 - (BOOL)prefersStatusBarHidden
57 {
58     return YES;
59 }
60 @end tableview的一些屬性:
(1)設定分割樣式(tableview.separatorStyle),這是個枚舉類型
(2)設定分割線的顔色,可以直接使用系統給出的顔色,如果系統給定的顔色不能滿足需求時,也可以自定義。
補充:顔色分為24位和32位的,如下
24bit顔色
R 8bit 0 ~ 255
G 8bit 0 ~ 255
B 8bit 0 ~ 255
32bit顔色
A 8bit 0 ~ 255(tou)
R 8bit
G 8bit
B 8bit
#ff ff ff 白色
#00 00 00 黑色
#ff 00 00 紅色
#255 00 00
設定為自定義顔色的執行個體:tableview.separatorColor = [UIColorcolorWithRed:0/255.0green:255/255.0blue:0/255.0alpha:255/255.0];
//接收的參數是顔色的比例值
(3)設定頂部和底部視圖
tableview.tableHeaderView //頂部
tableview.tableFooterView //底部