導讀
本期将介紹并示範基于MediaPipe的手勢骨架與特征點提取步驟以及以此為基礎實作手勢識别的方法。
介紹
關于MediaPipe以前有相關文章介紹,可以參看下面連結:
Google開源手勢識别--基于TF Lite/MediaPipe
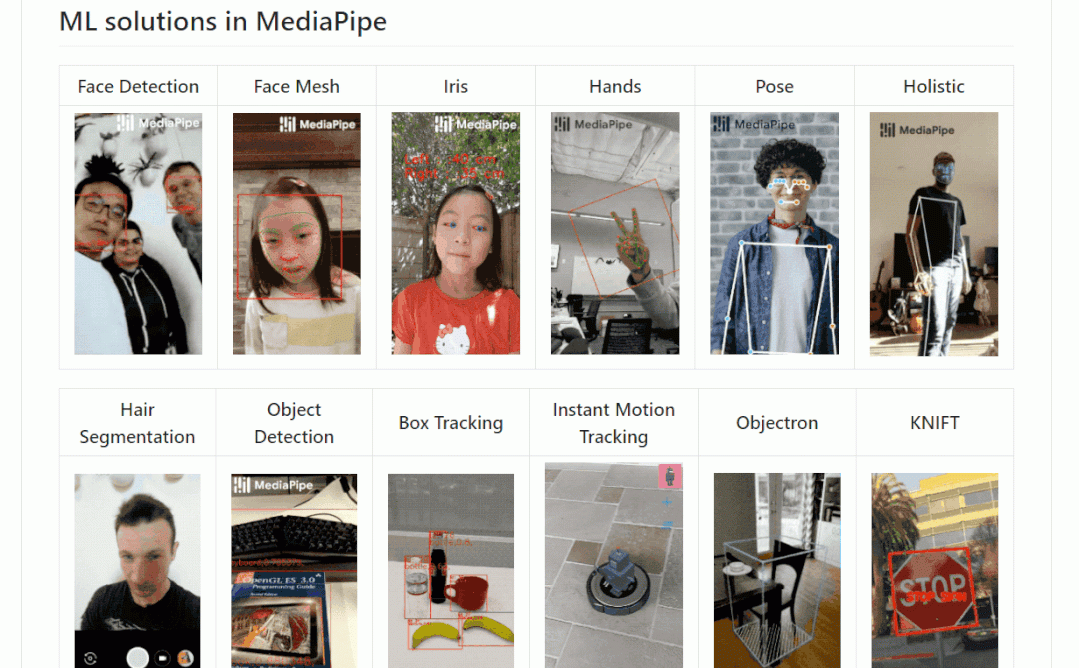
它能做些什麼?它支援的語言和平台有哪些?請看下面兩張圖:

我們主要介紹手勢骨架與關鍵點提取,其他内容大家有興趣自行學習了解。github位址:https://github.com/google/mediapipe
效果展示
手勢骨架提取與關鍵點标注:
手勢識别0~6:
實作步驟
具體可參考下面連結:
https://google.github.io/mediapipe/solutions/hands
(1) 安裝mediapipe,執行pip install mediapipe
(2) 下載下傳手勢檢測與骨架提取模型,位址:
https://github.com/google/mediapipe/tree/master/mediapipe/modules/hand_landmark
(3) 代碼測試(攝像頭實時測試):
import cv2
import mediapipe as mp
from os import listdir
mp_drawing = mp.solutions.drawing_utils
mp_hands = mp.solutions.hands


hands = mp_hands.Hands(
    min_detection_confidence=0.5, min_tracking_confidence=0.5)
cap = cv2.VideoCapture(0)
while cap.isOpened():
  success, image = cap.read()
  if not success:
    print("Ignoring empty camera frame.")
    continue


  image = cv2.cvtColor(cv2.flip(image, 1), cv2.COLOR_BGR2RGB)
  image.flags.writeable = False
  results = hands.process(image)


  image.flags.writeable = True
  image = cv2.cvtColor(image, cv2.COLOR_RGB2BGR)
  if results.multi_hand_landmarks:
    for hand_landmarks in results.multi_hand_landmarks:
      mp_drawing.draw_landmarks(
          image, hand_landmarks, mp_hands.HAND_CONNECTIONS)
  cv2.imshow('result', image)
  if cv2.waitKey(5) & 0xFF == 27:
    break
cv2.destroyAllWindows()
hands.close()
cap.release()
輸出與結果:
圖檔檢測(可支援多個手掌):
import cv2
import mediapipe as mp
from os import listdir
mp_drawing = mp.solutions.drawing_utils
mp_hands = mp.solutions.hands


# For static images:
hands = mp_hands.Hands(
    static_image_mode=True,
    max_num_hands=5,
    min_detection_confidence=0.2)
img_path = './multi_hands/'
save_path = './'
index = 0
file_list = listdir(img_path)
for filename in file_list:
  index += 1
  file_path = img_path + filename
  # Read an image, flip it around y-axis for correct handedness output (see
  # above).
  image = cv2.flip(cv2.imread(file_path), 1)
  # Convert the BGR image to RGB before processing.
  results = hands.process(cv2.cvtColor(image, cv2.COLOR_BGR2RGB))


  # Print handedness and draw hand landmarks on the image.
  print('Handedness:', results.multi_handedness)
  if not results.multi_hand_landmarks:
    continue
  image_hight, image_width, _ = image.shape
  annotated_image = image.copy()
  for hand_landmarks in results.multi_hand_landmarks:
    print('hand_landmarks:', hand_landmarks)
    print(
        f'Index finger tip coordinates: (',
        f'{hand_landmarks.landmark[mp_hands.HandLandmark.INDEX_FINGER_TIP].x * image_width}, '
        f'{hand_landmarks.landmark[mp_hands.HandLandmark.INDEX_FINGER_TIP].y * image_hight})'
    )
    mp_drawing.draw_landmarks(
        annotated_image, hand_landmarks, mp_hands.HAND_CONNECTIONS)
  cv2.imwrite(
      save_path + str(index) + '.png', cv2.flip(annotated_image, 1))
hands.close()


# For webcam input:
hands = mp_hands.Hands(
    min_detection_confidence=0.5, min_tracking_confidence=0.5)
cap = cv2.VideoCapture(0)
while cap.isOpened():
  success, image = cap.read()
  if not success:
    print("Ignoring empty camera frame.")
    # If loading a video, use 'break' instead of 'continue'.
    continue


  # Flip the image horizontally for a later selfie-view display, and convert
  # the BGR image to RGB.
  image = cv2.cvtColor(cv2.flip(image, 1), cv2.COLOR_BGR2RGB)
  # To improve performance, optionally mark the image as not writeable to
  # pass by reference.
  image.flags.writeable = False
  results = hands.process(image)


  # Draw the hand annotations on the image.
  image.flags.writeable = True
  image = cv2.cvtColor(image, cv2.COLOR_RGB2BGR)
  if results.multi_hand_landmarks:
    for hand_landmarks in results.multi_hand_landmarks:
      mp_drawing.draw_landmarks(
          image, hand_landmarks, mp_hands.HAND_CONNECTIONS)
  cv2.imshow('result', image)
  if cv2.waitKey(5) & 0xFF == 27:
    break
cv2.destroyAllWindows()
hands.close()
cap.release() 總結後續說明
總結:MediaPipe手勢檢測與骨架提取模型識别相較傳統方法更穩定,而且提供手指關節的3D坐标點,對于手勢識别與進一步手勢動作相關開發有很大幫助。
其他說明:
(1) 手部關節點标号與排序定義如下圖:
(2) 手部關節點坐标(x,y,z)輸出為小于1的小數,需要歸一化後顯示到圖像上,這部分可以檢視上部分源碼後轉到定義檢視,這裡給出demo代碼,另外Z坐标靠近螢幕增大,遠離螢幕減小:
def Normalize_landmarks(image, hand_landmarks):
  new_landmarks = []
  for i in range(0,len(hand_landmarks.landmark)):
    float_x = hand_landmarks.landmark[i].x
    float_y = hand_landmarks.landmark[i].y
    # Z坐标靠近螢幕增大,遠離螢幕減小
    float_z = hand_landmarks.landmark[i].z
    print(float_z)
    width = image.shape[1]
    height = image.shape[0]

    pt = mp_drawing._normalized_to_pixel_coordinates(float_x,float_y,width,height)
    new_landmarks.append(pt)
  return new_landmarks
(3) 基于此你可以做個簡單額手勢識别或者手勢靠近遠離螢幕的小程式,當然不僅要考慮關節點的坐标,可能還需要計算角度已經以前的狀态等等,比如下面這樣: